This post is part of a series about giving us a tangible reason to trust our hardware through non-destructive IRIS (Infra-Red, in-situ) inspection. Here’s the previous posts:
This post will discuss the control software used to drive IRIS.
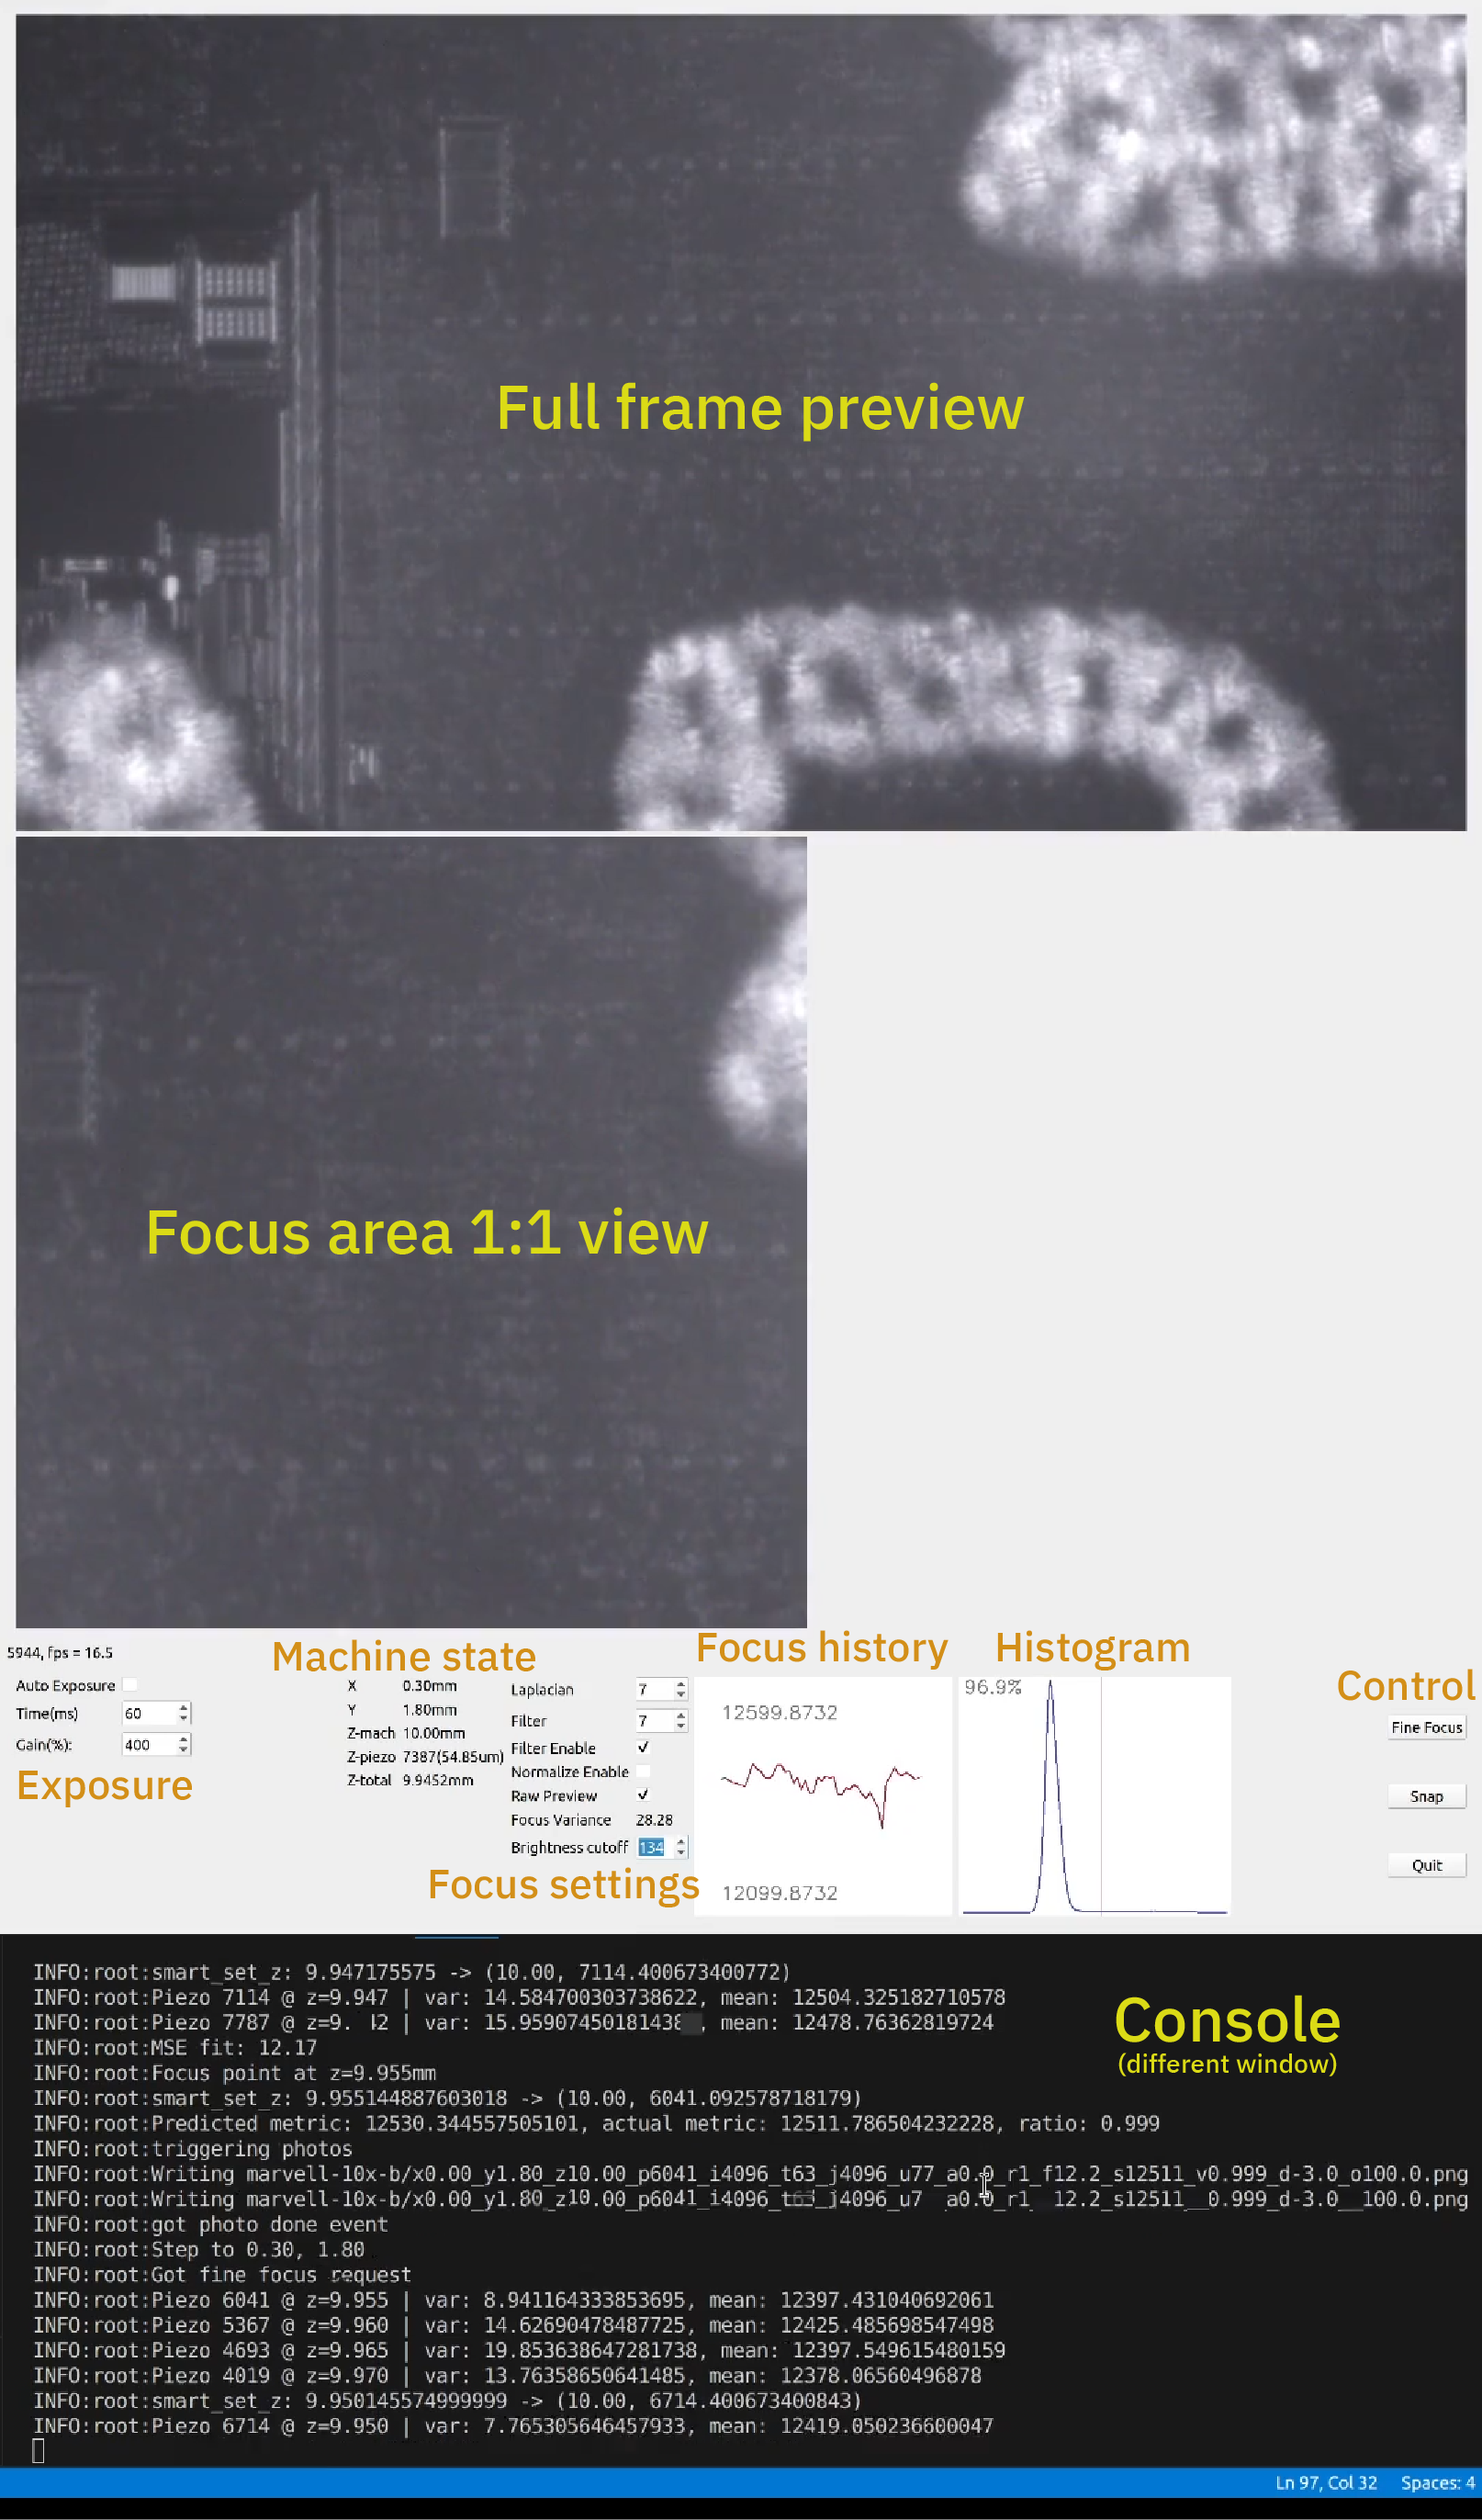
Above is a screenshot of the IRIS machine control software in action. The top part of the window is a preview of the full frame being captured; the middle of the window is the specific sub-region used for calculating focus, drawn at a 1:1 pixel size. Below that are various status readouts and control tweaks for controlling exposure, gain, and autofocus, as well as a graph that plots the “focus metric” over time, and the current histogram of the visible pixels. At the bottom is a view of the console window, which is separate from the main UI but overlaid in screen capture so it all fits in a single image.
The software itself is written in Python, using the PyQt framework. Why did I subject myself that? No particular reason, other than the demo code for the camera was written with that framework.
The control software grew out of a basic camera demo application provided by the camera vendor, eventually turning into a multi-threaded abomination. I had fully intended to use pyuscope to drive IRIS, but, after testing out the camera, I was like…maybe I can add just one more feature to help with testing…and before you know it, it’s 5AM and you’ve got a heaping pile of code, abandonment issues, and a new-found excitement to read about image processing algorithms. I never did get around to trying pyuscope, but I’d assume it’s probably much better than whatever code I pooped out.
There were a bunch of things I wish I knew about PyQt before I got started; for example, it plays poorly with multithreading, OpenCV and Matplotlib: basically, everything that draws to the screen (or could draw to the screen) has to be confined to a single thread. If I had known better I would have structured the code a bit differently, but instead it’s a pile of patches and shims to shuttle data between a control thread and an imaging/UI thread. I had to make some less-than-ideal tradeoffs between where I wanted decisions to be made about things like autofocus and machine trajectory, versus the control inputs to guide it and the real-time visualization cues to help debug what was going on.
For better or for worse, Python makes it easy and fun to write bad code.
Yet somehow, it all runs real-time, and is stable. It’s really amazing how fast our desktop PCs have become, and the amount of crimes you can get away with in your code without suffering any performance penalties. I spend most of my time coding Rust for Precursor, a 100MHz 32-bit device with 16MiB of RAM, so writing Python for a 16-core, 5GHz x86_64 with 32GiB of RAM is a huge contrast. While writing Python, sometimes I feel like Dr. Evil in the Austin Powers series, when he sheepishly makes a “villian demand” for 1 billion dollars – I’ll write some code allocating one beeeellion bytes of RAM, fully expecting everything to blow up, yet somehow the computer doesn’t even break a sweat.

Moore’s Law was pretty awesome. Too bad we don’t have it anymore.
Anyways, before I get too much into the weeds of the software, I have to touch on one bit of hardware, because, I’m a hardware guy.
I Need Knobs. Lots of Knobs.
When I first started bringing up the system, I was frustrated at how incredibly limiting traditional UI elements are. Building sliders and controlling them with a mouse felt so caveman, just pointing a stick and grunting at various rectangles on a slab of glass.
I wanted something more tactile, intuitive, and fast: I needed something with lots of knobs and sliders. But I didn’t want to pay a lot for it.
Fortunately, such a thing exists:
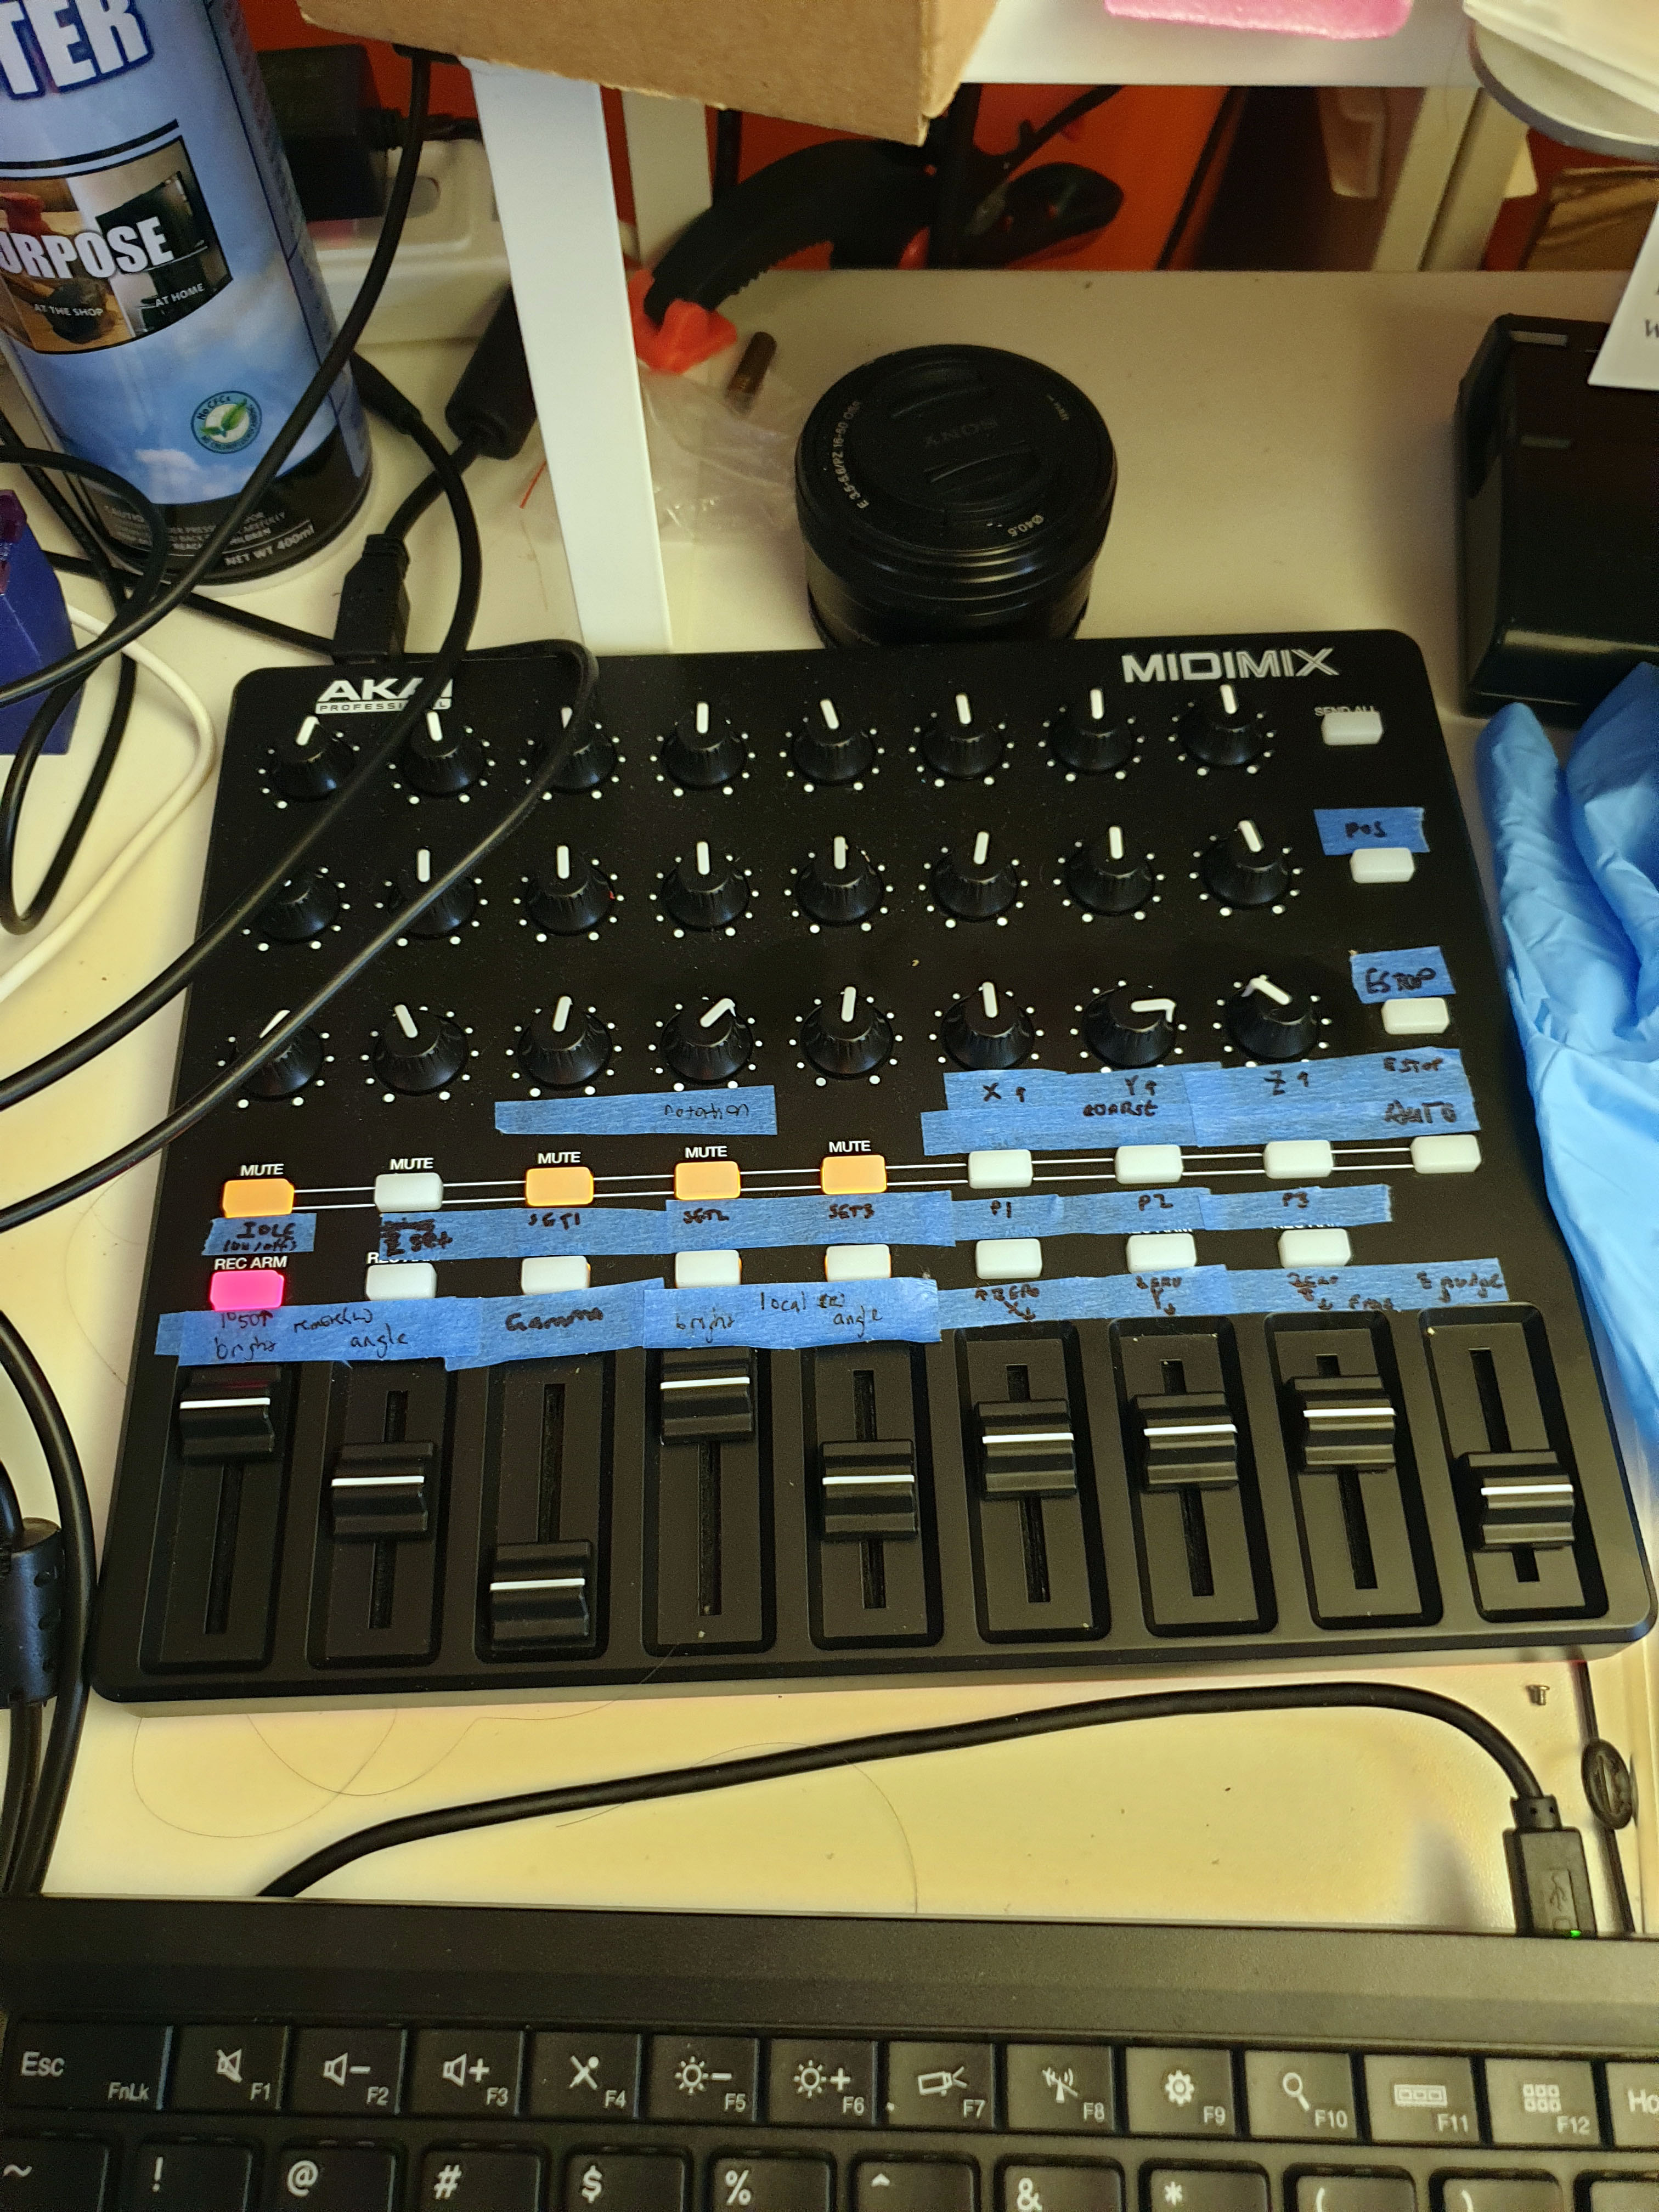
The Akai MIDImix (link without affiliate code) is a device that features 24 knobs, 9 sliders and a bunch of buttons for about $110. Each of the controls only has 7 bits of resolution, but, for the price it’s good enough.
Even better, there’s a good bit of work done already to reverse engineer its design, and Python already has libraries to talk to MIDI controllers. To figure out what the button mappings are, I use a small test script that I wrote to print out MIDI messages when I frob a knob.
It’s much more immediate and satisfying to tweak and adjust the machine’s position and light parameters in real time, and with this controller, I can even adjust multiple things simultaneously.
Core Modules
Below is a block diagram of the control software platform. I call the control software Jubiris. The square blocks represent Python modules. The ovals are hardware end points. The hexagons are subordinate threads.

The code is roughly broken into two primary threads, a Qt thread, and a control thread. The Qt thread handles the “big real time data objects”: image data, mostly. It is responsible for setting up the camera, handling frame ready events, display the image previews, doing image processing, writing files to disk, and other ancillary tasks associated with the Qt UI (like processing button presses and showing status text).
The control thread contains all the “strategy”. A set of Event and Queue objects synchronize data between the threads. It would have been nice to do all the image processing inside the control thread, but I also wanted the focus algorithm to run really fast. To avoid the overhead of copying raw 4k-resolution image frames between threads, I settled for the Qt thread doing the heavy lifting of taking the focus region of interest and turning it into a single floating point number, a “focus metric”, and passing that into the control thread via a Queue. The control thread then considers all the inputs from the MIDI controller and Events triggered via buttons in the Qt thread, and makes decisions about how to set the lights, piezo fine focus stage, Jubilee motors, and so forth. It also has some nominal “never to exceed” parameters coded into it so if something seems wrong it will ESTOP the machine and shut everything down.
Speaking of which, it’s never a good idea to disable those limits, even for a minute. I had a bug once where I had swapped the mapping of the limit switches on the zenith actuator, causing the motors to stop in the wrong position. For some reason, I thought it’d be a good idea to bypass the safeties to get more visibility into the machine’s trajectory. In a matter of about two seconds, I heard the machine groaning under the strain of the zenith motor dutifully forcing the lighting platform well past its safe limit, followed by a “ping” and then an uncontrolled “whirr” as the motor gleefully shattered its coupling and ran freely at maximum speed, scattering debris about the work area.
Turns out, I put the safeties are there for a reason, and it’s never a good idea to mix Python debugging practices (“just frob the variable and see what breaks!”) with hardware debugging, because instead of stack traces you get shattered bearings.
Thankfully I positioned the master power switch in an extremely accessible location, and the only things that were broken were a $5 coupling and my confidence.
Autofocus
Autofocus was one of those features that also started out as “just a test of the piezo actuators” that ended up blooming into a full-on situation. Probably the most interesting part of it, at least to me, was answering the question of “how does a machine even know when something is focused?”.
After talking to a couple of experts on this, the take-away I gathered is that you don’t, really. Unless you have some sort of structured light or absolute distance measurement sensor, the best you can do is to say you are “more or less focused than before”. This makes things a little tricky for imaging a chip, where you have multiple thin films stacked in close proximity: it’s pretty easy for the focus system to get stuck on the wrong layer. My fix to that was to initially use a manual focus routine to pick three points of interest that define the corners of the region we want to image, extrapolate a plane from those three points, and then if the focus algorithm takes us off some micron-scale deviation from the ideal plane we smack it and say “no! Pay attention to this plane”, and pray that it doesn’t get distracted again. It works reasonably well for a silicon chip because it is basically a perfect plane, but it struggles a bit whenever I exceed the limits of the piezo fine-focus element itself and have to invoke the Jubilee Z-controls to improve the dynamic range of the fine-focus.

Above: visualization of focus values versus an idealized plane. The laser marked area (highlighted in orange) causes the autofocus to fail, and so the focus result is clamped to an idealized plane.
How does a machine judge the relative focus between two images? The best I could find in the literature is ¯\_(ツ)_/¯ : it all kind of depends on what you’re looking at, and what you care about. Basically, you want some image processing algorithm that can take an arbitrary image and turn it into a single number: a “focused-ness” score. The key observation is that stuff that’s in focus tends to have sharp edges, and so what you want is an image processing kernel that ignores stuff like global lighting variations and returns you the “edginess” of an image.
The “Laplacian Operator” in OpenCV does basically this. You can think of it as taking the second derivative of an image in both X and Y. Here’s a before and after example image lifted from the OpenCV documentation.
Before running the Laplacian:
After running the Laplacian:

You can see how the bright regions in the lower image consists of mostly the sharp edges in the original image – soft gradients are converted to dark areas. An “in focus” image would have more and brighter sharp edges than a less focused image, and so, one could derive a “focused-ness” metric by calculating the variance of the Laplacian of an image.
I personally found this representation of the Laplacian insightful:
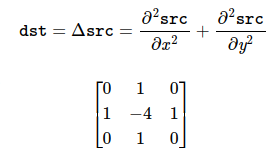
The result of the Laplacian is computed by considering the 8 pixels surrounding a source pixel, weighting the pixel in question by -4, and adding to it the value of its cardinal neighbors. In the case that you were looking at a uniformly shaded region, the sum is 0: the minus four weighting of the center pixel cancels out the weighting of the neighboring pixels perfectly. However, in the case that you’re looking at something where neighboring pixels don’t have the same values, you get a non-zero result (and intermediate results are stored using a floating point format, so we don’t end up clamping due to integer arithmetic limitations).
Also, it took me a long time to figure this out, but I think in “image processing nerd speak”, a Laplacian is basically a high-pass filter, and a Gaussian is a low-pass filter. I’m pretty sure this simplified description is going to cause some image processing academics to foam in the mouth, because of reasons. Sorry!
If this were a textbook, at this point we would declare success on computing focus, and leave all the other details as an exercise to the reader. Unfortunately, I’m the reader, so I had to figure out all the other details.

Here’s the list of other things I had to figure out to get this to work well:
- Let the machine settle before computing anything. This is done by observing the Laplacian metric in real-time, and waiting until its standard deviation falls below an acceptable threshold.
- Do a GaussianBlur before computing the Laplacian. GaussianBlur is basically a low pass filter that reduces noise artifacts, leading to more repeatable results. It may seem counter-intuitive to remove edges before looking for them, but, another insight is, at 10x magnification I get about 4.7 pixels per micron – and recall that my light source is only 1 micron wavelength. Thus, I have some spatial oversampling of the image, allowing me the luxury of using a GaussianBlur to remove pixel-to-pixel noise artifacts before looking for edges.
- Clip bright artifacts from the image before computing the Laplacian. I do this by computing a histogram and determining where most of the desired image intensities are, and then ignoring everything above a manually set threshold. Bright artifacts can occur for a lot of reasons, but are typically a result of dirt or dust in the field of view. You don’t want the algorithm focusing on the dust because it happens to be really bright and contrasting with the underlying circuitry.
- It sometimes helps to normalize the image before doing the Laplacian. I have it as an option in the image processing pipeline that I can set with a check-box in the main UI.
- You can pick the size of the Laplacian kernel. This effectively sets the “size of the edge” you’re looking for. It has to be an odd number. The example matrix discussed above uses a 3×3 kernel, but in many cases a larger kernel will give better results. Again, because I’m oversampling my image, a 7×7 kernel often gives the best results, but for some chips with larger features, or with a higher magnification objective, I might go even larger.
- Pick the right sub-region to focus on. In practice, the image is stitched together by piecing together many images, so as a default I just make sure the very center part is focused, since the edges are mostly used for aligning images. However, some chip regions are really tricky to focus on. Thus, I have an outer loop wrapped around the core focus algorithm, where I divide the image area into nine candidate regions and search across all of the regions to find an area with an acceptable focus result.
Now we know how to extract a “focus metric” for a single image. But how do we know where the “best” focal distance is? I use a curve fitting algorithm to find the best focus focus point. It works basically like this:
- Compute the metric for the current point
- Pick an arbitrary direction to nudge the focus
- Compute the new metric (i.e. variance of the Laplacian, as discussed above). If the metric is higher, keep going with the same nudge direction; if not, invert the sign of the nudge direction and carry on.
- Keep nudging until you observe the metric getting worse
- Take the last five points and fit them to a curve
- Pick the maximum value of the fitted curve as the focus point
- Check the quality of the curve fit; if the mean squared error of the points versus the fitted curve is too large, probably someone was walking past the machine and the vibrations messed up one of the measurements. Go back to step 4 and redo the measurements.
- Set the focus to the maximum value, and check that the resulting metric matches the predicted value; if not, sweep the proposed region to collect another few points and fit again

Above is an example of a successful curve fitting to find the maximum focus point. The X-axis plots the stage height in millimeters (for reasons related to the Jubilee control software, the “zero point” of the Z-height is actually at 10mm), and the Y axis is the “focus metric”. Here we can see that the optimal focus point probably lies at around 9.952 mm.
All of the data is collected in real time, so I use Pandas dataframes to track the focus results versus the machine state and timestamps. Dataframes are a pretty powerful tool that makes querying a firehose of real-time focus data much easier, but you have to be a little careful about how you use them: appending data to a dataframe is extremely slow, so you can’t implement a FIFO for processing real-time data by simply appending to and dropping rows from a dataframe with thousands of elements. Sometimes I just allocate a whole new dataframe, other times I manually replace existing entries, and other times I just keep the dataframe really short to avoid performance problems.
After some performance tuning, the whole algorithm runs quite quickly: the limiting factor ends up being the exposure time of the camera, which is around 60 ms. The actual piezo stage itself can switch to a new value in a fraction of that time, so we can usually find the focus point of an image within a couple of seconds.
In practice, stray vibrations from the environment limit how fast I can focus. The focus algorithm pauses if it detects stray vibrations, and it will recompute the focus point if it determines the environment was too noisy to run reliably. My building is made out of dense, solid poured concrete, so at night it’s pretty still. However, my building is also directly above a subway station, so during the day the subway rolling in and out (and probably all the buses on the street, too) will regularly degrade imaging performance. Fortunately, I’m basically nocturnal, so I do all my imaging runs at night, after public transportation stops running.
Below is a loop showing the autofocus algorithm running in real-time. Because we’re sweeping over such fine increments, the image changes are quite subtle. However, if you pay attention to the bright artifacts in the lower part of the image (those are laser markings for the part number on the chip surface), you’ll see a much more noticeable change as the focus algorithm does its thing.
Closing Thoughts
If you made it this far, congratulations. You made it through a post about software, written by someone who is decidedly not a software engineer. Before we wrap things up, I wanted to leave you with a couple of parting thoughts:
- OpenCV has just about every algorithm you can imagine, but it’s nearly impossible to find documentation on anything but the most popular routines. It’s often worth it to keep trudging through the documentation tree to find rare gems.
- Google sucks at searching for OpenCV documentation. Instead, keep a tab in your browser open to the OpenCV documentation. Be sure to select the version of the documentation that matches your installed version! It’s subtle, but there is a little pull-down menu next to the OpenCV menu that lets you pick that.
- Another reason why Google sucks for OpenCV docs is almost every link returned by Google defaults to an ancient version of the docs that does not match what you probably have installed. So if you are in the habit of “Google, copy, paste”, you can spend hours debugging subtle API differences until you notice that a Google result reset your doc browser version to 3.2, but you’re on 4.8 of the API.
- Because the documentation is often vague or wrong, I write a lot of small, single-use throw-away tests to figure out OpenCV. This is not reflected in the final code, but it’s an absolute nightmare to try and debug OpenCV in a real-time image pipeline. Do not recommend! Keep a little buffer around with some scaffolding to help you “single-step” through parts of your image processing pipeline until you feel like you’ve figured out what the API even means.
- OpenCV is blazing fast if you use it right, thanks in part to all of the important bits being native C++. I think in most cases the Python library is just wrappers for C++ libraries.
- OpenCV and Qt do not get along. It’s extremely tricky to get them to co-exist on a single machine, because OpenCV pulls in a version of Qt that is probably incompatible with your Qt installed package. There’s a few fixes for this. In the case that you are only using OpenCV for image processing, you can install the “headless” version that doesn’t pull in Qt. But if you’re trying to debug OpenCV you probably want to pop up windows using its native API calls, and in that case here’s one weird trick you can use to fix that. Basically, you figure out the location of the Qt binary is that’s bundled inside your OpenCV install, and point your OS environment variable at that.
- This is totally fine until you update anything. Ugh. Python.
- Google likewise sucks at Qt documentation. Bypass the pages of ad spam, outdated stackoverflow answers, and outright bad example code, and just go straight to the Qt for Python docs.
- LLMs can be somewhat helpful for generating Qt boilerplate. I’d say I get about a 50% hallucination rate, so my usual workflow is to ask an LLM to summarize the API options, check the Qt docs that they actually exist, then ask a tightly-formulated question of the LLM to derive an API example, and then cross-check anything suspicious in the resulting example against the Qt docs.
- LLMs can also be somewhat helpful for OpenCV boilerplate, but you also get a ton of hallucinations that almost work, some straight-up lies, and also some recommendations that are functional but highly inefficient or would encourage you to use data structures that are dead-ends. I find it more helpful to try and find an actual example program in a repo or in the OpenCV docs first, and then from there form very specific queries to the LLM to get higher quality results.
- Threading in Python is terrifying if you normally write concurrent code in Rust. It’s that feeling you get when you step into a taxi and habitually reach for a seat belt, only to find it’s not there or broken. You’ll probably fine! Until you crash.
And that’s basically it for the IRIS control software. The code is all located in this github repo. miduet.py (portmanteau of MIDI + Duet, i.e. Jubilee’s control module) is the top level module; note comments near the top of the file on setting up the environment. However, I’m not quite sure how useful it will be to anyone who doesn’t have an IRIS machine, which at this point is precisely the entire world except for me. But hopefully, the description of the concepts in this post were at least somewhat entertaining and possibly even informative.
Thanks again to NLnet and my Github Sponsors for making all this research possible!

That was a bit of a slog, but well worth it. Great work, sir!
[…] 详情参考 […]
A few years back, I had a similar problem with optimizing an auto-focus algorithm. I ended up prototyping about a dozen options; I don’t remember all of them, but the Laplacian was one. Scoring compared the optimum found by each algorithm vs. the hand-picked subjective “best”.
The most effective algorithm surprised me: convert the image to JPEG and measure the file size. It’s a surprisingly accurate measure of the entropy of the image, which is maximized when more pixels are in-focus.
Huh JPEG as a measure of entropy is interesting! I bet it’d be fast too, because JPEG compressors are so optimized…
I’m so glad to know that I wasn’t the only one thinking of that!
You are an extremely skilled engineer. I don’t know how you find the time to produce the documentation for your projects. Great work!
[…] « Control and Autofocus Software for Chip-Level Microscopy […]