Modifying the S400 Scanner for Watermark Enhancement
For some background on this page, please refer to this post.
A Microtek S400 scanner has sufficient resolution and color detail to resolve the watermarks printed on color lasjerjet printers. In Photoshop, you can play around with the color balance and thresholding to see the faint yellow dots, but you can do better! In order to enhance the watermarks I modified my S400 scanner to emit blue LED light instead of the normal white light from the internal CCFL tube.
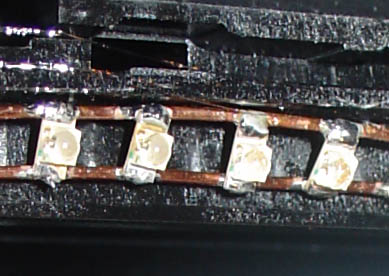
First, I built a bar of LEDs using surface-mount LEDs that I ordered from Digi-Key. A pair of 22-gauge solid copper wires, stripped back to bare copper, served as the power distribution busses for the LEDs. I soldered the LEDs between the wires, about one every centimeter or so.
Installation of the LED bar turned out to be relatively easy. It just so turns out that the S400 has a slot for a second light source. I’m guessing they designed the scan head to be extendable to some future version with alternate lighting sources. Great news for us! I hot-glued the LED array into the slot and put some strain reliefs on the wires so that I don’t interfere with the scanner mechanics too much during operation.

On the left, the LED array. On the right, the bright white reflective strip is the CCFL light normally used by the scanner. You can see a bit of the blue and green wires that I use to provide power to the LED array to the right.
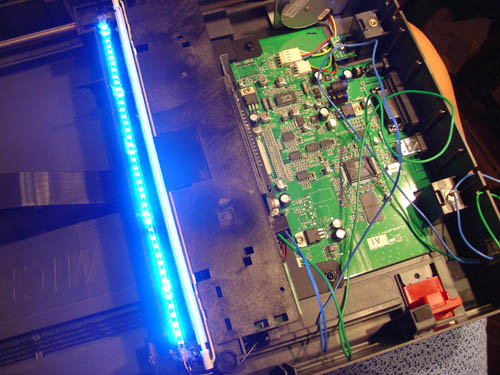
Here is the LED array in operation.
Now, the tricky part is that the scanner actually calibrates the sensor array prior to scanning. It does a light-dark calibration using a dummy white strip located off the scan area. If you just leave the blue LEDs on, the scanner will actually calibrate out the blue light and scan a relatively normal looking image (when the CCFL is enabled) or just scan darkness (when the CCFL is unplugged). Kudos to Microtek for such a robust calibration sequence!
In order to bypass this system, I had to unplug the CCFL and the LED array during the calibration sequence (it seems to happen at the start of every page scan) and then turn the LED array on once the scan head moves into the page area. Bypassing the calibration yields a very contrasty but somewhat noisy image, but it accomplishes the goal of making the watermark easily visible to the naked eye.
The results can be seen below!
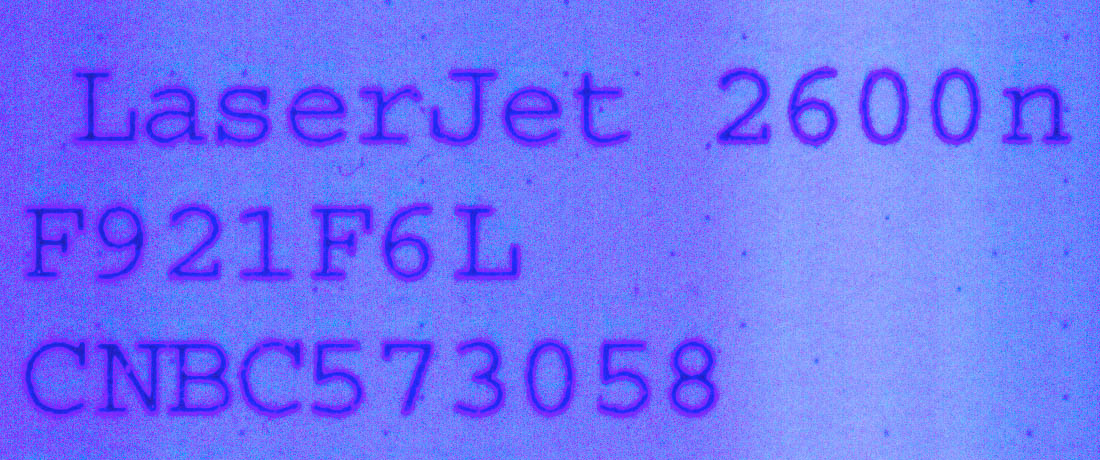
Unretouched scanned image using the modified scanner; approx resolution is 1200 dpi (click to see full-size version).
[…] Some of you may be aware that the US secret service had ordered that all color printers include nearly-invisible yellow tracking dots on every page you print. That’s right–every color page you print is serialized and trackable to the printer it came from. I have a couple of posts on the topic from a while ago. […]
[…] boards. Somehow over the years I never got around to buying a flatbed scanner that I didn’t take apart, but recently a coworker put an old one up for grabs. I actually wasn’t the first one to […]
One important thing I enjoy about blogs is the fact that they provoke an idea in my brain. As soon as that happens, I feel as I must provide feedback wishing it can be useful to other people.many different points of view, they challengealong with I find myself coming back to to your writings because you have many useful insightsare actually at this a long time, which is very excitingknow a lot.
Try to remember you may not always win. A number of days, the most resourceful person will taste defeat. But there is, in this case, always tomorrow – just after you have done the best to get success today.
Led lights are great because they are long lasting and consumes less electricity.—
Since LEDs are small, durable and require little power they are used in hand held devices such as flashlights. LED strobe lights or camera flashes operate at a safe, low voltage, as opposed to the 250+ volts commonly found in xenon flashlamp-based lighting. This is particularly applicable to cameras on mobile phones, where space is at a premium and bulky voltage-increasing circuitry is undesirable. LEDs are used for infrared illumination in night vision applications including security cameras. A ring of LEDs around a video camera, aimed forward into a retroreflective background, allows chroma keying in video productions.
Hey this was good, thanks for sharing. Expecting more similar stuff from this iste. Bookmarking your site now.
Very interesting, going to have a play around with something similar a little bit later tonight. Let you know how it goes.
1200 dpi seems a little low, anything ideas on how to improve it?
capturing the image data source to a platform imaging, geospatial metadata generation platform based image capture geospatial information associated with the source data of the image, the format of geospatial metadata a variable load with the imaging platform, digital watermark image data source with variable payload to generate a digital watermark image data with the imaging platform, and transmitted the digital watermark image data and metadata geospatial imaging platform to an image processing center, where he organizes the image processing center: extract variable data payload of the digital image watermark, process metadata, and publish metadata and links to additional data regarding the image data of digital watermark in a database watermark registration so that one or more client applications can access the database.Toledo Attorneys
Ever occurred to use only the blue channel of the output of an unmodified scanner? It has exactly the same effect as shining monochromatic blue light on a scene so that only the blue sensors in the CCD array receive light. I admit it’s simpler though.
Love this forum :) here is a little snippet I found thet you might like!
off topic but hey you smile :) Democracy: Four wolves and a lamb voting on lunch.
1200 DPI seems very low how can you increase that ?