My buddies at Dangerous Prototypes are hosting another Shenzhen hacker camp at the end of September. If you missed the last hacker camp or are just curious about Shenzhen, check it out — the slots are filling up fast!
Come to the world’s electronics capital and experience Shenzhen like a local hacker. Tour the famous Huaqiangbei electronics markets with people who live in the neighborhood, figure out what to eat and how to get around, and of course – learn how to reball BGA chips from a soldering master with noth’n but hand tools.
Optional: Tuesday 23 – early arrival dinner at Japanese Secret Location
Optional: Wednesday 24 – tour of Dongmen market & sign street, copy mall
Thursday 25 – talks: how to survive Shenzhen, Huaqianbei tour
Friday 26 – talks: how to use Shenzhen to the fullest, BGA reballing day 1
Saturday 27 – BGA reballing day 2, hacker BBQ
That’s just an overview. See the full Hacker Camp Shenzhen schedule here. You can expect nightly dinners and parties all week. If you want to come really early, we’re hacking Phuket from the 15th to the 19th.
So this past week has been quite a whirlwind — we wrapped up the Novena campaign and smashed all our stretch goals, concluding with over $700k raised, and I got my hair cut in a bar at midnight by none other than the skilled hands of Lenore of Evil Mad Scientist Laboratories (I blame Jake! :). It was an exhilarating week; xobs and I are really grateful for the outpouring of support and we’re looking forward to working with the community to build an open hardware ecosystem that can grow for years to come.
On my way back home to Singapore, I stopped by Dongguan to have a visit with my supply chain partners to hammer out production plans for Novena. Unfortunately, as I was getting out of the taxi at the Futian border checkpoint going into China, I dropped my phone on the sidewalk and shattered its screen.
There is no better place in the world to break your phone’s screen than the border crossing into Shenzhen. Within an hour of dropping the phone, I had a new screen installed by skilled hands in Hua Qiang Bei, for a price of $25.
Originally, I thought I would replace the screen myself — on my broken phone, I hastily visited iFixit for details on the procedure to replace the screen, and then booked it over to Hua Qiang Bei to purchase the replacement parts and tools I would need. The stall I visited quoted me about US$120 for a new screen, but then the lady grabbed my phone out of my hands, and launched a built in self test program on the phone by dialing *#0*# into the phone dialer UI.
She confirmed that there were no bad pixels on my OLED display and that the digitizer was still functional, but just cracked. She then offered to buy my broken OLED+digitizer assembly off of me, but only if they did the work to replace my screen. I said it would be fine as long as I could watch them do the job, to make sure they aren’t swapping out any other parts on me.
They had no problem with that, of course — so my phone came apart, had the old broken OLED+digitizer assembly separated, adhesive stripped from the phone body, replaced with a proper new film of adhesive, a “new” (presumably refurbished) OLED+digitizer fitted and re-assembled in 20 minutes. The whole service including parts and labor came out to $25. I kept on thinking “man I should take pictures of this” but unfortunately the device I would use to take said pictures was in pieces in front of me. But, I’ll hint that the process involved a hair dryer (used as a heat gun), copious amounts of contact cleaner (used to soften the adhesive on the OLED+digitizer module), and a very long thumbnail (in lieu of a spudger/guitar pick).
This is the power of recycling and repair — instead of paying $120 for a screen and throwing away what is largely a functional piece of electronics, I just had to pay for the cost of just replacing the broken glass itself. I had originally assumed that the glass on the digitizer is inseparable from the OLED, but apparently those clever folks in Hua Qiang Bei have figured out an efficient method to recycle these parts. After all, the bulk of the assembly’s cost is in the OLED display, and the touchscreen sensor electronics (which are also grafted onto the module) are also undamaged by the fall. Why waste perfectly good parts, anyways?
And so, my phone had a broken screen for all of an hour, and it was fixed for less than the cost of shipping spare parts to Singapore. There is no better place to break your phone than in Shenzhen!
Last December, Jie Qi and I launched a crowdfunding campaign to bring circuit stickers under the brand name of “chibitronics” to the world.
Our original timeline stated we would have orders shipped to Crowd Supply for fulfillment by May 2014. We’re really pleased that we were able to meet our goal, right on time, with the first shipment of over a thousand starter kits leaving the factory last week. 62 cartons of goods have cleared export in Hong Kong airport, and a second round of boxes are due to leave our factory around May 5, meaning we’ve got a really good chance of delivering product to backers by Mid-May.
Above: 62 cartons containing over a thousand chibitronics starter kits waiting for pickup.
Why On-Time Delivery Is So Important
A personal challenge of mine was to take our delivery commitment to backers very seriously. I’ve seen too many under-performing crowdfunding campaigns; I’m deeply concerned that crowdfunding for hardware is becoming synonymous with scams and spams. Kickstarter and Indiegogo have been plagued by non-deliveryand scams, and their blithe caveat emptor attitude around campaigns is a reflection of an entrenched conflict of interest between consumers and crowdfunding websites: “hey, thanks for the nickel, but what happened to your dollar is your problem”.
I’m honestly worried that crowdfunding will get such a bad reputation that it won’t be a viable platform for well-intentioned entrepreneurs and innovators in a few years.
I made the contentious choice to go with Crowd Supply in part because they show more savvy around vetting hardware products, and their service offering to campaigns — such as fulfillment, tier-one customer support, post-campaign pre-order support, and rolling delivery dates based on demand vs. capacity — is a boon for hardware upstarts. Getting fulfillment, customer support and an ongoing e-commerce site as part of the package essentially saves me one headcount, and when your company consists of just two or three people that’s a big deal.
Crowd Supply doesn’t have the same media footprint or brand power that Kickstarter has, which means it is harder to do a big raise with them, but at the end of the day I feel it’s very important to establish an example of sustainable crowdfunding practices that is better for both the entrepreneur and the consumer. It’s not just about a money grab today: it’s about building a brand and reputation that can be trusted for years to come.
Bottom line is, if I can’t prove to current and future backers that I can deliver on-time, I stand to lose a valuable platform for launching my future products.
On-Time Delivery Was not Easy
We did not deliver chibitronics on time because we had it easy. When drawing up the original campaign timeline, I had a min/max bounds on delivery time spanning from just after Chinese New Year (February) to around April. I added one month beyond the max just to be safe. We ended up using every last bit of padding in the schedule.
I made a lot of mistakes along the way, and through a combination of hard work, luck, planning, and strong factory relationships, we were able to battle through many hardships. Here’s a few examples of lessons learned.
A simple request for one is not necessarily a simple request for another. Included with every starter kit is a fantastic book (free to download) written by Jie Qi which serves as a step-by-step, self-instruction guide to designing with circuit stickers. The book is unusual because you’re meant to paste electronic circuits into it. We had to customize several aspects of the printing, from the paper thickness (to get the right light diffusion) to the binding (for a better circuit crafting experience) to the little pocket in the back (to hold swatches of Z-tape and Linqstat material). Most of these requests were relatively easy to accommodate, but one in particular threw the printer for a loop. We needed the metal spiral binding of the book to be non-conductive, so if someone accidentally laid copper tape on the binding it wouldn’t cause a short circuit.
Below is an example of how a circuit looks in the book — in this case, the DIY pressure sensor tutorial (click on image for a larger version).
Checking for conductivity of a wire seems like a simple enough request for someone who designs circuits for a living, but for a book printer, it’s extremely weird. No part of traditional book printing or binding requires such knowledge. Because of this, the original response from the printer is “we can’t guarantee anything about the conductivity of the binding wire”, and sure enough, the first sample was non-conductive, but the second was conductive and they could not explain why. This is where face to face meetings are invaluable. Instead of yelling at them over email, we arranged a meeting with the vendor during one of my monthly trips to Shenzhen. We had a productive discussion about their concerns, and at the conclusion of the meeting we ordered them a $5 multimeter in exchange for a guarantee of a non-conductive book spine. In the end, the vendor was simply unwilling to guarantee something for which he had no quality control procedure — an extremely reasonable position — and we just had to educate the vendor on how to use a multimeter.
To wit, this unusual non-conductivity requirement did extend our lead time by several days and added a few cents to the cost of the book, but overall, I’m willing to accept that compromise.
Never skip a checkplot. I alluded to this poignant lesson with the following tweet:
Skip a gerber checkplot … scrap 200+ PCBs due to config error on just one pad's soldermask. Lose four weeks and $,$$$ #fml#hardwareishard
The pad shapes for chibitronics are complex polyline geometries, which aren’t handled so gracefully by Altium. One problem I’ve discovered the hard way is the soldermask layer occasionally disappears for pads with complex geometry. One version of the file will have a soldermask opening, and in the next save checkpoint, it’s gone. This sort of bug is rare, but it does happen. Normally I do a gerber re-import check with a third-party tool, but since this was a re-order of an existing design that worked before, and I was in a rush, I skipped the check. Result? thousands of dollars of PCBs scrapped, four weeks gone from the schedule. Ouch.
Good thing I padded my delivery dates, and good thing I keep a bottle of fine scotch on hand to help bitter reminders of what happens when I get complacent go down a little bit easier.
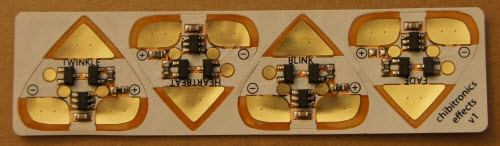
If something can fit in a right and a wrong way, the wrong way will happen. I’m paranoid about this problem — I’ve been burned by it many times before. The effects sticker sheet is a prime example of this problem waiting to happen. It is an array of four otherwise identical stickers, except for the LED flashing pattern they output. The LED flashing pattern is controlled by software, and trying to manage four separate firmware files and get them all loaded into the right spot in a tester is a nightmare waiting to happen. So, I designed the stickers to all use exactly the same firmware; their behaviors set by the value of a single external resistor.
So the logic goes: if all the stickers have the same firmware, it’s impossible to have a “wrong way” to program the stickers. Right?
Unfortunately, I also designed the master PCB panels so they were perfectly symmetric. You can load the panels into the assembly robot rotated by pi radians and the assembly program runs flawlessly — except that the resistors which set the firmware behavior are populated in reverse order from the silkscreen labels. Despite having fiducial holes and text on the PCBs in both Chinese and English that are uniquely orienting, this problem actually happened. The first samples of the effects stickers were “blinking” where it said “heartbeat”, “fading” where it said “twinkle”, and vice-versa.
Fortunately, the factory very consistently loaded the boards in backwards, which is the best case for a problem like this. I rushed a firmware patch (which is in itself a risky thing to do) that reversed the interpretation of the resistor values, and had a new set of samples fedexed to me in Singapore for sanity checking. We also built a secondary test jig to add a manual double-check for correct flashing behavior on the line in China. Although, in making that additional test, we were confronted with another common problem —
Some things just don’t translate well into Chinese. When coming up with instructions to describe the difference between “fading” (a slow blinking pattern) and “twinkling” (a flickering pattern), it turns out that the Chinese translation for “blink” and “twinkle” are similar. Twinkle translates to 闪烁 (“flickering, twinkling”) or 闪耀 (to glint, to glitter, to sparkle), whereas blink translates to 闪闪 (“flickering, sparkling, glittering”) or 闪亮 (“brilliant, shiny, to glisten, to twinkle”). I always dread making up subjective descriptions for test operators in Chinese, which is part of the reason we try to automate as many tests as possible. As one of my Chinese friends once quipped, Mandarin is a wonderful language for poetry and arts, but difficult for precise technical communications.
Above is an example of the effects stickers in action. How does one come up with a bulletproof, cross-cultural explanation of the difference between fading (on the left) and twinkling (on the right), using only simple terms anyone can understand, e.g. avoiding technical terms such as random, frequency, hertz, periodic, etc.
After viewing the video, our factory recommended to use “渐变” (gradual change) for fade and “闪烁” (flickering, twinkling) for twinkle. I’m not yet convinced this is a bulletproof description, but it’s superior to any translation I could come up with.
Funny enough, it was also a challenge for Jie and I to agree upon what a “twinkle” effect should look like. We had several long conversations on the topic, followed up by demo videos to clarify the desired effect. The implementation was basically tweaking code until it “looked about right” — Jie described our first iteration of the effect as “closer to a lightning storm than twinkling”. Given the difficulty we had describing the effect to each other, it’s no surprise I’m running into challenges accurately describing the effect in Chinese.
Eliminate single points of failure. When we built test jigs, we built two copies of each, even though throughput requirements demanded just one. Why? Just in case one failed. And guess what, one of them failed, for reasons as of yet unknown. Thank goodness we built two copies, or I’d be in China right now trying to diagnose why our sole test jig isn’t working.
Sometimes last minute changes are worth it. About six weeks ago, Jie suggested that we should include a stencil with the sensor/microcontroller kits. She reasoned that it can be difficult to lay out the copper tape patterns for complex stickers, such as the microcontroller (featuring seven pads), without a drawing of the contact patterns. I originally resisted the idea — we were just weeks away from finalizing the order, and I didn’t want to delay shipment on account of something we didn’t originally promise. As Jie is discovering, I can be very temperamental, especially when it comes to things that can cause schedule slips (sorry Jie, thanks for bearing with me!). However, her arguments were sound and so I instructed our factory to search for a stencil vendor. Two weeks passed and we couldn’t find anyone willing to take the job, but our factory’s sourcing department wasn’t going to give up so easily. Eventually, they found one vendor who had enough material in stock to tool up a die cutter and turn a couple thousand stencils within two weeks — just barely in time to meet the schedule.
When I got samples of the sensor/micro kit with the stencils, I gave them a whirl, and Jie was absolutely right about the utility of the stencils. The user experience is vastly improved when you have a template to work from, particularly for the microcontroller sticker with seven closely spaced pads. And so, even though it wasn’t promised as part of the original campaign, all backers who ordered the sensor/micro kit are getting a free stencil to help with laying out their designs.
Chinese New Year has a big impact the supply chain. Even though Chinese New Year (CNY) is a 2-week holiday, our initial schedule essentially wrote off the month of February. Reality matched this expectation, but I thought it’d be helpful to share an anecdote on exactly how CNY ended up impacting this project. We had a draft manuscript of our book in January, but I couldn’t get a complete sample until March. It’s not because the printer was off work for a month straight — their holiday, like everyone else’s, was about two weeks long. However, the paper vendor started its holiday about 10 days before the printer, and the binding vendor ended its holiday about 10 days after the printer. So even though each vendor took two weeks off, the net supply chain for printing a custom book was out for holiday for around 24 days — effectively the entire month of February. The staggered observance of CNY is necessary because of the sheer magnitude of human migration that accompanies the holiday.
Shipping is expensive, and difficult. When I ran the initial numbers on shipping, one thing I realized is we weren’t selling circuit stickers — at least by volume and weight, our principle product is printed paper (the book). So, to optimize logistics cost, I was pushing to ship starter kits (which contain a book) and additional stand-alone book orders by ocean, rather than air.
We actually had starter kits and books ready to go almost four weeks ago, but we just couldn’t get a reasonable quotation for the cost of shipping them by ocean. We spent almost three weeks haggling and quoting with ocean freight companies, and in the end, their price was basically the same as going by air, but would take three weeks longer and incurred more risk. It turns out that freight cost is a minor component of going by ocean, and you get killed by a multitude of surcharges, from paying the longshoreman to paying all the intermediate warehouses and brokers that handle your goods at the dock. All these fixed costs add up, such that even though we were shipping over 60 cartons of goods, air shipping was still a cost-effective option. To wit, a Maersk 40′ sea container will fit over 1250 cartons each containing 40 starter kits, so we’re still an order of magnitude away from being able to efficiently utilize ocean freight.
We’re not out of the Woods Yet. However excited I am about this milestone, I have to remind myself not to count my chickens before they hatch. Problems ranging from a routine screw-up by UPS to a tragic aviation accident to a logistics problem at Crowd Supply’s fulfillment depot to a customs problem could stymie an on-time delivery.
But, at the very least, at this point we can say we’ve done everything reasonably within our power to deliver on-time.
We are looking forward to hearing our backer’s feedback on chibitronics. If you are curious and want to join in on the fun, the Crowd Supply site is taking orders, and Jie and I will be at Maker Faire Bay Area 2014, in the Expo hall, teaching free workshops on how to learn and play with circuit stickers. We’re looking forward to meeting you!
Today at the Chaos Computer Congress (30C3), xobs and I disclosed a finding that some SD cards contain vulnerabilities that allow arbitrary code execution — on the memory card itself. On the dark side, code execution on the memory card enables a class of MITM (man-in-the-middle) attacks, where the card seems to be behaving one way, but in fact it does something else. On the light side, it also enables the possibility for hardware enthusiasts to gain access to a very cheap and ubiquitous source of microcontrollers.
In order to explain the hack, it’s necessary to understand the structure of an SD card. The information here applies to the whole family of “managed flash” devices, including microSD, SD, MMC as well as the eMMC and iNAND devices typically soldered onto the mainboards of smartphones and used to store the OS and other private user data. We also note that similar classes of vulnerabilities exist in related devices, such as USB flash drives and SSDs.
Flash memory is really cheap. So cheap, in fact, that it’s too good to be true. In reality, all flash memory is riddled with defects — without exception. The illusion of a contiguous, reliable storage media is crafted through sophisticated error correction and bad block management functions. This is the result of a constant arms race between the engineers and mother nature; with every fabrication process shrink, memory becomes cheaper but more unreliable. Likewise, with every generation, the engineers come up with more sophisticated and complicated algorithms to compensate for mother nature’s propensity for entropy and randomness at the atomic scale.
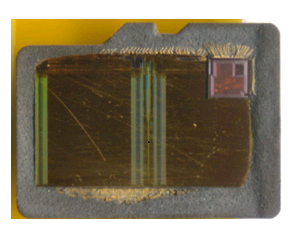
These algorithms are too complicated and too device-specific to be run at the application or OS level, and so it turns out that every flash memory disk ships with a reasonably powerful microcontroller to run a custom set of disk abstraction algorithms. Even the diminutive microSD card contains not one, but at least two chips — a controller, and at least one flash chip (high density cards will stack multiple flash die). You can see some die shots of the inside of microSD cards at a microSD teardown I did a couple years ago.
In our experience, the quality of the flash chip(s) integrated into memory cards varies widely. It can be anything from high-grade factory-new silicon to material with over 80% bad sectors. Those concerned about e-waste may (or may not) be pleased to know that it’s also common for vendors to use recycled flash chips salvaged from discarded parts. Larger vendors will tend to offer more consistent quality, but even the largest players staunchly reserve the right to mix and match flash chips with different controllers, yet sell the assembly as the same part number — a nightmare if you’re dealing with implementation-specific bugs.
The embedded microcontroller is typically a heavily modified 8051 or ARM CPU. In modern implementations, the microcontroller will approach 100 MHz performance levels, and also have several hardware accelerators on-die. Amazingly, the cost of adding these controllers to the device is probably on the order of $0.15-$0.30, particularly for companies that can fab both the flash memory and the controllers within the same business unit. It’s probably cheaper to add these microcontrollers than to thoroughly test and characterize each flash memory chip, which explains why managed flash devices can be cheaper per bit than raw flash chips, despite the inclusion of a microcontroller.
The downside of all this complexity is that there can be bugs in the hardware abstraction layer, especially since every flash implementation has unique algorithmic requirements, leading to an explosion in the number of hardware abstraction layers that a microcontroller has to potentially handle. The inevitable firmware bugs are now a reality of the flash memory business, and as a result it’s not feasible, particularly for third party controllers, to indelibly burn a static body of code into on-chip ROM.
The crux is that a firmware loading and update mechanism is virtually mandatory, especially for third-party controllers. End users are rarely exposed to this process, since it all happens in the factory, but this doesn’t make the mechanism any less real. In my explorations of the electronics markets in China, I’ve seen shop keepers burning firmware on cards that “expand” the capacity of the card — in other words, they load a firmware that reports the capacity of a card is much larger than the actual available storage. The fact that this is possible at the point of sale means that most likely, the update mechanism is not secured.
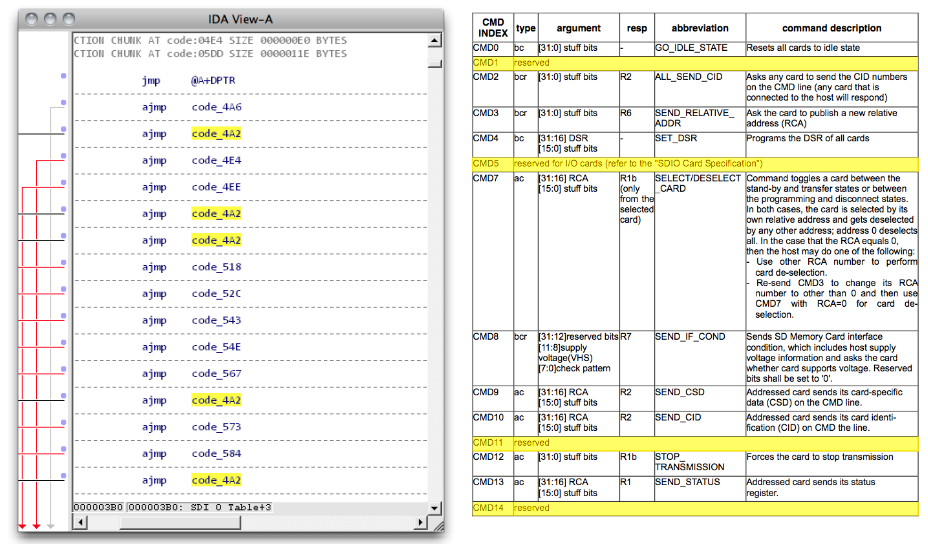
In our talk at 30C3, we report our findings exploring a particular microcontroller brand, namely, Appotech and its AX211 and AX215 offerings. We discover a simple “knock” sequence transmitted over manufacturer-reserved commands (namely, CMD63 followed by ‘A’,’P’,’P’,’O’) that drop the controller into a firmware loading mode. At this point, the card will accept the next 512 bytes and run it as code.
From this beachhead, we were able to reverse engineer (via a combination of code analysis and fuzzing) most of the 8051’s function specific registers, enabling us to develop novel applications for the controller, without any access to the manufacturer’s proprietary documentation. Most of this work was done using our open source hardware platform, Novena, and a set of custom flex circuit adapter cards (which, tangentially, lead toward the development of flexible circuit stickers aka chibitronics).
Significantly, the SD command processing is done via a set of interrupt-driven call backs processed by the microcontroller. These callbacks are an ideal location to implement an MITM attack.
It’s as of yet unclear how many other manufacturers leave their firmware updating sequences unsecured. Appotech is a relatively minor player in the SD controller world; there’s a handful of companies that you’ve probably never heard of that produce SD controllers, including Alcor Micro, Skymedi, Phison, SMI, and of course Sandisk and Samsung. Each of them would have different mechanisms and methods for loading and updating their firmwares. However, it’s been previously noted that at least one Samsung eMMC implementation using an ARM instruction set had a bug which required a firmware updater to be pushed to Android devices, indicating yet another potentially promising venue for further discovery.
From the security perspective, our findings indicate that even though memory cards look inert, they run a body of code that can be modified to perform a class of MITM attacks that could be difficult to detect; there is no standard protocol or method to inspect and attest to the contents of the code running on the memory card’s microcontroller. Those in high-risk, high-sensitivity situations should assume that a “secure-erase” of a card is insufficient to guarantee the complete erasure of sensitive data. Therefore, it’s recommended to dispose of memory cards through total physical destruction (e.g., grind it up with a mortar and pestle).
From the DIY and hacker perspective, our findings indicate a potentially interesting source of cheap and powerful microcontrollers for use in simple projects. An Arduino, with its 8-bit 16 MHz microcontroller, will set you back around $20. A microSD card with several gigabytes of memory and a microcontroller with several times the performance could be purchased for a fraction of the price. While SD cards are admittedly I/O-limited, some clever hacking of the microcontroller in an SD card could make for a very economical and compact data logging solution for I2C or SPI-based sensors.
Slides from our talk at 30C3 can be downloaded here, or you can watch the talk on Youtube below.
Team Kosagi would like to extend a special thanks to .mudge for enabling this research through the Cyber Fast Track program.
I’m fond of trawling the electronic markets of Shenzhen. It’s a huge area, several city blocks; it is overwhelming in scale. My friends at haxlr8r have published a guide to the markets, targeted at helping intrepid hacker-engineers use the market more efficiently, without having to spend a couple of weeks just figuring out the basics.
This is the first guide I’ve seen that gives a floor-by-floor breakdown of the wares contained in each building. This is particularly handy as some buildings contain several specialties that are not reflected by the items you find on the ground floor. It’s also bi-lingual, which helps if you can’t speak the language and you need to point at something the locals can read. While the map is missing a couple of my favorite spots, overall it’s well done and took a lot of effort to compile.
If you’re into making electronics, this electronics market is a must-see destination. If you have an idea you’re itching to build, you might want to consider looking into haxlr8r. haxlr8r’s offices are right in the heart of the electronics district, and I’m a mentor for the program; so, it’s a great opportunity to learn the markets, build stuff, and hang out and have a few beers.