Archive for the ‘open source’ Category

The Plausibly Deniable DataBase (PDDB): It’s Real Now!

Thursday, July 28th, 2022

Earlier I described the Plausibly Deniable DataBase (PDDB). It’s a filesystem (like FAT or ext4), combined with plausibly deniable full disk encryption (similar to LUKS or VeraCrypt) in a “batteries included” fashion. Plausible deniability aims to make it difficult to prove “beyond a reasonable doubt” that additional secrets exist on the disk, even in the face of forensic evidence.

Since then, I’ve implemented, deployed, and documented the PDDB. Perhaps of most interest for the general reader is the extensive documentation now available in the Xous Book. Here you can find discussions about the core data structures, key derivations, native & std APIs, testing, backups, and issues affecting security and deniability.

Rust: A Critical Retrospective

Thursday, May 19th, 2022

Since I was unable to travel for a couple of years during the pandemic, I decided to take my new-found time and really lean into Rust. After writing over 100k lines of Rust code, I think I am starting to get a feel for the language and like every cranky engineer I have developed opinions and because this is the Internet I’m going to share them.

The reason I learned Rust was to flesh out parts of the Xous OS written by Xobs. Xous is a microkernel message-passing OS written in pure Rust. Its closest relative is probably QNX. Xous is written for lightweight (IoT/embedded scale) security-first platforms like Precursor that support an MMU for hardware-enforced, page-level memory protection.

In the past year, we’ve managed to add a lot of features to the OS: networking (TCP/UDP/DNS), middleware graphics abstractions for modals and multi-lingual text, storage (in the form of an encrypted, plausibly deniable database called the PDDB), trusted boot, and a key management library with self-provisioning and sealing properties.

One of the reasons why we decided to write our own OS instead of using an existing implementation such as SeL4, Tock, QNX, or Linux, was we wanted to really understand what every line of code was doing in our device. For Linux in particular, its source code base is so huge and so dynamic that even though it is open source, you can’t possibly audit every line in the kernel. Code changes are happening at a pace faster than any individual can audit. Thus, in addition to being home-grown, Xous is also very narrowly scoped to support just our platform, to keep as much unnecessary complexity out of the kernel as possible.

Being narrowly scoped means we could also take full advantage of having our CPU run in an FPGA. Thus, Xous targets an unusual RV32-IMAC configuration: one with an MMU + AES extensions. It’s 2022 after all, and transistors are cheap: why don’t all our microcontrollers feature page-level memory protection like their desktop counterparts? Being an FPGA also means we have the ability to fix API bugs at the hardware level, leaving the kernel more streamlined and simplified. This was especially relevant in working through abstraction-busting processes like suspend and resume from RAM. But that’s all for another post: this one is about Rust itself, and how it served as a systems programming language for Xous.

Rust: What Was Sold To Me

Back when we started Xous, we had a look at a broad number of systems programming languages and Rust stood out. Even though its `no-std` support was then-nascent, it was a strongly-typed, memory-safe language with good tooling and a burgeoning ecosystem. I’m personally a huge fan of strongly typed languages, and memory safety is good not just for systems programming, it enables optimizers to do a better job of generating code, plus it makes concurrency less scary. I actually wished for Precursor to have a CPU that had hardware support for tagged pointers and memory capabilities, similar to what was done on CHERI, but after some discussions with the team doing CHERI it was apparent they were very focused on making C better and didn’t have the bandwidth to support Rust (although that may be changing). In the grand scheme of things, C needed CHERI much more than Rust needed CHERI, so that’s a fair prioritization of resources. However, I’m a fan of belt-and-suspenders for security, so I’m still hopeful that someday hardware-enforced fat pointers will make their way into Rust.

That being said, I wasn’t going to go back to the C camp simply to kick the tires on a hardware retrofit that backfills just one poor aspect of C. The glossy brochure for Rust also advertised its ability to prevent bugs before they happened through its strict “borrow checker”. Furthermore, its release philosophy is supposed to avoid what I call “the problem with Python”: your code stops working if you don’t actively keep up with the latest version of the language. Also unlike Python, Rust is not inherently unhygienic, in that the advertised way to install packages is not also the wrong way to install packages. Contrast to Python, where the official docs on packages lead you to add them to system environment, only to be scolded by Python elders with a “but of course you should be using a venv/virtualenv/conda/pipenv/…, everyone knows that”. My experience with Python would have been so much better if this detail was not relegated to Chapter 12 of 16 in the official tutorial. Rust is also supposed to be better than e.g. Node at avoiding the “oops I deleted the Internet” problem when someone unpublishes a popular package, at least if you use fully specified semantic versions for your packages.

In the long term, the philosophy behind Xous is that eventually it should “get good enough”, at which point we should stop futzing with it. I believe it is the mission of engineers to eventually engineer themselves out of a job: systems should get stable and solid enough that it “just works”, with no caveats. Any additional engineering beyond that point only adds bugs or bloat. Rust’s philosophy of “stable is forever” and promising to never break backward-compatibility is very well-aligned from the point of view of getting Xous so polished that I’m no longer needed as an engineer, thus enabling me to spend more of my time and focus supporting users and their applications.

The Rough Edges of Rust

There’s already a plethora of love letters to Rust on the Internet, so I’m going to start by enumerating some of the shortcomings I’ve encountered.

“Line Noise” Syntax

This is a superficial complaint, but I found Rust syntax to be dense, heavy, and difficult to read, like trying to read the output of a UART with line noise:

Trying::to_read::<&'a heavy>(syntax, |like| { this. can_be( maddening ) }).map(|_| ())?;

In more plain terms, the line above does something like invoke a method called “to_read” on the object (actually `struct`) “Trying” with a type annotation of “&heavy” and a lifetime of ‘a with the parameters of “syntax” and a closure taking a generic argument of “like” calling the can_be() method on another instance of a structure named “this” with the parameter “maddening” with any non-error return values mapped to the Rust unit type “()” and errors unwrapped and kicked back up to the caller’s scope.

Deep breath. Surely, I got some of this wrong, but you get the idea of how dense this syntax can be.

And then on top of that you can layer macros and directives which don’t have to follow other Rust syntax rules. For example, if you want to have conditionally compiled code, you use a directive like

#[cfg(all(not(baremetal), any(feature = “hazmat”, feature = “debug_print”)))]

Which says if either the feature “hazmat” or “debug_print” is enabled and you’re not running on bare metal, use the block of code below (and I surely got this wrong too). The most confusing part of about this syntax to me is the use of a single “=” to denote equivalence and not assignment, because, stuff in config directives aren’t Rust code. It’s like a whole separate meta-language with a dictionary of key/value pairs that you query.

I’m not even going to get into the unreadability of Rust macros – even after having written a few Rust macros myself, I have to admit that I feel like they “just barely work” and probably thar be dragons somewhere in them. This isn’t how you’re supposed to feel in a language that bills itself to be reliable. Yes, it is my fault for not being smart enough to parse the language’s syntax, but also, I do have other things to do with my life, like build hardware.

Anyways, this is a superficial complaint. As time passed I eventually got over the learning curve and became more comfortable with it, but it was a hard, steep curve to climb. This is in part because all the Rust documentation is either written in eli5 style (good luck figuring out “feature”s from that example), or you’re greeted with a formal syntax definition (technically, everything you need to know to define a “feature” is in there, but nowhere is it summarized in plain English), and nothing in between.

To be clear, I have a lot of sympathy for how hard it is to write good documentation, so this is not a dig at the people who worked so hard to write so much excellent documentation on the language. I genuinely appreciate the general quality and fecundity of the documentation ecosystem.

Rust just has a steep learning curve in terms of syntax (at least for me).

Rust Is Powerful, but It Is Not Simple

Rust is powerful. I appreciate that it has a standard library which features HashMaps, Vecs, and Threads. These data structures are delicious and addictive. Once we got `std` support in Xous, there was no going back. Coming from a background of C and assembly, Rust’s standard library feels rich and usable — I have read some criticisms that it lacks features, but for my purposes it really hits a sweet spot.

That being said, my addiction to the Rust `std` library has not done any favors in terms of building an auditable code base. One of the criticisms I used to leverage at Linux is like “holy cow, the kernel source includes things like an implementation for red black trees, how is anyone going to audit that”.

Now, having written an OS, I have a deep appreciation for how essential these rich, dynamic data structures are. However, the fact that Xous doesn’t include an implementation of HashMap within its repository doesn’t mean that we are any simpler than Linux: indeed, we have just swept a huge pile of code under the rug; just the `collection`s portion of the standard library represents about 10k+ SLOC at a very high complexity.

So, while Rust’s `std` library allows the Xous code base to focus on being a kernel and not also be its own standard library, from the standpoint of building a minimum attack-surface, “fully-auditable by one human” codebase, I think our reliance on Rust’s `std` library means we fail on that objective, especially so long as we continue to track the latest release of Rust (and I’ll get into why we have to in the next section).

Ideally, at some point, things “settle down” enough that we can stick a fork in it and call it done by well, forking the Rust repo, and saying “this is our attack surface, and we’re not going to change it”. Even then, the Rust `std` repo dwarfs the Xous repo by several multiples in size, and that’s not counting the complexity of the compiler itself.

Rust Isn’t Finished

This next point dovetails into why Rust is not yet suitable for a fully auditable kernel: the language isn’t finished. For example, while we were coding Xous, a thing called `const generic` was introduced. Before this, Rust had no native ability to deal with arrays bigger than 32 elements! This limitation is a bit maddening, and even today there are shortcomings such as the `Default` trait being unable to initialize arrays larger than 32 elements. This friction led us to put limits on many things at 32 elements: for example, when we pass the results of an SSID scan between processes, the structure only reserves space for up to 32 results, because the friction of going to a larger, more generic structure just isn’t worth it. That’s a language-level limitation directly driving a user-facing feature.

Also over the course of writing Xous, things like in-line assembly and workspaces finally reached maturity, which means we need to go back a revisit some unholy things we did to make those critical few lines of initial boot code, written in assembly, integrated into our build system.

I often ask myself “when is the point we’ll get off the Rust release train”, and the answer I think is when they finally make “alloc” no longer a nightly API. At the moment, `no-std` targets have no access to the heap, unless they hop on the “nightly” train, in which case you’re back into the Python-esque nightmare of your code routinely breaking with language releases.

We definitely gave writing an OS in `no-std` + stable a fair shake. The first year of Xous development was all done using `no-std`, at a cost in memory space and complexity. It’s possible to write an OS with nothing but pre-allocated, statically sized data structures, but we had to accommodate the worst-case number of elements in all situations, leading to bloat. Plus, we had to roll a lot of our own core data structures.

About a year ago, that all changed when Xobs ported Rust’s `std` library to Xous. This means we are able to access the heap in stable Rust, but it comes at a price: now Xous is tied to a particular version of Rust, because each version of Rust has its own unique version of `std` packaged with it. This version tie is for a good reason: `std` is where the sausage gets made of turning fundamentally `unsafe` hardware constructions such as memory allocation and thread creation into “safe” Rust structures. (Also fun fact I recently learned: Rust doesn’t have a native allocater for most targets – it simply punts to the native libc `malloc()` and `free()` functions!) In other words, Rust is able to make a strong guarantee about the stable release train not breaking old features in part because of all the loose ends swept into `std`.

I have to keep reminding myself that having `std` doesn’t eliminate the risk of severe security bugs in critical code – it merely shuffles a lot of critical code out of sight, into a standard library. Yes, it is maintained by a talented group of dedicated programmers who are smarter than me, but in the end, we are all only human, and we are all fair targets for software supply chain exploits.

Rust has a clockwork release schedule – every six weeks, it pushes a new version. And because our fork of `std` is tied to a particular version of Rust, it means every six weeks, Xobs has the thankless task of updating our fork and building a new `std` release for it (we’re not a first-class platform in Rust, which means we have to maintain our own `std` library). This means we likewise force all Xous developers to run `rustup update` on their toolchains so we can retain compatibility with the language.

This probably isn’t sustainable. Eventually, we need to lock down the code base, but I don’t have a clear exit strategy for this. Maybe the next point at which we can consider going back to `nostd` is when we can get the stable `alloc` feature, which allows us to have access to the heap again. We could then decouple Xous from the Rust release train, but we’d still need to backfill features such as Vec, HashMap, Thread, and Arc/Mutex/Rc/RefCell/Box constructs that enable Xous to be efficiently coded.

Unfortunately, the `alloc` crate is very hard, and has been in development for many years now. That being said, I really appreciate the transparency of Rust behind the development of this feature, and the hard work and thoughtfulness that is being put into stabilizing this feature.

Rust Has A Limited View of Supply Chain Security

I think this position is summarized well by the installation method recommended by the rustup.rs installation page:

`curl --proto '=https' --tlsv1.2 -sSf https://sh.rustup.rs | sh`

“Hi, run this shell script from a random server on your machine.”

To be fair, you can download the script and inspect it before you run it, which is much better than e.g. the Windows .MSI installers for vscode. However, this practice pervades the entire build ecosystem: a stub of code called `build.rs` is potentially compiled and executed whenever you pull in a new crate from crates.io. This, along with “loose” version pinning (you can specify a version to be, for example, simply “2” which means you’ll grab whatever the latest version published is with a major rev of 2), makes me uneasy about the possibility of software supply chain attacks launched through the crates.io ecosystem.

Crates.io is also subject to a kind of typo-squatting, where it’s hard to determine which crates are “good” or “bad”; some crates that are named exactly what you want turn out to just be old or abandoned early attempts at giving you the functionality you wanted, and the more popular, actively-maintained crates have to take on less intuitive names, sometimes differing by just a character or two from others (to be fair, this is not a problem unique to Rust’s package management system).

There’s also the fact that dependencies are chained – when you pull in one thing from crates.io, you also pull in all of that crate’s subordinate dependencies, along with all their build.rs scripts that will eventually get run on your machine. Thus, it is not sufficient to simply audit the crates explicitly specified within your Cargo.toml file — you must also audit all of the dependent crates for potential supply chain attacks as well.

Fortunately, Rust does allow you to pin a crate at a particular version using the `Cargo.lock` file, and you can fully specify a dependent crate down to the minor revision. We try to mitigate this in Xous by having a policy of publishing our Cargo.lock file and specifying all of our first-order dependent crates to the minor revision. We have also vendored in or forked certain crates that would otherwise grow our dependency tree without much benefit.

That being said, much of our debug and test framework relies on some rather fancy and complicated crates that pull in a huge number of dependencies, and much to my chagrin even when I try to run a build just for our target hardware, the dependent crates for running simulations on the host computer are still pulled in and the build.rs scripts are at least built, if not run.

In response to this, I wrote a small tool called `crate-scraper` which downloads the source package for every source specified in our Cargo.toml file, and stores them locally so we can have a snapshot of the code used to build a Xous release. It also runs a quick “analysis” in that it searches for files called build.rs and collates them into a single file so I can more quickly grep through to look for obvious problems. Of course, manual review isn’t a practical way to detect cleverly disguised malware embedded within the build.rs files, but it at least gives me a sense of the scale of the attack surface we’re dealing with — and it is breathtaking, about 5700 lines of code from various third parties that manipulates files, directories, and environment variables, and runs other programs on my machine every time I do a build.

I’m not sure if there is even a good solution to this problem, but, if you are super-paranoid and your goal is to be able to build trustable firmware, be wary of Rust’s expansive software supply chain attack surface!

You Can’t Reproduce Someone Else’s Rust Build

A final nit I have about Rust is that builds are not reproducible between different computers (they are at least reproducible between builds on the same machine if we disable the embedded timestamp that I put into Xous for $reasons).

I think this is primarily because Rust pulls in the full path to the source code as part of the panic and debug strings that are built into the binary. This has lead to uncomfortable situations where we have had builds that worked on Windows, but failed under Linux, because our path names are very different lengths on the two and it would cause some memory objects to be shifted around in target memory. To be fair, those failures were all due to bugs we had in Xous, which have since been fixed. But, it just doesn’t feel good to know that we’re eventually going to have users who report bugs to us that we can’t reproduce because they have a different path on their build system compared to ours. It’s also a problem for users who want to audit our releases by building their own version and comparing the hashes against ours.

There’s some bugs open with the Rust maintainers to address reproducible builds, but with the number of issues they have to deal with in the language, I am not optimistic that this problem will be resolved anytime soon. Assuming the only driver of the unreproducibility is the inclusion of OS paths in the binary, one fix to this would be to re-configure our build system to run in some sort of a chroot environment or a virtual machine that fixes the paths in a way that almost anyone else could reproduce. I say “almost anyone else” because this fix would be OS-dependent, so we’d be able to get reproducible builds under, for example, Linux, but it would not help Windows users where chroot environments are not a thing.

Where Rust Exceeded Expectations

Despite all the gripes laid out here, I think if I had to do it all over again, Rust would still be a very strong contender for the language I’d use for Xous. I’ve done major projects in C, Python, and Java, and all of them eventually suffer from “creeping technical debt” (there’s probably a software engineer term for this, I just don’t know it). The problem often starts with some data structure that I couldn’t quite get right on the first pass, because I didn’t yet know how the system would come together; so in order to figure out how the system comes together, I’d cobble together some code using a half-baked data structure.

Thus begins the descent into chaos: once I get an idea of how things work, I go back and revise the data structure, but now something breaks elsewhere that was unsuspected and subtle. Maybe it’s an off-by-one problem, or the polarity of a sign seems reversed. Maybe it’s a slight race condition that’s hard to tease out. Nevermind, I can patch over this by changing a <= to a <, or fixing the sign, or adding a lock: I’m still fleshing out the system and getting an idea of the entire structure. Eventually, these little hacks tend to metastasize into a cancer that reaches into every dependent module because the whole reason things even worked was because of the “cheat”; when I go back to excise the hack, I eventually conclude it’s not worth the effort and so the next best option is to burn the whole thing down and rewrite it…but unfortunately, we’re already behind schedule and over budget so the re-write never happens, and the hack lives on.

Rust is a difficult language for authoring code because it makes these “cheats” hard – as long as you have the discipline of not using “unsafe” constructions to make cheats easy. However, really hard does not mean impossible – there were definitely some cheats that got swept under the rug during the construction of Xous.

This is where Rust really exceeded expectations for me. The language’s structure and tooling was very good at hunting down these cheats and refactoring the code base, thus curing the cancer without killing the patient, so to speak. This is the point at which Rust’s very strict typing and borrow checker converts from a productivity liability into a productivity asset.

I liken it to replacing a cable in a complicated bundle of cables that runs across a building. In Rust, it’s guaranteed that every strand of wire in a cable chase, no matter how complicated and awful the bundle becomes, is separable and clearly labeled on both ends. Thus, you can always “pull on one end” and see where the other ends are by changing the type of an element in a structure, or the return type of a method. In less strictly typed languages, you don’t get this property; the cables are allowed to merge and affect each other somewhere inside the cable chase, so you’re left “buzzing out” each cable with manual tests after making a change. Even then, you’re never quite sure if the thing you replaced is going to lead to the coffee maker switching off when someone turns on the bathroom lights.

Here’s a direct example of Rust’s refactoring abilities in action in the context of Xous. I had a problem in the way trust levels are handled inside our graphics subsystem, which I call the GAM (Graphical Abstraction Manager). Each Canvas in the system gets a `u8` assigned to it that is a trust level. When I started writing the GAM, I just knew that I wanted some notion of trustability of a Canvas, so I added the variable, but wasn’t quite sure exactly how it would be used. Months later, the system grew the notion of Contexts with Layouts, which are multi-Canvas constructions that define a particular type of interaction. Now, you can have multiple trust levels associated with a single Context, but I had forgotten about the trust variable I had previously put in the Canvas structure – and added another trust level number to the Context structure as well. You can see where this is going: everything kind of worked as long as I had simple test cases, but as we started to get modals popping up over applications and then menus on top of modals and so forth, crazy behavior started manifesting, because I had confused myself over where the trust values were being stored. Sometimes I was updating the value in the Context, sometimes I was updating the one in the Canvas. It would manifest itself sometimes as an off-by-one bug, other times as a concurrency error.

This was always a skeleton in the closet that bothered me while the GAM grew into a 5k-line monstrosity of code with many moving parts. Finally, I decided something had to be done about it, and I was really not looking forward to it. I was assuming that I messed up something terribly, and this investigation was going to conclude with a rewrite of the whole module.

Fortunately, Rust left me a tiny string to pull on. Clippy, the cheerfully named “linter” built into Rust, was throwing a warning that the trust level variable was not being used at a point where I thought it should be – I was storing it in the Context after it was created, but nobody every referred to it after then. That’s strange – it should be necessary for every redraw of the Context! So, I started by removing the variable, and seeing what broke. This rapidly led me to recall that I was also storing the trust level inside the Canvases within the Context when they were being created, which is why I had this dangling reference. Once I had that clue, I was able to refactor the trust computations to refer only to that one source of ground truth. This also led me to discover other bugs that had been lurking because in fact I was never exercising some code paths that I thought I was using on a routine basis. After just a couple hours of poking around, I had a clear-headed view of how this was all working, and I had refactored the trust computation system with tidy APIs that were simple and easier to understand, without having to toss the entire code base.

This is just one of many positive experiences I’ve had with Rust in maintaining the Xous code base. It’s one of the first times I’ve walked into a big release with my head up and a positive attitude, because for the first time ever, I feel like maybe I have a chance of being able deal with hard bugs in an honest fashion. I’m spending less time making excuses in my head to justify why things were done this way and why we can’t take that pull request, and more time thinking about all the ways things can get better, because I know Clippy has my back.

Caveat Coder

Anyways, that’s a lot of ranting about software for a hardware guy. Software people are quick to remind me that first and foremost, I make circuits and aluminum cases, not code, therefore I have no place ranting about software. They’re right – I actually have no “formal” training to write code “the right way”. When I was in college, I learned Maxwell’s equations, not algorithms. I could never be a professional programmer, because I couldn’t pass even the simplest coding interview. Don’t ask me to write a linked list: I already know that I don’t know how to do it correctly; you don’t need to prove that to me. This is because whenever I find myself writing a linked list (or any other foundational data structure for that matter), I immediately stop myself and question all the life choices that brought me to that point: isn’t this what libraries are for? Do I really need to be re-inventing the wheel? If there is any correlation between doing well in a coding interview and actual coding ability, then you should definitely take my opinions with the grain of salt.

Still, after spending a couple years in the foxhole with Rust and reading countless glowing articles about the language, I felt like maybe a post that shared some critical perspectives about the language would be a refreshing change of pace.

Building a Curve25519 Hardware Accelerator

Thursday, July 15th, 2021

Note: this post uses a $\LaTeX$ plugin to render math symbols. It may require a desktop browser for the full experience…

The “double ratchet” algorithm is integral to modern end-to-end-encrypted chat apps, such as Signal, WhatsApp, and Matrix. It gives encrypted conversations the properties of resilience, forward secrecy, and break-in recovery; basically, even if an adversary can manipulate or observe portions of an exchange, including certain secret materials, the damage is limited with each turn of the double ratchet.

The double-ratchet algorithm is a soup of cryptographic components, but one of the most computationally expensive portions is the “Diffie-Hellman (DH) key exchange”, using Elliptic Curve Diffie-Hellman (ECDH) with Curve25519. How expensive? This post from 2020 claims a speed record of 3.2 million cycles on a Cortex-M0 for just one of the core mathematical operations: fairly hefty. A benchmark of the x25519-dalek Rust crate on a 100 MHz RV32-IMAC implementation clocks in at 100ms per DH key exchange, of which several are involved in a double-ratchet. Thus, any chat client implementation on a small embedded CPU would suffer from significant UI lag.

There are a few strategies to rectify this, ranging from adding a second CPU core to off-load the crypto, to making a full-custom hardware accelerator. Adding a second RISC-V CPU core is expedient, but it wouldn’t do much to force me to understand what I was doing as far as the crypto goes; and there’s already a strong contingent of folks working on multi-core RISC-V on FPGA implementations. The last time I implemented a crypto algorithm was for RSA on a low-end STM32 back in the mid 2000’s. I really enjoyed getting into the guts of the algorithm and stretching my understanding of the underlying mathematical primitives. So, I decided to indulge my urge to tinker, and make a custom hardware accelerator for Curve25519 using Litex/Migen and Rust bindings.

What the Heck Is $\mathbf{{F}}_{{{{2^{{255}}}}-19}}$?

I wanted the accelerator primitive to plug directly into the Rust Dalek Cryptography crates, so that I would be as light-fingered as possible with respect to changes that could lead to fatal flaws in the broader cryptosystem. I built some simple benchmarks and profiled where the most time was being spent doing a double-ratchet using the Dalek Crypto crates, and the vast majority of the time for a DH key exchange was burned in the Montgomery Multiply operation. I won’t pretend to understand all the fancy math-terms, but people smarter than me call it a “scalar multiply”, and it actually consists of thousands of “regular” multiplies on 255-bit numbers, with modular reductions in the prime field $\mathbf{{F}}_{{{{2^{{255}}}}-19}}$, among other things.

Wait, what? So many articles and journals I read on the topic just talk about prime fields, modular reduction and blah blah blah like it’s asking someone to buy milk and eggs at the grocery store. It was a real struggle to try and make sense of all the tricks used to do a modular multiply, much less to say even elliptic curve point transformations.

Well, that’s the point of trying to implement it myself — by building an engine, maybe you won’t understand all the hydrodynamic nuances around fuel injection, but you’ll at least gain an appreciation for what a fuel injector is. Likewise, I can’t say I deeply understand the number theory, but from what I can tell multiplication in $\mathbf{{F}}_{{{{2^{{255}}}}-19}}$ is basically the same as a “regular 255-bit multiply” except you do a modulo (you know, the `%` operator) against the number $2^{{255}}-19$ when you’re done. There’s a dense paper by Daniel J. Bernstein, the inventor of Curve25519, which I tried to read several times. One fact I gleaned is part of the brilliance of Curve25519 is that arithmetic modulo $2^{{255}}-19$ is quite close to regular binary arithmetic except you just need to special-case 19 outcomes out of $2^{{255}}$. Also, I learned that the prime modulus, $2^{{255}}-19$, is where the “25519” comes from in the name of the algorithm (I know, I know, I’m slow!).

After a whole lot more research I stumbled on a paper by Furkan Turan and Ingrid Verbauwhede that broke down the algorithm into terms I could better understand. Attempts to reach out to them to get a copy of the source code was, of course, fruitless. It’s a weird thing about academics — they like to write papers and “share ideas”, but it’s very hard to get source code from them. I guess that’s yet another reason why I never made it in academia — I hate writing papers, but I like sharing source code. Anyways, the key insight from their paper is that you can break a 255-bit multiply down into operations on smaller, 17-bit units called “limbs” — get it? digits are your fingers, limbs (like your arms) hold multiple digits. These 17-bit limbs map neatly into 15 Xilinx 7-Series DSP48E block (which has a fast 27×18-bit multiplier): 17 * 15 = 255. Using this trick we can decompose multiplication in $\mathbf{{F}}_{{{{2^{{255}}}}-19}}$ into the following steps:

  1. Schoolbook multiplication with 17-bit “limbs”
  2. Collapse partial sums
  3. Propagate carries
  4. Is the sum $\geq$ $2^{{255}}-19$?
  5. If yes, add 19; else add 0
  6. Propagate carries again, in case the addition by 19 causes overflows

The multiplier would run about 30% faster if step (6) were skipped. This step happens in a fairly small minority of cases, maybe a fraction of 1%, and the worst-case carry propagate through every 17-bit limb is diminishingly rare. The test for whether or not to propagate carries is fairly straightforward. However, short-circuiting the carry propagate step based upon the properties of the data creates a timing side-channel. Therefore, we prefer a slower but safer implementation, even if we are spending a bunch of cycles propagating zeros most of the time.

Buckle up, because I’m about to go through each step in the algorithm in a lot of detail. One motivation of the exercise was to try to understand the math a bit better, after all!

TL;DR: Magic Numbers

If you’re skimming this article, you’ll see the numbers “19” and “17” come up over and over again. Here’s a quick TL;DR:

  • 19 is the tiny amount subtracted from $2^{{255}}$ to arrive at a prime number which is the largest number allowed in Curve25519. Overflowing this number causes things to wrap back to 0. Powers of 2 map efficiently onto binary hardware, and thus this representation is quite nice for hardware people like me.
  • 17 is a number of bits that conveniently divides 255, and fits into a single DSP hardware primitive (DSP48E) that is available on the target device (Xilinx 7-series FPGA) that we’re using in this post. Thus the name of the game is to split up this 255-bit number into 17-bit chunks (called “limbs”).

Schoolbook Multiplication

The first step in the algorithm is called “schoolbook multiplication”. It’s like the kind of multiplication you learned in elementary or primary school, where you write out the digits in two lines, multiply each digit in the top line by successive digits in the bottom line to create successively shifted partial sums that are then added to create the final result. Of course, there is a twist. Below is what actual schoolbook multiplication would be like, if you had a pair of numbers that were split into three “limbs”, denoted as A[2:0] and B[2:0]. Recall that a limb is not necessarily a single bit; in our case a limb is 17 bits.

                   |    A2        A1       A0
    x              |    B2        B1       B0
   ------------------------------------------
                   | A2*B0     A1*B0    A0*B0
            A2*B1  | A1*B1     A0*B1
   A2*B2    A1*B2  | A0*B2
     (overflow)         (not overflowing)

The result of schoolbook multiplication is a result that potentially has 2x the number of limbs than the either multiplicand.

Mapping the overflow back into the prime field (e.g. wrapping the overflow around) is a process called reduction. It turns out that for a prime field like $\mathbf{{F}}_{{{{2^{{255}}}}-19}}$, reduction works out to taking the limbs that extend beyond the base number of limbs in the field, shifting them right by the number of limbs, multiplying it by 19, and adding it back in; and if the result isn’t a member of the field, add 19 one last time, and take the result as just the bottom 255 bits (ignore any carry overflow). If this seems magical to you, you’re not alone. I had to draw it out before I could understand it.

This trick works because the form of the field is $2^{{n}}-p$: it is a power of 2, reduced by some small amount $p$. By starting from a power of 2, most of the binary numbers representable in an n-bit word are valid members of the field. The only ones that are not valid field members are the numbers that are equal to $2^{{n}}-p$ but less than $2^{{n}}-1$ (the biggest number that fits in n bits). To turn these invalid binary numbers into members of the field, you just need to add $p$, and the reduction is complete.


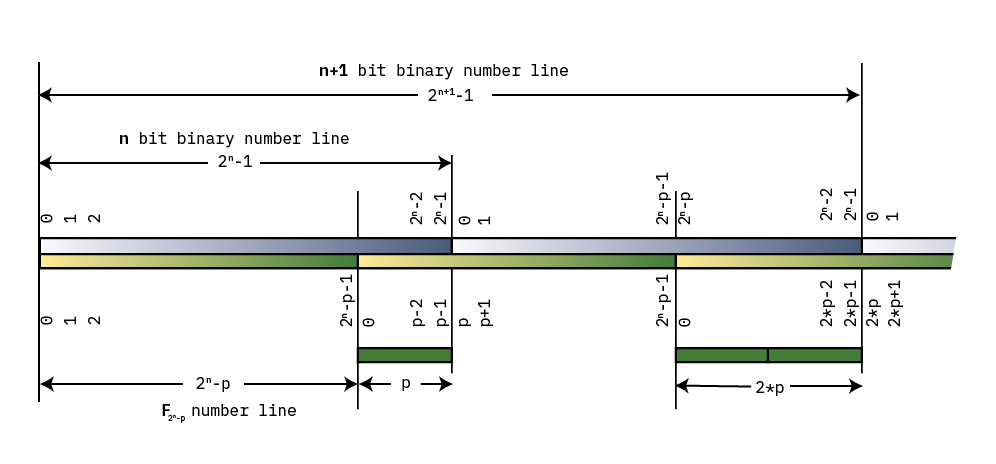
A diagram illustrating modular reduction

The diagram above draws out the number lines for both a simple binary number line, and for some field $\mathbf{{F}}_{{{{2^{{n}}}}-p}}$. Both lines start at 0 on the left, and increment until they roll over. The point at which $\mathbf{{F}}_{{{{2^{{n}}}}-p}}$ rolls over is a distance $p$ from the end of the binary number line: thus, we can observe that $2^{{n}}-1$ reduces to $p-1$. Adding 1 results in $2^{{n}}$, which reduces to $p$: that is, the top bit, wrapped around, and multiplied by $p$.

As we continue toward the right, the numbers continue to go up and wrap around, and for each wrap the distance between the “plain old binary” wrap point and the $\mathbf{{F}}_{{{{2^{{n}}}}-p}}$ wrap point increases by a factor of $p$, such that $2^{{n+1}}$ reduces to $2*p$. Thus modular reduction of natural binary numbers that are larger than our field $2^{{n}}-p$ consists of taking the bits that overflow an $n$-bit representation, shifting them to the right by $n$, and multiplying by $p$.

In order to convince myself this is true, I tried out a more computationally tractable example than $\mathbf{{F}}_{{{{2^{{255}}}}-19}}$: the prime field $\mathbf{{F}}_{{{{2^{{6}}}}-5}} = 59$. The members of the field are from 0-58, and reduction is done by taking any number modulo 59. Thus, the number 59 reduces to 0; 60 reduces to 1; 61 reduces to 2, and so forth, until we get to 64, which reduces to 5 — the value of the overflowed bits (1) times $p$.

Let’s look at some more examples. First, recall that the biggest member of the field, 58, in binary is 0b00_11_1010.

Let’s consider a simple case where we are presented a partial sum that overflows the field by one bit, say, the number 0b01_11_0000, which is decimal 112. In this case, we take the overflowed bit, shift it to the right, multiply by 5:

0b01_11_0000
   ^ move this bit to the right multiply by 0b101 (5)

0b00_11_0000 + 0b101 = 0b00_11_0101 = 53

And we can confirm using a calculator that 112 % 59 = 53. Now let’s overflow by yet another bit, say, the number 0b11_11_0000. Let’s try the math again:

0b11_11_0000
   ^ move to the right and multiply by 0b101: 0b101 * 0b11 = 0b1111

0b00_11_0000 + 0b1111 = 0b00_11_1111

This result is still not a member of the field, as the maximum value is 0b0011_1010. In this case, we need to add the number 5 once again to resolve this “special-case” overflow where we have a binary number that fits in $n$ bits but is in that sliver between $2^{{n}}-p$ and $2^{{n}}-1$:

0b00_11_1111 + 0b101 = 0b01_00_0100

At this step, we can discard the MSB overflow, and the result is 0b0100 = 4; and we can check with a calculator that 240 % 59 = 4.

Therefore, when doing schoolbook multiplication, the partial products that start to overflow to the left can be brought back around to the right hand side, after multiplying by $p$, in this case, the number 19. This magical property is one of the reasons why $\mathbf{{F}}_{{{{2^{{255}}}}-19}}$ is quite amenable to math on binary machines.

Let’s use this finding to rewrite the straight schoolbook multiplication form from above, but now with the modular reduction applied to the partial sums, so it all wraps around into this compact form:

                   |    A2        A1       A0
    x              |    B2        B1       B0
   ------------------------------------------
                   | A2*B0     A1*B0    A0*B0
                   | A1*B1     A0*B1 19*A2*B1
                 + | A0*B2  19*A2*B2 19*A1*B2
                 ----------------------------
                        S2        S1       S0

As discussed above, each overflowed limb is wrapped around and multiplied by 19, creating a number of partial sums S[2:0] that now has as many terms as there are limbs, but with each partial sum still potentially overflowing the native width of the limb. Thus, the inputs to a limb are 17 bits wide, but we retain precision up to 48 bits during the partial sum stage, and then do a subsequent condensation of partial sums to reduce things back down to 17 bits again. The condensation is done in the next three steps, “collapse partial sums”, “propagate carries”, and finally “normalize”.

However, before moving on to those sections, there is an additional trick we need to apply for an efficient implementation of this multiplication step in hardware.

In order to minimize the amount of data movement, we observe that for each row, the “B” values are shared between all the multipliers, and the “A” values are constant along the diagonals. Thus we can avoid re-loading the “A” values every cycle by shifting the partial sums diagonally through the computation, allowing the “A” values to be loaded as “A” and “A*19” into holding register once before the computations starts, and selecting between the two options based on the step number during the computation.


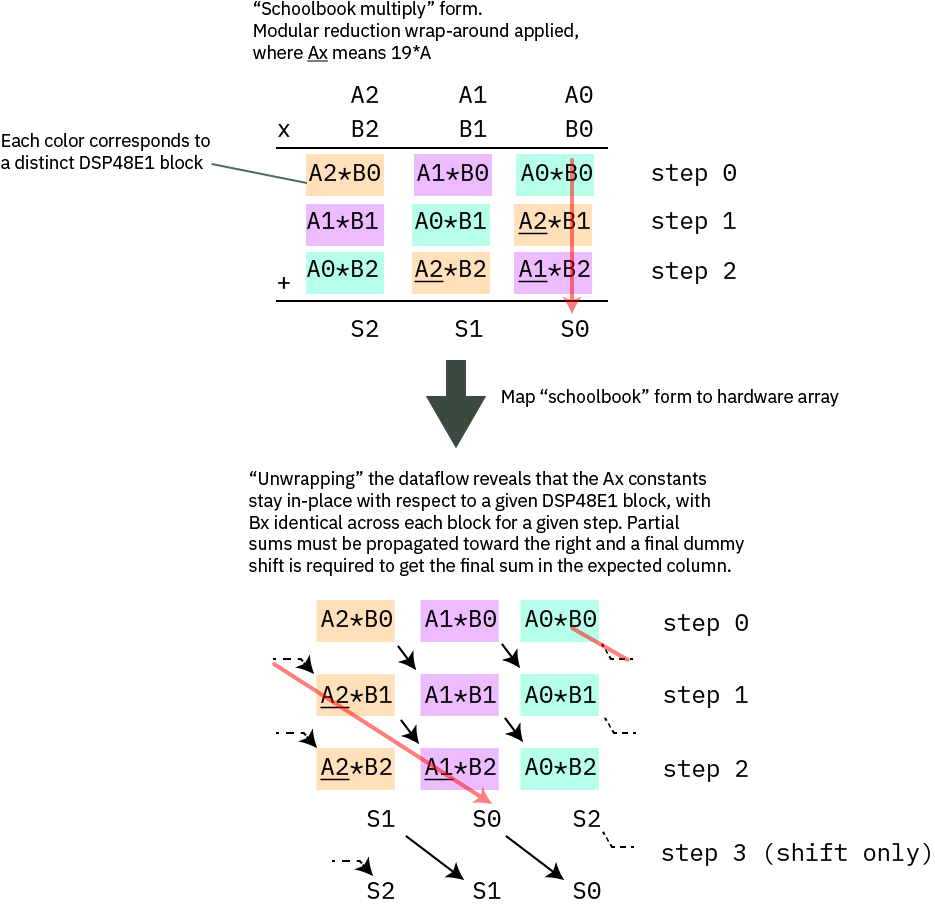
Mapping schoolbook multiply onto the hardware array to minimize data movement

The diagram above illustrates how the schoolbook multiply is mapped onto the hardware array. The top diagram is an exact redrawing of the previous text box, where the partial sums that would extend to the left have been multiplied by 19 and wrapped around. Each colored block corresponds to a given DSP48E1 block, which you may recall is a fast 27×18 multiplier hardware primitive built into our Xilinx FPGAs. The red arrow illustrates the path of a partial sum in both the schoolbook form and the unwrapped form for hardware implementation. In the bottom diagram, one can clearly see that the Ax coefficients are constant for each column, and that for each row, the Bx values are identical across all blocks in each step. Thus each column corresponds to a single DSP48E1 block. We take advantage of the ability of the DSP48E1 block to hold two selectable A values to pre-load Ax and Ax*19 before the computation starts, and we bus together the Bx values and change them in sequence with each round. The partial sums are then routed to the “down and right” to complete the mapping. The final result is one cycle shifted from the canonical mapping.

We have a one-cycle structural pipeline delay going from this step to the next one, so we use this pipeline delay to do a shift with no add by setting the `opmode` from `C+M` to `C+0` (in other words, instead of adding to the current multiplication output for the last step, we squash that input and set it to 0).

The fact that we pipeline the data also gives us an opportunity to pick up the upper limb of the partial sum collapse “for free” by copying it into the “D” register of the DSP48E1 during the shift step.

In C, the equivalent code basically looks like this:

   // initialize the a_bar set of data
   for( int i = 0; i < DSP17_ARRAY_LEN; i++ ) {
      a_bar_dsp[i] = a_dsp[i] * 19;
   }
   operand p;
   for( int i = 0; i < DSP17_ARRAY_LEN; i++ ) {
      p[i] = 0;
   }

   // core multiply
   for( int col = 0; col < 15; col++ ) {
     for( int row = 0; row < 15; row++ ) {
       if( row >= col ) {
         p[row] += a_dsp[row-col] * b_dsp[col];
       } else {
         p[row] += a_bar_dsp[15+row-col] * b_dsp[col];
       }
     }
   }

By leveraging the special features of the DSP48E1 blocks, in hardware this loop completes in just 15 clock cycles.

Collapse Partial Sums

At this point, the potential width of the partial sum is up to 43 bits wide. This next step divides the partial sums up into 17-bit words, and then shifts the higher to the next limbs over, allowing them to collapse into a smaller sum that overflows less.

... P2[16:0]   P1[16:0]      P0[16:0]
... P1[33:17]  P0[33:17]     P14[33:17]*19
... P0[50:34]  P14[50:34]*19 P13[50:34]*19

Again, the magic number 19 shows up to allow sums which “wrapped around” to add back in. Note that in the timing diagram you will find below, we refer to the mid- and upper- words of the shifted partial sums as “Q” and “R” respectively, because the timing diagram lacks the width within a data bubble to write out the full notation: so `Q0,1` is P14[33:17] and `R0,2` is P13[50:34] for P0[16:0].

Here’s the C code equivalent for this operation:

     // the lowest limb has to handle two upper limbs wrapping around (Q/R)
     prop[0] = (p[0] & 0x1ffff) +
       (((p[14] * 1) >> 17) & 0x1ffff) * 19 +
       (((p[13] * 1) >> 34) & 0x1ffff) * 19;
     // the second lowest limb has to handle just one limb wrapping around (Q)
     prop[1] = (p[1] & 0x1ffff) +
       ((p[0] >> 17) & 0x1ffff) +
       (((p[14] * 1) >> 34) & 0x1ffff) * 19;
     // the rest are just shift-and-add without the modular wrap-around
     for(int bitslice = 2; bitslice < 15; bitslice += 1) {
         prop[bitslice] = (p[bitslice] & 0x1ffff) + ((p[bitslice - 1] >> 17) & 0x1ffff) + ((p[bitslice - 2] >> 34));
     }

This completes in 2 cycles after a one-cycle pipeline stall delay penalty to retrieve the partial sum result from the previous step.

Propagate Carries

The partial sums will generate carries, which need to be propagated down the chain. The C-code equivalent of this looks as follows:

   for(int i = 0; i < 15; i++) {
     if ( i+1 < 15 ) {
        prop[i+1] = (prop[i] >> 17) + prop[i+1];
        prop[i] = prop[i] & 0x1ffff;
     }
   }

The carry-propagate completes in 14 cycles. Carry-propagates are expensive!

Normalize

We’re almost there! Except that $0 \leq result \leq 2^{{256}}-1$, which is slightly larger than the range of $\mathbf{{F}}_{{{{2^{{255}}}}-19}}$.

Thus we need to check if number is somewhere in between 0x7ff….ffed and 0x7ff….ffff, or if the 256th bit will be set. In these cases, we need to add 19 to the result, so that the result is a member of the field $2^{{255}}-19$ (the 256th bit is dropped automatically when concatenating the fifteen 17-bit limbs together into the final 255-bit result).

We use another special feature of the DSP48E1 block to help accelerate the test for this case, so that it can complete in a single cycle without slowing down the machine. We use the “pattern detect” (PD) feature of the DSP48E1 to check for all “1’s” in bit positions 255-5, and a single LUT to compare the final 5 bits to check for numbers between {prime_string} and $2^{{255}}-1$. We then OR this result with the 256th bit.

If the result falls within this special “overflow” case, we add the number 19, otherwise, we add 0. Note that this add-by-19-or-0 step is implemented by pre-loading the number 19 into the A:B pipeline registers of the DSP4E1 block during the “propagate” stage. Selection of whether to add 19 or 0 relies on the fact that the DSP48E1 block has an input multiplexer to its internal adder that can pick data from multiple sources, including the ability to pick no source by loading the number 0. Thus the operation mode of the DSP48E1 is adjusted to either pull an input from A:B (that is, the number 19) or the number 0, based on the result of the overflow computation. Thus the PD feature is important in preventing this step from being rate-limiting. With the PD feature we only have to check an effective 16 intermediate results, instead of 256 raw bits, and then drive set the operation mode of the ALU.

With the help of the special DSP48E1 features, this operation completes in just a single cycle.

After adding the number 19, we have to once again propagate carries. Even if we add the number 0, we also have to “propagate carries” for constant-time operation, to avoid leaking information in the form of a timing side-channel. This is done by running the carry propagate operation described above a second time.

Once the second carry propagate is finished, we have the final result.

Potential corner case

There is a potential corner case where if the carry-propagated result going into “normalize” is between

0xFFFF_FFFF_FFFF_FFFF_FFFF_FFFF_FFFF_FFDA and
0xFFFF_FFFF_FFFF_FFFF_FFFF_FFFF_FFFF_FFEC

In this case, the top bit would be wrapped around, multiplied by 19, and added to the LSB, but the result would not be a member of $2^{{255}}-19$ (it would be one of the 19 numbers just short of $2^{{255}}-1$), and the multiplier would pass it on as if it were a valid result.

In some cases, this isn’t even a problem, because if the subsequent result goes through any operation that also includes a reduce operation, the result will still reduce correctly.

However, I do not think this corner case is possible, because the overflow path to set the high bit is from the top limb going from 0x1_FFFF -> 0x2_0000 (that is, 0x7FFFC -> 0x80000 when written MSB-aligned) due to a carry coming in from the lower limb, and it would require the carry to be very large, not just +1 as shown in the simple rollover case, but a value from 0x1_FFED-0x1_FFDB.

I don’t have a formal mathematical proof of this, but I strongly suspect that carry values going into the top limb cannot approach these large numbers, and therefore it is not possible to hit this corner case. Consider that the biggest value of a partial sum is 0x53_FFAC_0015 (0x1_FFFF * 0x1_FFFF * 15). This means the biggest value of the third overflowed 17-bit limb is 0x14. Therefore the biggest value resulting from the “collapse partial sums” stage is 0x1_FFFF + 0x1_FFFF + 0x14 = 0x4_0012. Thus the largest carry term that has to propagate is 0x4_0012 >> 17 = 2. 2 is much smaller than the amount required to trigger this condition, that is, a value in the range of 0x1_FFED-0x1_FFDB. Thus, perhaps this condition simply can’t happen? It’d be great to have a real mathematician comment if this is a real corner case…

Real Hardware

You can jump to the actual code that implements the above algorithm, but I prefer to think about implementations visually. Thus, I created this timing diagram that fully encapsulates all of the above steps, and the data movements between each part (click on the image for an editable, larger version; works best on desktop):

Block diagrams of the multiplier and even more detailed descriptions of its function can be found in our datasheet documentation. There’s actually a lot to talk about there, but the discussion rapidly veers into trade-offs on timing closure and coding technique, and farther away from the core topic of the Curve25519 algorithm itself.

Didn’t You Say We Needed Thousands of These…?

So, that was the modular multiply. We’re done right? Nope! This is just one core op in a sequence of thousands of these to do a scalar multiply. One potentially valid strategy could be to try to hang the modular multiplier off of a Wishbone bus peripheral and shove numbers at it, and come back and retrieve results some time later. However, the cost of pushing 256-bit numbers around is pretty high, and any gains from accelerating the multiply will quickly be lost in the overhead of marshaling data. After all, a recurring theme in modern computer architecture is that data movement is more expensive than the computation itself. Damn you, speed of light!

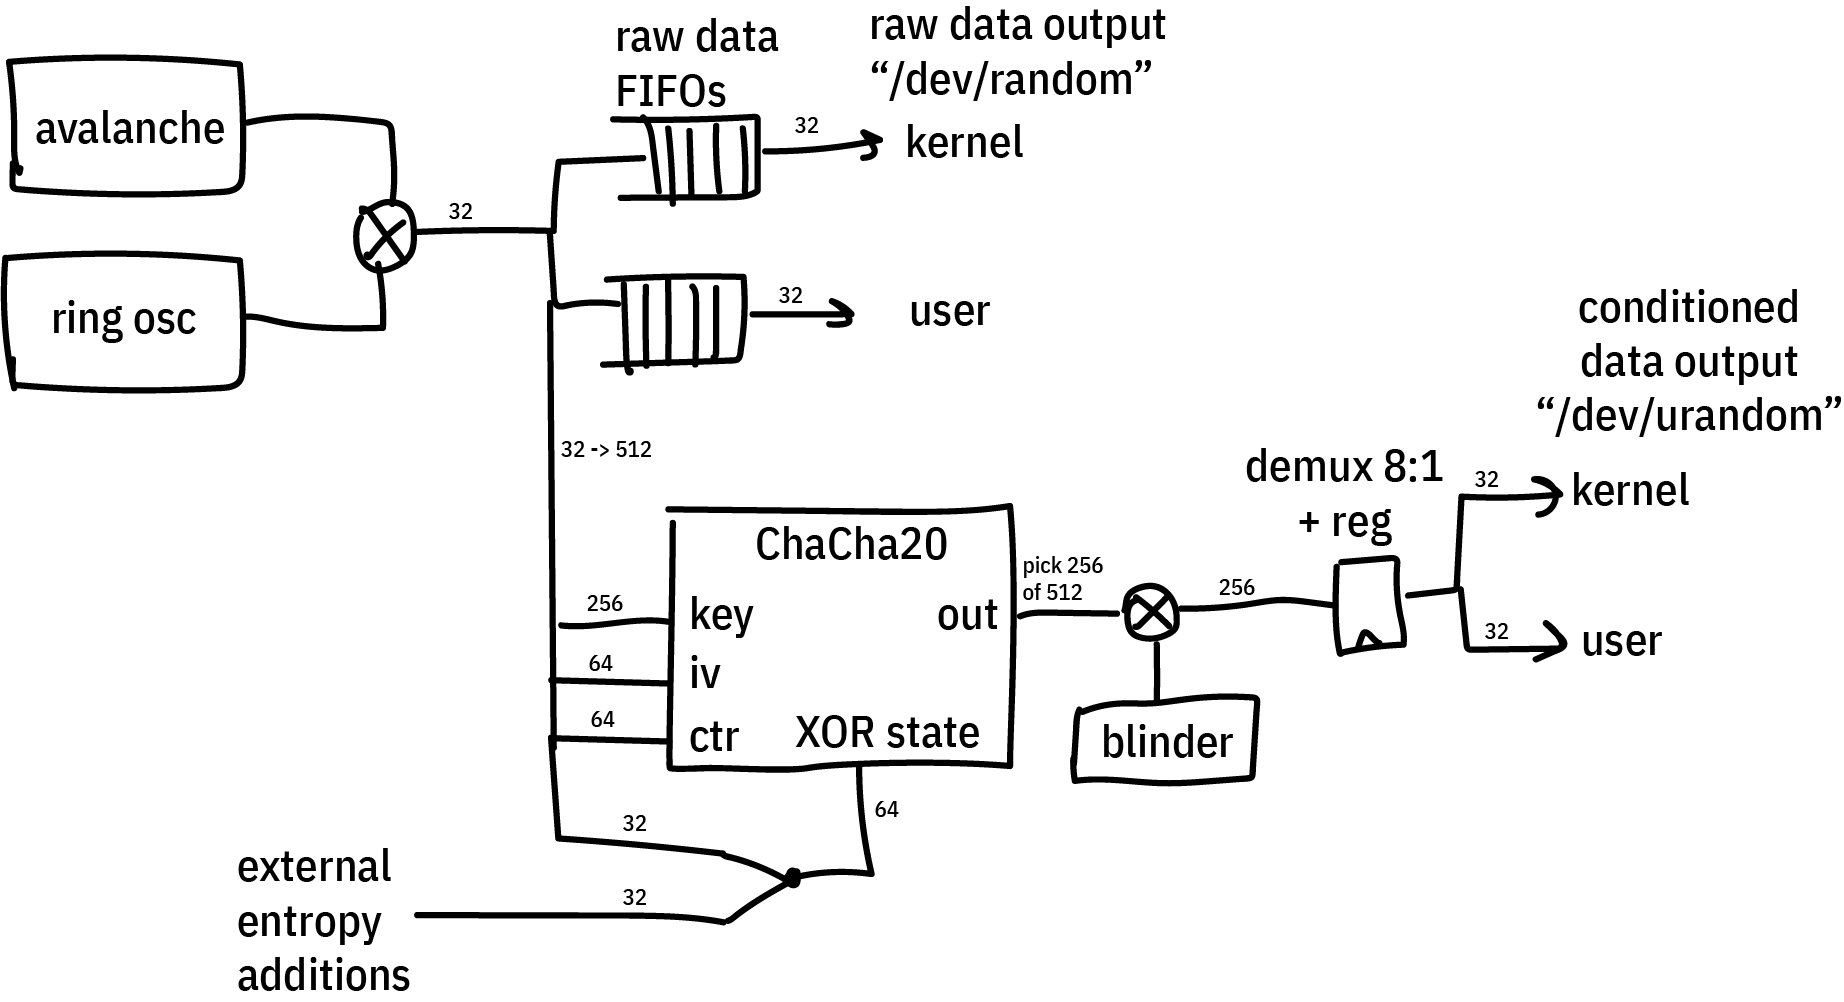
Thus, in order to achieve the performance I was hoping to get, I decided to wrap this inside a microcoded “CPU” of sorts. Really more of an “engine” than a car — if a RISC-V CPU is your every-day four-door sedan optimized for versatility and efficiency, the microcoded Curve25519 engine I created is more of a drag racer: a turbocharged engine block on wheels that’s designed to drive long flat stretches of road as fast as possible. While you could use this to drive your kids to school, you’ll have a hard time turning corners, and you’ll need to restart the engine after every red light.

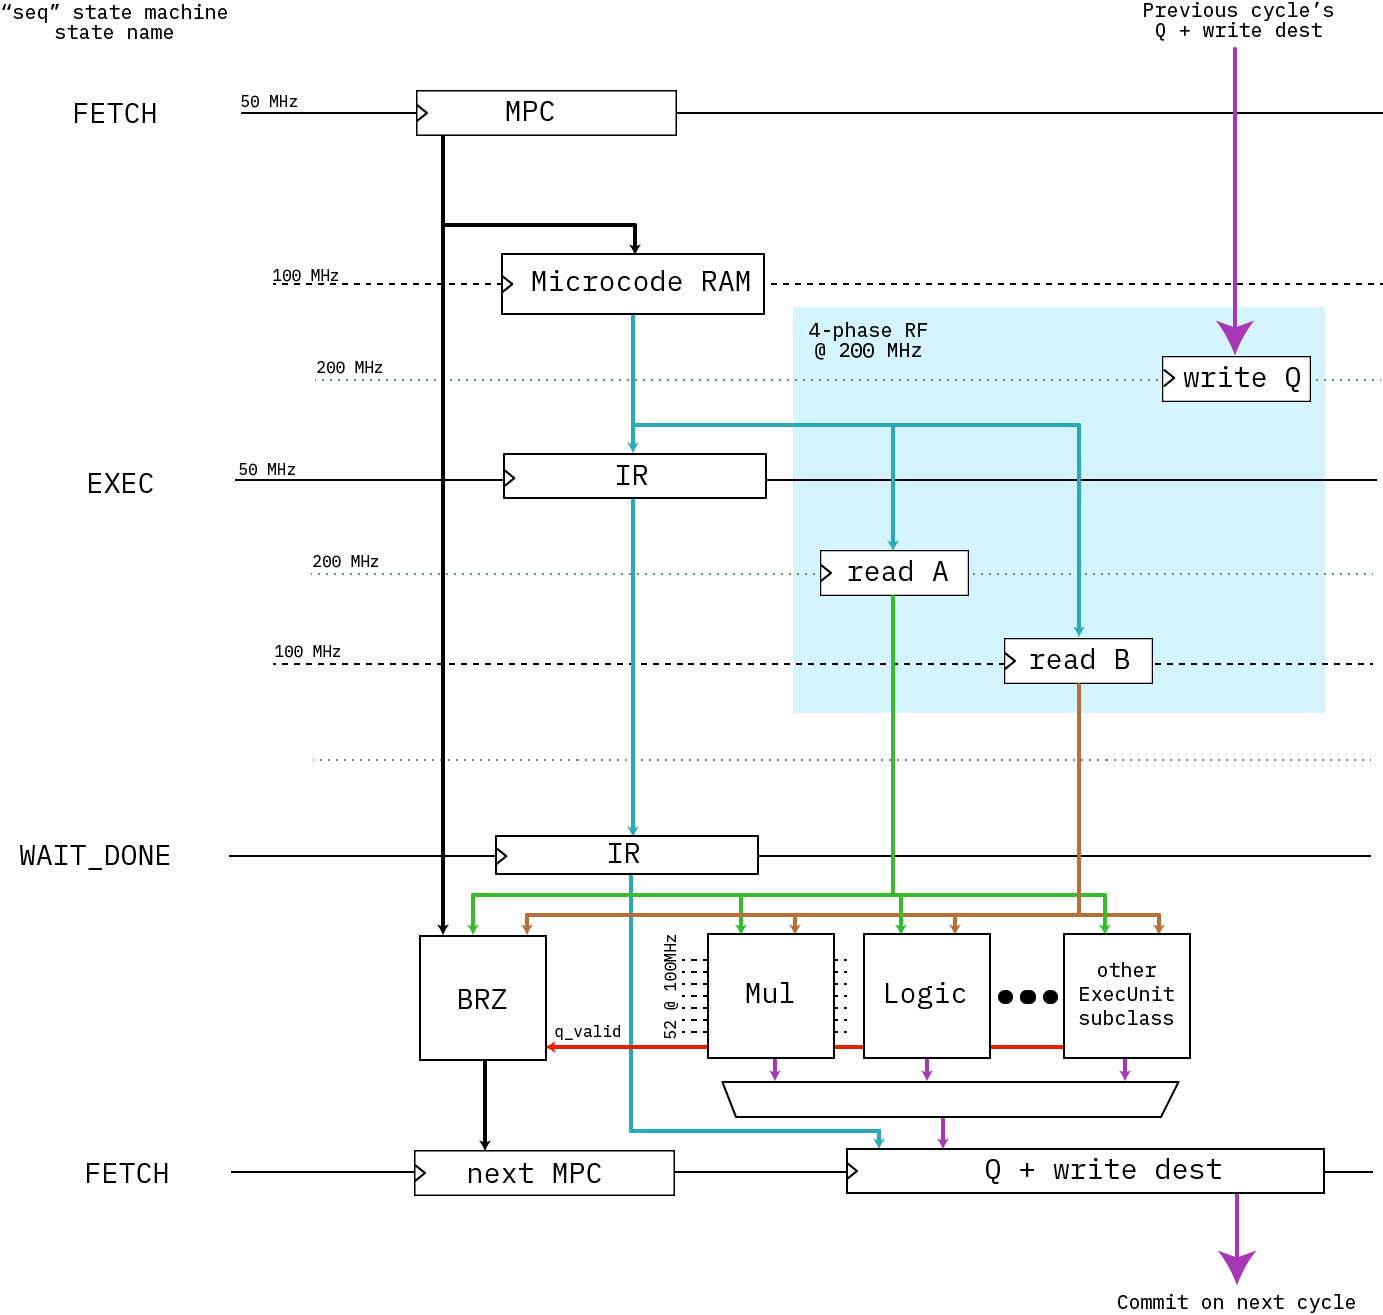
Above is a block diagram of the engine’s microcoded architecture. It’s a simple “three-stage” pipeline (FETCH/EXEC/RETIRE) that runs at 50MHz with no bypassing (that would be extremely expensive with 256-bit wide datapaths). I was originally hoping we could close timing at 100MHz, but our power-optimized -1L FPGA just wouldn’t have it; so the code sequencer runs at 50MHz; the core multiplier at 100MHz; and the register file uses four phases at 200MHz to access a simple RAM block to create a space-efficient virtual register file that runs at 50MHz.

The engine has just 13 opcodes:

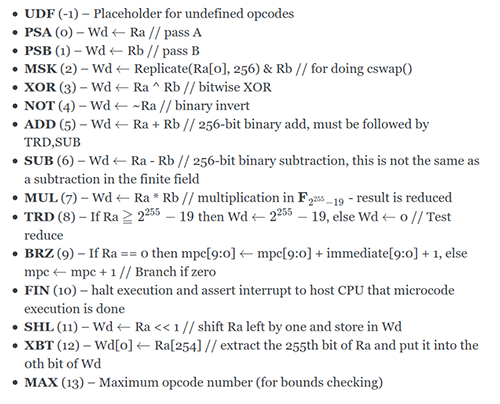
There’s no compiler for it; instead, we adapted the most complicated Rust macro I’ve ever seen from johnas-schievink’s rustasm6502 crate to create the abomination that is engine25519-as. Here’s a snippet of what the assembly code looks like, in-lined as a Rust macro:

let mcode = assemble_engine25519!(
start:
    // from FieldElement.invert()
    // let (t19, t3) = self.pow22501();   // t19: 249..0 ; t3: 3,1,0
    // let t0  = self.square();           // 1         e_0 = 2^1
    mul %0, %30, %30  // self is W, e.g. %30
    // let t1  = t0.square().square();    // 3         e_1 = 2^3
    mul %1, %0, %0
    mul %1, %1, %1
    // let t2  = self * &t1;              // 3,0       e_2 = 2^3 + 2^0
    mul %2, %30, %1
    // let t3  = &t0 * &t2;               // 3,1,0
    mul %3, %0, %2
    // let t4  = t3.square();             // 4,2,1
    mul %4, %3, %3
    // let t5  = &t2 * &t4;               // 4,3,2,1,0
    mul %5, %2, %4

    // let t6  = t5.pow2k(5);             // 9,8,7,6,5
    psa %28, #5       // coincidentally, constant #5 is the number 5
    mul %6, %5, %5
pow2k_5:
    sub %28, %28, #1  // %28 = %28 - 1
    brz pow2k_5_exit, %28
    mul %6, %6, %6
    brz pow2k_5, #0
pow2k_5_exit:
    // let t7  = &t6 * &t5;               // 9,8,7,6,5,4,3,2,1,0
    mul %7, %6, %5
);

The `mcode` variable is a [i32] fixed-length array, which is quite friendly to our `no_std` Rust environment that is Xous.

Fortunately, the coders of the curve25519-dalek crate did an amazing job, and the comments that surround their Rust code map directly onto our macro language, register numbers and all. So translating the entire scalar multiply inside the Montgomery structure was a fairly straightforward process, including the final affine transform.

How Well Does It Run?

The fully accelerated Montgomery multiply operation was integrated into a fork of the curve25519-dalek crate, and wrapped into some benchmarking primitives inside Xous, a small embedded operating system written by Xobs. A software-only implementation of curve25519 would take about 100ms per DH operation on a 100MHz RV32-IMAC CPU, while our hardware-accelerated version completes in about 6.7ms — about a 15x speedup. Significantly, the software-only operation does not incur the context-switch to the sandboxed hardware driver, whereas our benchmark includes the overhead of the syscall to set up and run the code; thus the actual engine itself runs a bit faster per-op than the benchmark might hint at. However, what I’m most interested in is in-application performance, and therefore I always include the overhead of swapping to the hardware driver context to give an apples-to-apples comparison of end-user application performance. More importantly, the CPU is free to do other things while the engine does it’s thing, such as servicing the network stack or updating the UX.

I think the curve25519 accelerator engine hit its goals — it strapped enough of a rocket on our little turtle of a CPU so that it’ll be able render a chat UX while doing double-ratchets as a background task. I also definitely learned more about the algorithm, although admittedly I still have a lot more to learn if I’m to say I truly understand elliptic curve cryptography. So far I’ve just shaken hands with the fuzzy monsters hiding inside the curve25519 closet; they seem like decent chaps — they’re not so scary, I just understand them poorly. A couple more interactions like this and we might even become friends. However, if I were to be honest, it probably wouldn’t be worth it to port the curve25519 accelerator engine from its current FPGA format to an ASIC form. Mask-defined silicon would run at least 5x faster, and if we needed the compute power, we’d probably find more overall system-level benefit from a second CPU core than a domain-specific accelerator (and hopefully by then the multi-core stuff in Litex will have sufficiently stabilized that it’d be a relatively low-risk proposition to throw a second CPU into a chip tape-out).

That being said, I learned a lot, and I hope that by sharing my experience, someone else will find Curve25519 a little more approachable, too!

Adding a ChaCha Cipher to Precursor’s TRNG

Tuesday, June 22nd, 2021

This is the second post of a two-part series on Betrusted/Precursor’s True Random Number Generator (TRNG).

A bulletproof source of random numbers is a key component of any cryptosystem, so we’ve done an extensive, months-long characterization of Precursor’s dual, redundant TRNG sources, which consists of an avalanche noise generator and a ring oscillator. We’ve found them to produce passable raw entropy, but you don’t have to take my word for it. You can download our raw data and run your on analysis on it if you like (at least until our ISP cuts us off for serving multiple 10GiB files filled with random data).

However, the system is still missing two features that are generally considered to be best practice:

  1. Independent, on-line health monitors of the raw TRNG outputs, discussed in our previous post.
  2. Conditioning of the raw data.

Because Precursor uses an FPGA for its SoC, we can add new features to the hardware “on the fly”, and in this post will focus on adding the hardware for the conditioning of raw data. The post is a bit of a slog to read through; I’ll try not to do too many in this style. But occasionally, I think it’s good to have a “reality check” that conveys the depth of difficulties encountered while implementing a feature, instead of making everything look easy or cramming all the details into a tweet. This post will hopefully also serve as a detailed reference for the handful of future developers who want to implement similar features, and would like to avoid some of the mistakes I’ve made.

Despite best efforts to make TRNGs unbiased and flawless, they are really hard to get right. Furthermore, they are only capable of producing high-quality entropy at a limited data rate. Thus, most practical systems take a TRNG output and run it through a cryptographic stream cipher to generate a final datastream; this conditioning of the raw data simultaneously protects against minor flaws in the TRNG while improving the availability of entropy.

So in Precursor, we’d like to add some conditioning on the collected entropy. To be clear, we will always make the raw entropy pool available for inspection — this is absolutely necessary for testing and CI coverage — but it’s a good idea to throw the output of your TRNG into a cryptographically sound stream cipher of some type, so that in the case that your TRNG suffers a sporadic drop-out, you don’t have a disastrous, instantaneous collapse of entropy. Depending on how you configure the conditioning, you can also increase the effective availability of random numbers.

After poking around a bit on the Internet, it seems popular to feed a seed of entropy into the ChaCha20 stream cipher (I refer to it as a “cipher” in this post, but I think more technically because of the way I’m using it, it should be referred to as a CSPRNG – Cryptographically Secure Pseudo Random Number Generator). This is done in the Linux kernel as well as by cryptech.is’s HSM and a few other implementations. The devil, of course, is always in the details. Cryptech.is takes the output of their TRNGs, hashes them with a SHA2 block, and then feeds it into a ChaCha20 stream cipher. Linux maintains an entropy pool that is collected from a variety of low-and-high-quality sources, blends them using some fast and slow techniques based upon the nature of the source, runs it through SHA1, and then into ChaCha20 to create the final stream.

In our implementation, we’re skipping the SHA pre-hash of the entropy pool, for the following reasons:

  1. We don’t have the space (as in FPGA gates) or computational resources (as in CPU cycles for software emulation) to do this continuously
  2. The raw entropy sources themselves are fairly high-quality (as opposed to in the case of Linux they are taking things like time stamps and network traffic patterns, so using SHA-1 to blind that is quite reasonable); and, we have two entropy sources of different architectures, each source consisting of multiple raw entropy generation elements. In other words, we’re starting from a pretty good place already.
  3. The ChaCha20 cipher is mainly to protect against transient drop-out or unpredicted aging issues in the TRNG.
  4. The ChaCha20 cipher itself is considered to be cryptographically secure; augmenting it with a SHA pre-hash does not seem to lend any clear benefit in our case.
  5. We will prefer to reseed the ChaCha20 cipher at a fairly high rate, rather than seed it occasionally through a more expensive SHA operation.

Also in reading some of the docs out there, it seem that 20 is the minimum number of rounds considered to be cryptographically secure for ChaCha, but “more rounds is better”. Thus, while tweaking the Secworks open-source Chacha implementation to fit in Precursor, I think I’ll also create an option to let the ChaCha rounds function run to at least a minimum number of rounds but otherwise “free run” when the system is idle. This makes it useless as a cipher, but if the power impact is minimal, this should help the diffusion of entropy across all the bits of the cipher and make it more robust against attempts to back-track its state.

The diagram above gives an “artist’s impression” of the architecture of the system. It’s an early sketch, before I fully understood everything going on. The final details came out a little different, but the big ideas are there. Not shown is logic that ensures the ChaCha20 cipher has completed its minimum amount of rounds between each output sample, and automatic re-seeding logic that pulls in 32 bits of entropy from the TRNGs on a regular basis at some re-seeding interval that can be programmed by software.

After installing the tooling necessary to build a Precursor/Betrusted SoC and run simulations, I started writing the code.

Here’s the general method I use to develop code:

  1. Think about what I’m trying to do. See above.
  2. Write the smaller submodules.
  3. Wrap the smaller modules into a simulation framework that shakes most of the skeletons out of the closet.
  4. Repeat 1-3, working your way up the chain until you arrive at your full solution.
  5. Write drivers for your new feature
  6. Slot your feature into the actual hardware
  7. Test in real hardware
  8. Continuously integrate, if possible, either by re-running your sim against every repo change or better yet recompiling and re-running your test on actual hardware.

The key to this loop is the simulation. The better your simulation, the better your outcome. By “better simulation”, I mean, the less assumptions and approximations made in the test bench. For example, one could simulate a module by hooking it up to a hand-rolled set of Verilog vectors that exercises a couple read and write cycles and verifies nothing explodes; or, one could simulate a module by hooking it up to a fully simulated CPU, complete with power-on reset and multiple clock phases, and using a Rust-based framework to exercise the same reads and writes. The two test benches ostensibly achieve the same outcome, but the latter checks much more of the hairy corner cases.

For Betrusted/Precursor, we developed a comprehensive simulation framework that achieves the latter scenario as much as possible. We simulate a full, gate-level VexRISCV CPU, running a Rust-built BIOS, employing as many of the Xilinx-provided hardware models as we can for things like the PLL and global power-on reset. You can make a new testbench by running the “new_sim.py” script in the `deps/gateware/sim` directory, and it will automatically copy over all the basics so you can just instantiate your core module and start running simulation code.

Another thing I learned perhaps too late was to pick a good IDE. Python sucks to develop. It sucks even more without an IDE. For a long time I was writing in vanilla emacs. The game-changer for me was being able to control-click through modules and find their definitions; most IDEs support this.

Writing The Block

I noted in Cryptech.is’s presentations that they were using a 24-round variant with a potential to go to 32; and even though cryptanalysis shows its solid with 20 rounds, perhaps there is still a potential that maybe some knowledge of the output could be used to infer something about the next set of outputs.

So, I still made a very light-fingered change, where the core round function could be advanced by one during idle periods based on a `force_round` input. In any case, the output of the ChaCha cipher is not used until at least 20 rounds in any case, but on average it will go many more rounds (thousands of rounds) before the output is used, and the number of rounds advanced depends upon the exact timing of the code that accesses the TRNG.

Thus, the overall flow of events for the conditioning block are as follows:

  1. On boot, we pull in 384 bits of “key” state (256 bits key + 64 bits iv + 64 bits nonce) from the TRNG, and then initialize the cipher.
  2. We also pull in 512 bits of “input” state. This is a fixed quantity that is XOR’d with the ChaCha block state. I worry that tying this to a fixed value could lead to leakage of the ChaCha state to the output, thus, on every boot we load in a new random input value.
  3. Once the cipher is initialized, a counter keeps track of how many blocks we’ve generated. Once we have passed a threshold, the conditioner automatically requests another 32-bit word of entropy from the TRNG and does a rotate-and-XOR of the data into the “key” state. The key state is re-incorporated on the next “advance” call of the block.
  4. Every “selfmix” interval, the cipher will also advance its rounds counter by one (this is the supplemental entropy/scrambling as noted previously)
  5. The user can also supply seeding data at any time, which is folded in with a rotate-and-XOR function. Note for every seed provided, it’s best practice to read 16 words of TRNG output, to ensure that the seed state is incorporated into the TRNG as a whole. It doesn’t harm things to not do that, just, if you kept on applying the same seed over and over again it’ll eventually just XOR into and out of the key pool without doing anything useful.
  6. The output of the cipher is latched into a 512-bit register, and `urandom` data outputs are multiplexed to the kernel and userspace through the CSR. A `valid` bit is provided, and it should be checked prior to every read of data from the Conditioned TRNG output.

Building, and Failing

So your code is all writ, now time to try a quick “smoke test” to see if the build fails. And, sure enough, even though the build completes, I’m not meeting timing. We’re using a -1L variant of the Spartan 7 part, which is the lowest power model (important for battery life) but also the slowest performer in the group. So, even though Cryptech.is advertised hitting 100MHz performance on the block, I did note they were using a -3 variant (one of the fastest models) of a fairly high-end Artix FPGA.

So, back to the drawing board — it’s time to drop the clock frequency on the core to 50MHz. This is probably fine from a performance standpoint, as it could still yield 1.6Gbps burst rate of random numbers, but it does introduce some potentially thorny issues with clock domain crossings. In particular, I don’t get to be lazy and just use a bunch of Migen’s BusSynchronizer primitives to bridge 512-bit data between domains. That would be…expensive, in terms of logic resources. Instead, I’m going to have to be careful and use multi-cycle paths with explicit timing exceptions to make sure this works and without consuming undue amounts of resources.

What — you mean you thought getting code to compile was the end of the story? In hardware, every flip flop is a race condition against a clock — just think of it that way. Every time you make a register, you now have a potential concurrency problem. Now scale that up to the tens of thousands of registers in an FPGA, and you get an idea of why correct compilation is only a small portion of the whole story.

Failing More, in Order to Get Better

After reducing the frequency of the core to 50MHz and fighting for a half day with the Vivado constraints syntax to convince it not to spend half an hour routing cross-clock-domain that are actually relaxed, I finally have the design building with timing closure. The next step is going back into the simulation bench and checking all the corner cases.

I modified the existing `trng_managed` simulation bench to add a series of tests that would exercise all the new features — including checking the rate of read, all the dual port options, and deliberately forcing some reads to fail by bypassing certain checks on validity of data to really push the engine to its limit. In the process of running these benches, I found more new corner cases, for example, the ChaCha engine would stall if the raw entropy FIFO ran out of seeding data; it would just wait for reboot of the avalanche+ring oscillator TRNGs, a process that can take milliseconds. This shouldn’t happen on the `urandom` engine — it is the “unlimited” random data engine after all, so some fixes were made to keep the block state evolving even if we ran out of seeding data. However, I have to emphasize this really is a corner case, you have to basically configure the system to constantly reseed and pull entropy out at a rate much higher than you can do anything useful with it to hit that limit. But, that’s the point of testing — to break your system before users do.

Rinse, Lather, Repeat

Now that the simulation runs, we repeat the loop and see how badly timing is broken. It turns out with all the tweaks in place, I’ve introduced an accidental critical path. While the design can meet timing with this, it takes almost 3x the time to build, which means we’re probably going to start failing builds pretty soon. I should probably fix this problem now, while the design details are fresh in my head.

I open up the design in the Vivado tools and have it plot a timing histogram for me, below is an example of the output:

Above: Example of a slack histogram generated by Vivado. Green bars toward the left indicate paths with less timing slack, to the right have more. So for example, the left-most bin has 206 paths with 0.041ns-0.227ns of slack. The more “left-heavy” the histogram is, the harder the design is to place & route, and the more likely the process will not complete with perfect timing closure.

The left-most bin are the most over-constrained elements, and I can see that the `trngmanaged_holding_buf` registers are just barely passing.

I generate a schematic view like this inside the Vivado design tool, and backtracing the inputs to the `holding_buf` registers I can see the signal eventually goes through an enormous combinational path that includes the VexRiscV’s address decoders. This means that we have a critical path that extends from inside the VexRiscV load/store unit all the way to the 512-bit shifter of the ChaCha block.

If it were the case that we actually needed to pull data cycle-by-cycle out of the ChaCha block and somehow change the behavior of the system within a single cycle, then this path would make sense. But in practice, the actual rate is far lower than that — the tightest, most unrolled read loops take at least 2 cycles to execute; but more typically 10-12 cycles per iteration if you’re doing any sort of useful load or store with the data and running it from a rolled-up loop. Furthermore, the ChaCha block is basically a “read-only” block — there’s nothing the CPU is going to do to reconfigure it on the fly that would prevent us from
pipelining this.

So, I go back and add a “depth 1 FIFO” to the output, to break the shift register out of the critical path while still preserving the read-invalidate semantics required by the CSR interface (that is, the contract we have with the CSR interface is the cycle after a random number is read, either the next value should be a valid, new random number; or it can be an invalid number, but the “valid” bit must be cleared that very cycle). Using a simple pipeline register won’t work, because it introduces an extra cycle delay on the read-invalidate semantics and it’s possible, although very unlikely, that a code loop could have back-to-back loads and it will grab a stale “valid” state.

After running another simulation just to make sure we haven’t introduced any new bugs, I run a compilation again and hope this greatly relaxes the timing. It didn’t, but long story short, I had accidentally leaked one path in the FIFO through as a combinational element. After spending a couple hours tracing that issue out, I finally met with some success.

After applying these fixes, the compilation time is back down to its normal value, and we can see that the timing bins at the very far left of the histogram have a fraction of paths as before — 69, down from 206. It looks like the `holding_buf` register is still causing some troubles, but at least we’ve taken pressure off of the actually most difficult paths, which are inside the Curve 25519 Engine, and not some made-up timing emergencies inside the shift register at the output stage of the TRNG.

The price of all the timing fixes is increased resource utilization. Initial estimates showed about a 6% area cost for the ChaCha block without the timing fixes, but we ended up with around 10.5% area cost once all is said and done. The SoC uses around 68.2% of the FPGA now, which is still fine for routability and gives some space for a few more smaller blocks, but it’s probably at the upper limit of what we can reasonably expect to fit while having short (~8-9 minute) compilation cycles. I’m also making a mental note to myself that as part of the histogram analysis it looks like the next critical path to knock back is in the CSR address decoders. Adding the dozens of registers to read out the results from the TRNG health tests has probably forced an extra layer of LUTs to be instantiated inside the core arbitration logic; thus, pruning some of these registers if they end up being superfluous could be a way to win back some timing margin if I end up in a jam later.

Rubber, Meet Road. Road, Meet Rubber.

Well, that took some time in simulation. But we’re not done yet! It’s time to run this code on real hardware, and then upgrade the kernel and services of Xous to use it — and let’s not forget CI integration as well.

First things first, let’s just take the design, as-is, with no mods to Xous and see if it boots, and what the power draw change is. The good news is that things boot, and the system draws about 5 mA extra, or about 5% more idle power than it did before. The ChaCha whitener is in the always-on domain, because it has to be able to run while the kernel is idling to produce random data. In particular, the core can “wake up” the avalanche generator and ring oscillators while the CPU is idle to summon more TRNG data even when the CPU is asleep; as such its clock can’t be gated off, but it is better than the alternative of running the CPU to manage these processes. A quick test tweaking the knobs on the duty cycle of the self-mixing for the ChaCha core shows it doesn’t have a measurable impact on the power, which means that probably most of the extra power is just the fixed cost of clocking that much more logic on the fabric.

The next step is to switch over the kernel and core services from using raw random numbers to the new ChaCha conditioned “urandom” source. This should have been easy in theory since everything worked in simulation, but of course — it didn’t work. I was greeted with a full system hang on the first go. This kind of bug is dreaded, because it’s some issue in the full system integration that exists outside of the testbenches, so you have to resort to long compile cycles and “printf” debugging.

Some further poking revealed that even worse yet, on some boots, the system worked, on others, it didn’t. However, the pattern was enough for me to suspect an issue in the reset logic. Going back into my code, I did find a subtle bug where I forgot to assign the reset line for the ChaCha core to the 50MHz clock domain (it was still tied to the reset for the 100MHz clock domain). For good measure, I also added a reset pulse extender, just to make sure it saw a long, solid reset. The polarity of the ChaCha core reset is opposite from what the rest of the system uses, so it’s also possible there is some glitches due to that. Anyways, after another four hours of tweaking and testing these fixes, re-running simulations, and cross-checking documentation about the reset process to really make sure we found a root cause, the system seems to come up as expected from the “urandom” source.

For TRNGs, The Work is Never Done

The final phase of modifying any TRNG is continuous integration. This is extremely important because you can only get a hint if a TRNG is mis-behaving in subtle ways after collecting dozens of gigabytes of data from it over dozens of runs; and due to the limited rate of entropy, gathering such quantity of data can take weeks. Thus, we have a Precursor unit dedicated to doing nothing but rotating through its entropy sources and feeding its data into a set of test suites to try and uncover any subtle biases in the generators. You can browse the raw data and results of our CI bench here.

Now that we have this conditioned output, we need to integrate that into the test bench. It’s also going to be important to do a few “cold boot with recorded data” runs as well, so we can compare boot-to-boot to make sure that we have actually seeded the generator with random data and we’re not just accidentally running a ChaCha cipher (which should have excellent statistical randomness) with a fixed set of keys (which would have an identical stream boot-to-boot despite the excellent statistics).

In the process of re-integrating these tests into the CI bench, I discovered a number of problems with our original tool for shuttling random numbers to the host for analysis. For a number of reasons, the original CI tool relied on a fairly complicated Rust program with multiple threads, which was getting hard to maintain and the Rust wasn’t adding a lot of value; in fact I found a subtle integration bug that was causing all the tests for the past month to be run only on the ring oscillator!

Since we had a pretty decent Python script for doing USB updates over USB, I modified that into a script currently living in xous-core/tools/trng_test.py. This script is matched to a thread that runs inside the `trng` server on the Xous side when it is built with one of the TRNG tester options. On the Precursor side, a pair of 512kiB buffers are filled and the host is told which of the two to read from. The host-side Python script then reads the buffers and echos its contents out as binary data to stdout, which can then by piped into an analysis program (such as `dieharder`) or recorded to disk for later analysis. This whole mess is then wrapped in some other shell-script Frankenstein that’s fired off by a cron job which manages the rebuild, reflashing, and logging of data via a Raspberry Pi that can keep an eye on the serial console for errors during the CI process. It feels like a house made of playing cards, but it works!

Closing Thoughts

If you made it this far, congratulations. Hopefully it conveys, with some accuracy, the range of difficulties one might encounter when implementing a “typical” feature like this for an FPGA-based SoC, and it may even be useful to the handful of developers who want to actually attempt something like this!

What’s the Value of Hackable Hardware, Anyway?

Friday, December 11th, 2020

There is plenty of skepticism around the value of hackable products. Significantly, hackability is different from openness: cars are closed-source, yet support vibrant modding communities; gcc is one of the “real OG”s of open source, but few users find it easy to extend or enhance. Is it better to have a garden planted by the most knowledgeable botanists and maintained by experienced gardeners, or an open plot of land maintained by whoever has the interest and time?


Above left: Walled garden of Edzell Castle; above right: Thorncliffe Park community garden.

In the case of hardware products, consumer behavior consistently affirms a strong preference for well-curated gardens. Hardware is hard – not only is it difficult to design and validate, supply chains benefit from economies of scale and predictable user demand. The larger a captive audience, the more up-front money one can invest into developing a better hardware product. However, every decision to optimize comes with inherent trade-offs. For example, anytime symmetry is broken, one must optimize for either a right-handed or a left-handed version.


Above: touching the spot indicated by the red arrow would degrade antenna performance on an iPhone 4. This spot would naturally rest on the palm of a left-handed user. Image adapted from “iPhone 4” by marc.flores, licensed under CC BY 2.0.

Some may recall a decade ago when the iPhone 4 was launched, left-handed people noticed the phone would frequently drop calls. It turned out the iPhone 4 was designed with a critical antenna element that would fail when held naturally by a left-handed person. The late Steve Jobs responded to this problem by telling users to “just avoid holding it that way”. Even if he didn’t mean it, I couldn’t help but feel like he was saying the iPhone 4 was perfect and left-handers like me were just defective humans who should be sent to re-education camps on how to hold things.

Of course, as a hardware engineer, I can also sympathize with why Steve Jobs might have felt this way – clearly, a huge amount of effort and thought went into designing a technical masterpiece that was also of museum-quality construction. It’s frustrating to be told, after spending years and billions of dollars trying to build “the perfect product” that they somehow got it wrong because humans aren’t a homogeneous population. Rumors have it Apple spent tens of millions of dollars building micron-precision production jigs out of injection-molding grade tooling to ensure the iPhone4 was simply perfect in terms of production tolerances; duplicating all of those to make a mirror-image version for left-handers that make up 10% of the market size just made no business sense. It proved to be cheaper and easier, ultimately, to take full refunds or to give out rubber bumpers to the users who requested them.

I do think there is such a thing as “over-designing” a product. For example, contemporary “high concept” smartphone design is minimalist – phone companies have removed headphone jacks, hidden the front camera, and removed physical buttons. There is clearly no place for screws in this world; the love affair of smartphones and adhesives has proven to be … sticky. Adhesives, used in place of screws in modern smartphones, are so aggressive that removing them either requires additional equipment, such as a hot plate and solvents, or simply destroying the outer bezel by breaking the outer case off in pieces and replacing it with an entirely new bezel upon re-assembly. In other words, hacking a modern smartphone necessarily implies the destruction or damage of adhesive-bound parts.

With Precursor, I’m bringing screws back.

Precursor’s screws are unapologetic – I make no attempt to hide them or cover them with bits of tape or rubber inserts. Instead, I’ve sourced custom-made Torx T3 metric screws with a black oxide finish that compliments the overall color scheme of Precursor. Six of them line the front, as a direct invitation for users to remove them and see what’s inside. I’ve already received ample criticism for the decision to show screws as “primitive”, “ugly”, “out of touch with modern trends” — but in the end, I feel the visual clutter of these six screws is a small price to pay for the gain in hackability.

Of course, the anti-screw critics question the value of hackability. Surely, I am sacrificing mass-market appeal to enable a fringe market; if hackability was so important, wouldn’t Apple and Google already have incorporated it into their phones? Wouldn’t we see more good examples of hackability already?

This line of questioning is circular: you can’t get good examples of hacks until you have made hackable products wide-spread. However, the critics are correct, in a way: in order to bootstrap an ecosystem, we’re going to need some good examples of why hackability matters.

In the run-up to crowdfunding Precursor, I was contemplating a good demo hack for Precursor. Fortuitously, a fellow named Matt Campbell opened a GitHub issue requesting a text-to-speech option for blind users. This led me to ask what might be helpful in terms of a physical keyboard design to assist blind people. You can read the thread for yourself, but I’ll highlight that even the blind community itself is divided on whether or not there is such a thing as the “blind ghetto” — an epithet applied by some users who feel that blindness-specific products tend to lag behind modern smartphones, tablets, and laptops. However, given that most modern gadgets struggle to consider the needs of 10% of the population that’s left-handed, I’m readily sympathetic to the notion that gadgets make little to no concession to accommodate the even smaller number of blind users.

Matt was articulate in specifying his preferred design for a pocketable keyboard. He referred me to the “Braille ‘n Speak” (shown above) as an example of an existing braille keyboard. Basically, it takes the six dots that make up braille, and lines them up horizontally into three left and three right sets of buttons, adding a single button in the middle that functions as a space bar. Characters are entered by typing chords that correspond to the patterns of the six dots in the braille alphabet. Not being a braille user myself, I had to look up what the alphabet looked like. I made the guide below based on a snippet from Wikipedia to better understand how such a keyboard might be used.

Ironically, even though Matt had linked me to the picture of the Braille n’ Speak, it still took a while to sink in that a braille variant of Precursor did not need a display. I’m a bit ashamed to admit my first sketches involved trying to cram this set of switches into the existing keyboard area of the Precursor, without first removing the display entirely. I had to overcome my own prejudice about how the world should look and it took me time and empathy to understand this new perspective.

Once I had a better grasp of Matt’s request, I set about designing a customized braille variant. Precursor was designed for this style of hacking: the keyboard is a simple 2-layer PCB that’s cheap and easy to re-design, and the front bezel is also a PCB, which is a bit more expensive to redesign. Fortunately, I was able to amortize setup costs by bundling the braille front bezel variant with another variant that I had to fabricate anyways for the crowdfunding campaign. Beyond that, I also had to come up with some custom key caps to complement the switches.

The major challenge in designing any type of mobile-friendly keyboard is always a trade-off between the hand feel of the switches, versus thinness of the overall design. On one side of the spectrum, full-travel mechanical switches have a wonderful hand feel, but are thicker than a sausage. On the other side of the spectrum, dome switches and printed carbon ink patterns are thinner than a credit card, but can feel mushy and have a limited “sweet spot” — the region of a key switch with optimal tactile feedback and operational force curves. The generally well-regarded Thinkpad keyboards go with a middle-ground solution that’s a few millimeters thick, using a “scissor” mechanism to stabilize the key caps over a silicone dome switch, giving individual keys a bit of travel while ensuring that the “sweet spot” covers the entire key cap. Optimizing key switch mechanisms is hard: some may recall the controversy over Apple’s re-design of the MacBook’s keyboard to use a “butterfly” mechanism, which shaved a couple mm of thickness, but led to lawsuits over a defect where the keyboard allegedly stopped working when small bits of dust or other particles got trapped under it.

Given the short time frame and a shoestring budget, I decided to use an ultra-thin (0.35mm) tactile switch that I could buy off-the-shelf from Digikey and create custom key caps with small dimples to assist users in finding the relatively small sweet spots typical of such switches. I have sincere hopes this is a pretty good final solution; while it lacks a scissor mechanism to spread off-centered force, the simple mechanism meant I didn’t have to stick with a square key cap and could do something more comfortable and ergonomic to focus forces into the sweet spot. At the very least, the mechanism would be no worse than the current mechanism used in Precursor’s existing keyboard for sighted users, which is similarly a dome switch plus a hybrid-polymer key film.

Next, I had to figure out where to place the switches. To assist with this, I printed a 1:1 scale version of the Precursor case, dipped my fingertips in ink, and proceeded to tap on the printout in what felt like a natural fashion.

I then took the resulting ink spots and dimensioned their centers, to place the centroid of each key cap. I also asked my partner, who has smaller hands, to place her fingers over the spots and noted the differences in where her fingers lay to help shape the final key caps for different-sized hands.

Next, using the “master profile” discussed in the previous post on Precursor’s mechanical design, I translated this into a sketch to help create a set of key caps based on splines that matched the natural angle of fingers.

Above, you can see an early sketch of the key caps, showing the initial shape with dimples for centering the fingers.

Before moving ahead and spending a few hundred dollars to build a functional prototype, I decided to get Matt’s feedback on the design. We submitted the design to Shapeways and had a 3D print sent to Matt, which he graciously paid for. After receiving the plastic dummy, his feedback was that the center space bar should be a single key, instead of two separate keys, so I merged the two separate key caps of the space bar together into a single piece, while retaining two separate switches wired in parallel under the space bar. I felt this was a reasonable compromise that would allow for a “sweet spot” that serviced lefties as well as righties.

I then re-designed the keyboard PCB, which was a fairly simple task, because the braille keyboard consists of only eight switches. I just had to be careful to pick row/column pairs that would not conflict during chording and be sure to include the row/column pairs necessary to turn Precursor on after being put to sleep. I also redesigned the bezel; eliminating the display actually makes manufacturing a little bit easier because it also removes a beveling step in the manufacturing process. I kept the RF antenna in exactly the same location, as its design was already well-characterized and it takes a lot of effort to tune the antenna. Finally, I decided to manufacture the key switches out of aluminum. The switches have a lot of fine features and I needed a stiff material that could translate off-target force to the key switches to enlarge the sweet spot as much as possible.


Above: The prototype of Precursor with braille keyboard.

About three weeks later, all the parts for the braille keyboard had arrived. I decided to use purple anodization for the key switches which, combined with the organic key shapes, gives the final design a bit of a Wakanda-esque “Black Panther” aesthetic, especially when mounted in a brass case. The key switch feel is about in line with what I imagined, with the caveat that one of the switches feels a little less nice than the rest, but I think that’s due to a bad solder job on the switch itself. I haven’t had a chance to trace it down because…well, I’ve had to write a bunch of posts like this to fund Precursor. I have also been working with Xobs to refactor Xous in hopes of putting together enough code to send Matt a prototype he can evaluate without having to write gobs of embedded hardware driver code himself.

Above is a quick photo showing the alignment of fingers to keys. Naturally, it’s perfect for my hand because it was designed around it. I’m looking forward to hearing Matt’s opinion about the feel of the keys.

Above is a photo of the custom parts for the braille keyboard. At the top, you can see the custom bezel with key caps and the RF antenna matching circuitry on the top right. On the bottom, you can see the custom keyboard PCB mounted onto a Precursor motherboard. The keyboard PCB is mostly blank and, because of the small number of keys and the flexibility of the FPGA, there’s an option to mount more peripherals on the PCB.

Despite not being yet finalized, I hope this exercise is sufficient to demonstrate the potential value of hackable products. The original design scope for Precursor (née Betrusted) did not explicitly include a braille keyboard option, but thanks to modular design principles and the use of accessible construction materials, I was able to produce a prototype in about a month that has a similar fit and finish as the mainstream product.

As long as humans choose to embrace diversity, I think hackability will have value. A notional “perfect” product implies there’s such a thing as a “perfect” user. However, in reality, even the simple conundrum of left- or right-handedness challenges the existence of a singular “perfect” product for all of humanity. Fortunately, accommodating the wonderfully diverse, quirky, and interesting range of humanity implicates just a few simple engineering principles, such as embracing screws over adhesives, openness, and modularity. That we can’t hack our products isn’t a limitation of physics and engineering. Precursor demonstrates one can build something simultaneously secure and hackable, while being compact and pocketable. This suggests the relative lack of hackable products on the market isn’t a fundamental limitation. Maybe we just need a little more imagination, maybe we need to be a little more open-minded about aesthetics, and maybe companies need to be willing to take brave steps toward openness and inclusivity.

For Apple, true “courage to move on and do something new that betters all of us” was to remove the headphone jack, which resulted in locking users deeper into a walled-garden ecosystem. For hackers like myself, our “courage” is facing blunt criticisms for making “ugly” products with screws in order to facilitate mods, such as braille keyboards, in order to expand the definition of “all of us” beyond a set of privileged, “perfect” users.

I hope this braille keyboard is just the first example of many mods for Precursor that adapt the product for unique end-users, bucking the trend of gaslighting users to mold their behavior and preferences to fit the product. If you’ve got an itch to develop your own yet-to-be-seen feature in a mobile device, please visit our crowdfunding campaign page to learn more about Precursor. We’re close to being funded, but we’ve only a few days left in the campaign. After the campaign concludes on December 15th, the limited edition will no longer be available, and pricing of the standard model goes up. If you like what you see, please consider helping us to bring Precursor to life!