Why Open Hardware on Its Own Doesn’t Solve the Trust Problem
A few years ago, Sean ‘xobs’ Cross and I built an open-source laptop, Novena, from the circuit boards up, and shared our designs with the world. I’m a strong proponent of open hardware, because sharing knowledge is sharing power. One thing we didn’t anticipate was how much the press wanted to frame our open hardware adventure as a more trustable computer. If anything, the process of building Novena made me acutely aware of how little we could trust anything. As we vetted each part for openness and documentation, it became clear that you can’t boot any modern computer without several closed-source firmware blobs running between power-on and the first instruction of your code. Critics on the Internet suggested we should have built our own CPU and SSD if we really wanted to make something we could trust.
I chewed on that suggestion quite a bit. I used to be in the chip business, so the idea of building an open-source SoC from the ground-up wasn’t so crazy. However, the more I thought about it, the more I realized that this, too was short-sighted. In the process of making chips, I’ve also edited masks for chips; chips are surprisingly malleable, even post tape-out. I’ve also spent a decade wrangling supply chains, dealing with fakes, shoddy workmanship, undisclosed part substitutions – there are so many opportunities and motivations to swap out “good” chips for “bad” ones. Even if a factory could push out a perfectly vetted computer, you’ve got couriers, customs officials, and warehouse workers who can tamper the machine before it reaches the user. Finally, with today’s highly integrated e-commerce systems, injecting malicious hardware into the supply chain can be as easy as buying a product, tampering with it, packaging it into its original box and returning it to the seller so that it can be passed on to an unsuspecting victim.
If you want to learn more about tampering with hardware, check out my presentation at Bluehat.il 2019.
Based on these experiences, I’ve concluded that open hardware is precisely as trustworthy as closed hardware. Which is to say, I have no inherent reason to trust either at all. While open hardware has the opportunity to empower users to innovate and embody a more correct and transparent design intent than closed hardware, at the end of the day any hardware of sufficient complexity is not practical to verify, whether open or closed. Even if we published the complete mask set for a modern billion-transistor CPU, this “source code” is meaningless without a practical method to verify an equivalence between the mask set and the chip in your possession down to a near-atomic level without simultaneously destroying the CPU.
So why, then, is it that we feel we can trust open source software more than closed source software? After all, the Linux kernel is pushing over 25 million lines of code, and its list of contributors include corporations not typically associated with words like “privacy” or “trust”.
The key, it turns out, is that software has a mechanism for the near-perfect transfer of trust, allowing users to delegate the hard task of auditing programs to experts, and having that effort be translated to the user’s own copy of the program with mathematical precision. Thanks to this, we don’t have to worry about the “supply chain” for our programs; we don’t have to trust the cloud to trust our software.
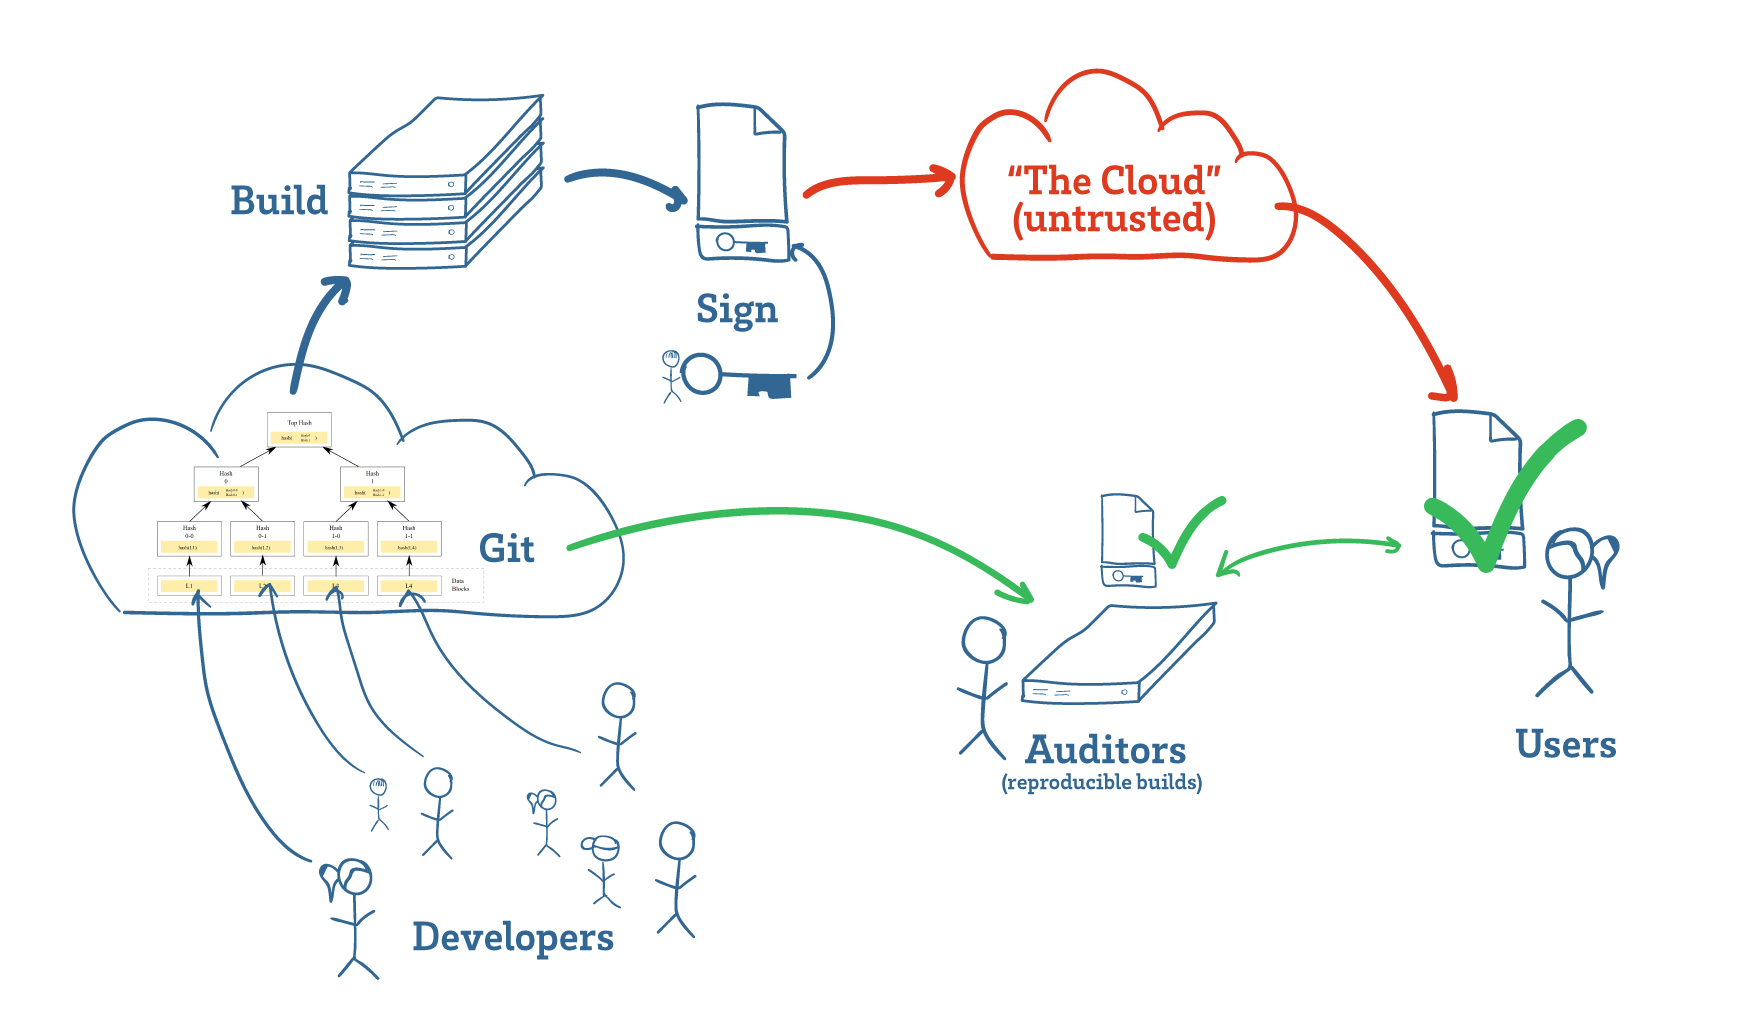
Software developers manage source code using tools such as Git (above, cloud on left), which use Merkle trees to track changes. These hash trees link code to their development history, making it difficult to surreptitiously insert malicious code after it has been reviewed. Builds are then hashed and signed (above, key in the middle-top), and projects that support reproducible builds enable any third-party auditor to download, build, and confirm (above, green check marks) that the program a user is downloading matches the intent of the developers.
There’s a lot going on in the previous paragraph, but the key take-away is that the trust transfer mechanism in software relies on a thing called a “hash”. If you already know what a hash is, you can skip the next paragraph; otherwise read on.
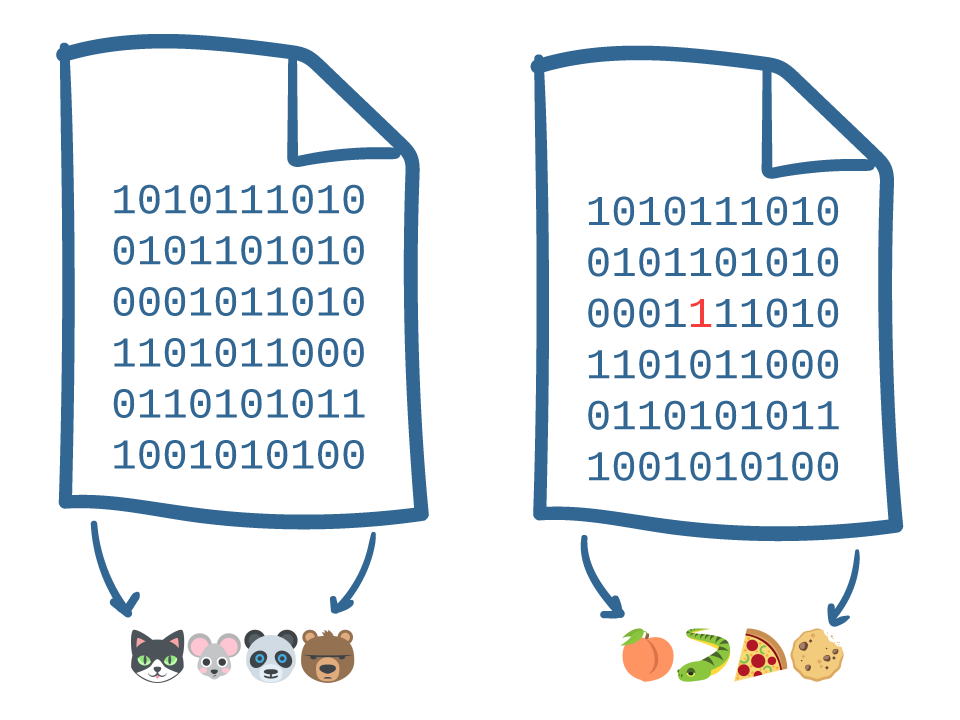
A hash turns an arbitrarily large file into a much shorter set of symbols: for example, the file on the left is turned into “cat-mouse-panda-bear”. These symbols have two important properties: even the tiniest change in the original file leads to an enormous change in the shorter set of symbols; and knowledge of the shorter set of symbols tells you virtually nothing about the original file. It’s the first property that really matters for the transfer of trust: basically, a hash is a quick and reliable way to identify small changes in large sets of data. As an example, the file on the right has one digit changed — can you find it? — but the hash has dramatically changed into “peach-snake-pizza-cookie”.
Because computer source code is also just a string of 1’s and 0’s, we can also use hash functions on computer source code, too. This allows us to quickly spot changes in code bases. When multiple developers work together, every contribution gets hashed with the previous contribution’s hashes, creating a tree of hashes. Any attempt to rewrite a contribution after it’s been committed to the tree is going to change the hash of everything from that point forward.
This is why we don’t have to review every one of the 25+ million lines of source inside the Linux kernel individually – we can trust a team of experts to review the code and sleep well knowing that their knowledge and expertise can be transferred into the exact copy of the program running on our very own computers, thanks to the power of hashing.
Because hashes are easy to compute, programs can be verified right before they are run. This is known as closing the “Time-of-Check vs Time-of-Use” (TOCTOU) gap. The smaller the gap between when the program is checked versus when it is run, the less opportunity there is for malicious actors to tamper with the code.
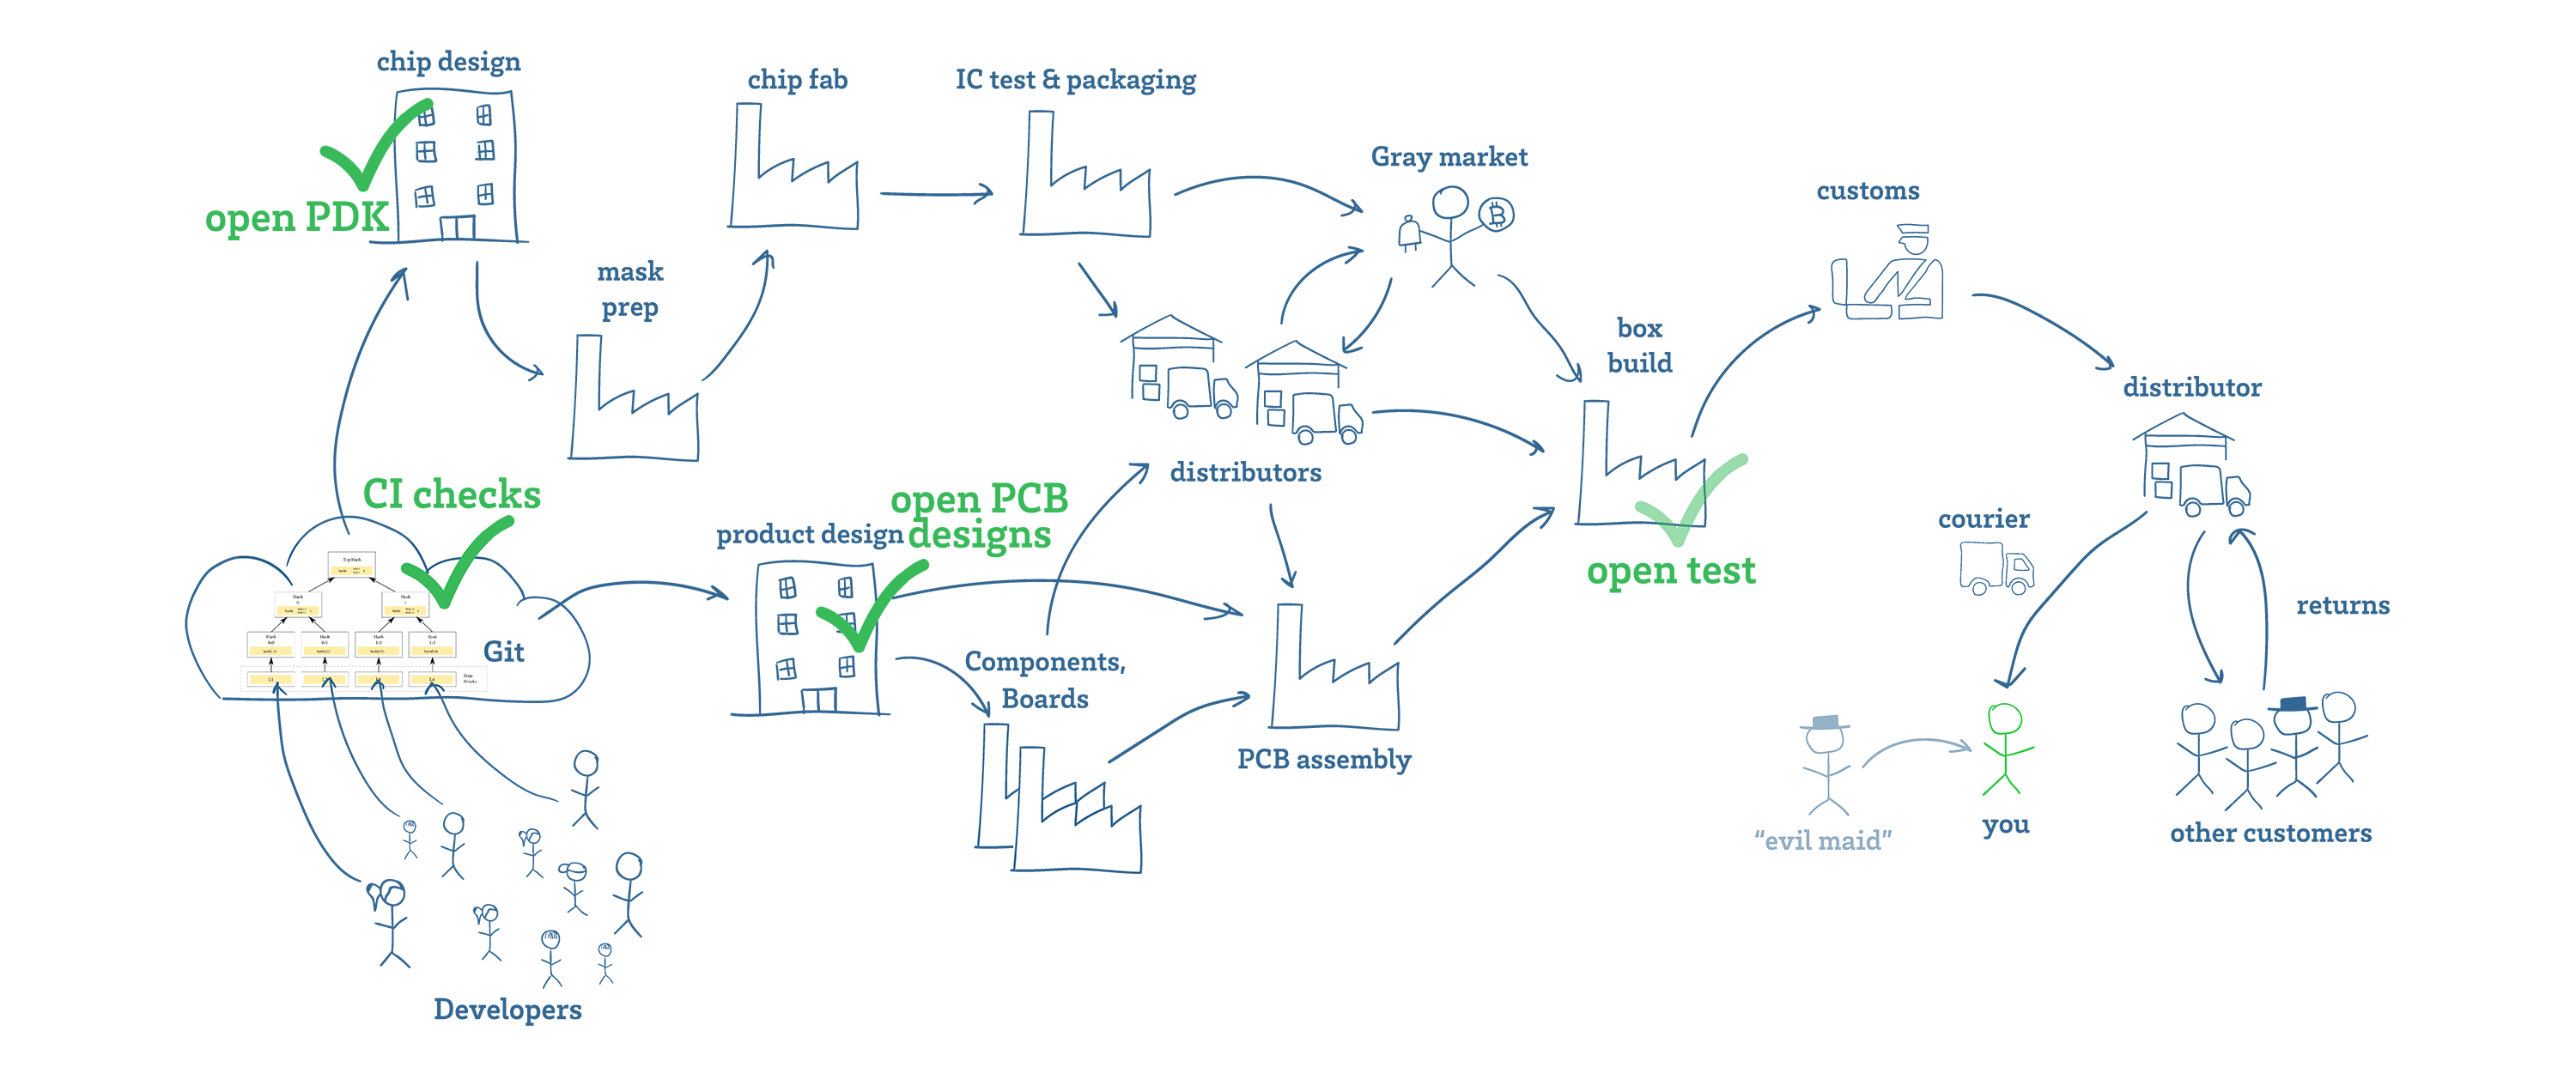
Now consider the analogous picture for open source in the context of hardware, shown above. If it looks complicated, that’s because it is: there are a lot of hands that touch your hardware before it gets to you!
Git can ensure that the original design files haven’t been tampered with, and openness can help ensure that a “best effort” has been made to build and test a device that is trustworthy. However, there are still numerous actors in the supply chain that can tamper with the hardware, and there is no “hardware hash function” that enables us to draw an equivalence between the intent of the developer, and the exact instance of hardware in any user’s possession. The best we can do to check a modern silicon chip is to destructively digest and delayer it for inspection in a SEM, or employ a building-sized microscope to perform ptychographic imaging.
It’s like the Heisenberg Uncertainty Principle, but for hardware: you can’t simultaneously be sure of a computer’s construction without disturbing its function. In other words, for hardware the time of check is decoupled from the time of use, creating opportunities for tampering by malicious actors.
Of course, we entirely rely upon hardware to faithfully compute the hashes and signatures necessary for the perfect trust transfer of trust in software. Tamper with the hardware, and all of a sudden all these clever maths are for naught: a malicious piece of hardware could forge the results of a hash computation, thus allowing bad code to appear identical to good code.
Three Principles for Building Trustable Hardware
So where does this leave us? Do we throw up our hands in despair? Is there any solution to the hardware verification problem?
I’ve pondered this problem for many years, and distilled my thoughts into three core principles:
1. Complexity is the enemy of verification. Without tools like hashes, Merkel trees and digital signatures to transfer trust between developers and users, we are left in a situation where we are reduced to relying on our own two eyes to assess the correct construction of our hardware. Using tools and apps to automate verification merely shifts the trust problem, as one can only trust the result of a verification tool if the tool itself can be verified. Thus, there is an exponential spiral in the cost and difficulty to verify a piece of hardware the further we drift from relying on our innate human senses. Ideally, the hardware is either trivially verifiable by a non-technical user, or with the technical help of a “trustable” acquaintance, e.g. someone within two degrees of separation in the social network.
2. Verify entire systems, not just components. Verifying the CPU does little good when the keyboard and display contain backdoors. Thus, our perimeter of verification must extend from the point of user interface all the way down to the silicon that carries out the secret computations. While open source secure chip efforts such as Keystone and OpenTitan are laudable and valuable elements of a trustable hardware ecosystem, they are ultimately insufficient by themselves for protecting a user’s private matters.
3. Empower end-users to verify and seal their hardware. Delegating verification and key generation to a central authority leaves users exposed to a wide range of supply chain attacks. Therefore, end users require sufficient documentation to verify that their hardware is correctly constructed. Once verified and provisioned with keys, the hardware also needs to be sealed, so that users do not need to conduct an exhaustive re-verification every time the device happens to leave their immediate person. In general, the better the seal, the longer the device may be left unattended without risk of secret material being physically extracted.
Unfortunately, the first and second principles conspire against everything we have come to expect of electronics and computers today. Since their inception, computer makers have been in an arms race to pack more features and more complexity into ever smaller packages. As a result, it is practically impossible to verify modern hardware, whether open or closed source. Instead, if trustworthiness is the top priority, one must pick a limited set of functions, and design the minimum viable verifiable product around that.
The Simplicity of Betrusted
In order to ground the conversation in something concrete, we (Sean ‘xobs’ Cross, Tom Mable, and I) have started a project called “Betrusted” that aims to translate these principles into a practically verifiable, and thus trustable, device. In line with the first principle, we simplify the device by limiting its function to secure text and voice chat, second-factor authentication, and the storage of digital currency.
This means Betrusted can’t browse the web; it has no “app store”; it won’t hail rides for you; and it can’t help you navigate a city. However, it will be able to keep your private conversations private, give you a solid second factor for authentication, and perhaps provide a safe spot to store digital currency.
In line with the second principle, we have curated a set of peripherals for Betrusted that extend the perimeter of trust to the user’s eyes and fingertips. This sets Betrusted apart from open source chip-only secure enclave projects.
Verifiable I/O
For example, the input surface for Betrusted is a physical keyboard. Physical keyboards have the benefit of being made of nothing but switches and wires, and are thus trivial to verify.
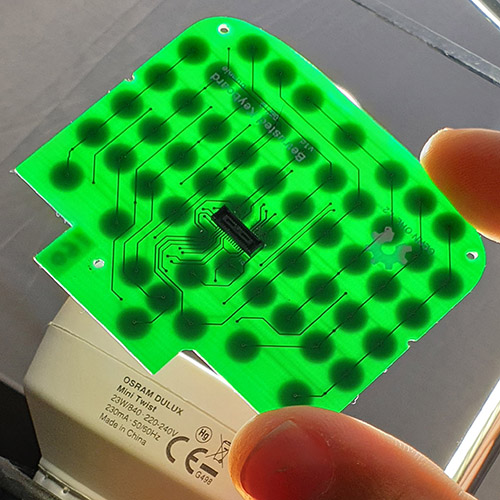
Betrusted’s keyboard is designed to be pulled out and inspected by simply holding it up to a light, and we support different languages by allowing users to change out the keyboard membrane.
The output surface for Betrusted is a black and white LCD with a high pixel density of 200ppi, approaching the performance of ePaper or print media, and is likely sufficient for most text chat, authentication, and banking applications. This display’s on-glass circuits are entirely constructed of transistors large enough to be 100% inspected using a bright light and a USB microscope. Below is an example of what one region of the display looks like through such a microscope at 50x magnification.
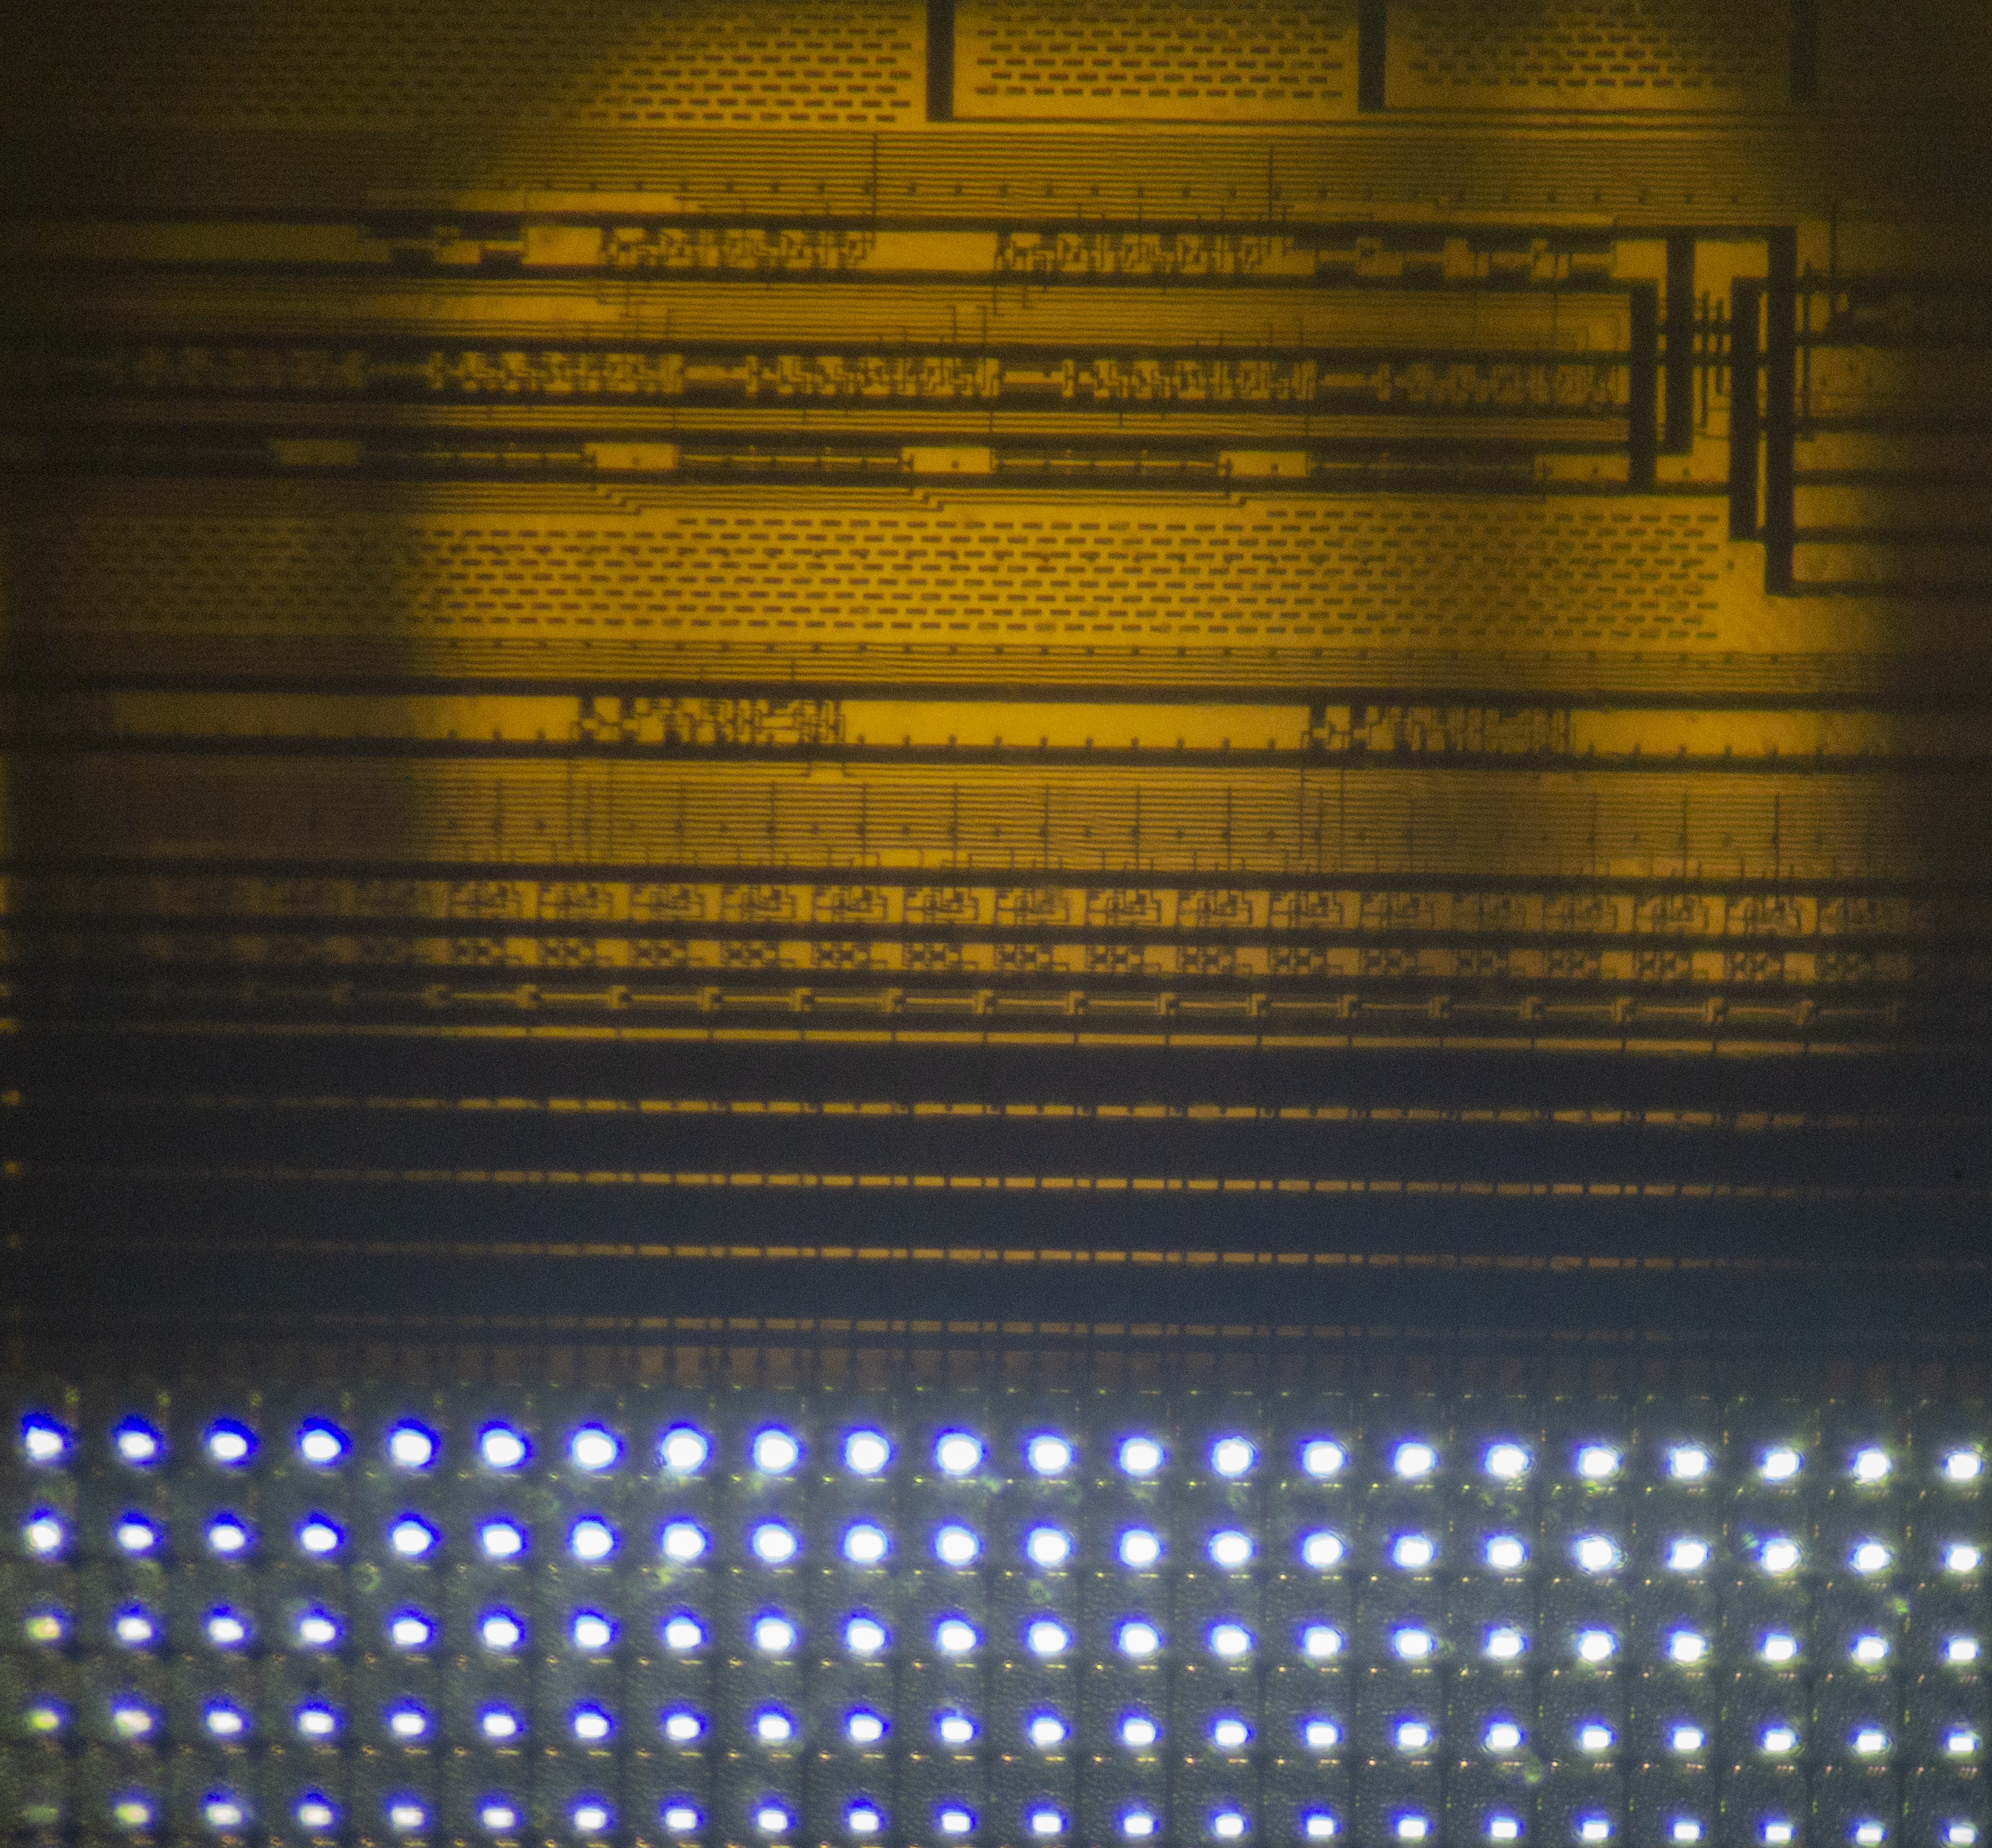
The meta-point about the simplicity of this display’s construction is that there are few places to hide effective back doors. This display is more trustable not just because we can observe every transistor; more importantly, we probably don’t have to, as there just aren’t enough transistors available to mount an attack.
Contrast this to the more sophisticated color displays, which rely on a fleck of silicon with millions of transistors implementing a frame buffer and command interface, and this controller chip is closed-source. Even if such a chip were open, verification would require a destructive method involving delayering and a SEM. Thus, the inspectability and simplicity of the LCD used in Betrusted is fairly unique in the world of displays.
Verifiable CPU
The CPU is, of course, the most problematic piece. I’ve put some thought into methods for the non-destructive inspection of chips. While it may be possible, I estimate it would cost tens of millions of dollars and a couple years to execute a proof of concept system. Unfortunately, funding such an effort would entail chasing venture capital, which would probably lead to a solution that’s closed-source. While this may be an opportunity to get rich selling services and licensing patented technology to governments and corporations, I am concerned that it may not effectively empower everyday people.
The TL;DR is that the near-term compromise solution is to use an FPGA. We rely on logic placement randomization to mitigate the threat of fixed silicon backdoors, and we rely on bitstream introspection to facilitate trust transfer from designers to user. If you don’t care about the technical details, skip to the next section.
The FPGA we plan to use for Betrusted’s CPU is the Spartan-7 FPGA from Xilinx’s “7-Series”, because its -1L model bests the Lattice ECP5 FPGA by a factor of 2-4x in power consumption. This is the difference between an “all-day” battery life for the Betrusted device, versus a “dead by noon” scenario. The downside of this approach is that the Spartan-7 FPGA is a closed source piece of silicon that currently relies on a proprietary compiler. However, there have been some compelling developments that help mitigate the threat of malicious implants or modifications within the silicon or FPGA toolchain. These are:
• The Symbiflow project is developing a F/OSS toolchain for 7-Series FPGA development, which may eventually eliminate any dependence upon opaque vendor toolchains to compile code for the devices.
• Prjxray is documenting the bitstream format for 7-Series FPGAs. The results of this work-in-progress indicate that even if we can’t understand exactly what every bit does, we can at least detect novel features being activated. That is, the activation of a previously undisclosed back door or feature of the FPGA would not go unnoticed.
• The placement of logic with an FPGA can be trivially randomized by incorporating a random seed in the source code. This means it is not practically useful for an adversary to backdoor a few logic cells within an FPGA. A broadly effective silicon-level attack on an FPGA would lead to gross size changes in the silicon die that can be readily quantified non-destructively through X-rays. The efficacy of this mitigation is analogous to ASLR: it’s not bulletproof, but it’s cheap to execute with a significant payout in complicating potential attacks.
The ability to inspect compiled bitstreams in particular brings the CPU problem back to a software-like situation, where we can effectively transfer elements of trust from designers to the hardware level using mathematical tools. Thus, while detailed verification of an FPGA’s construction at the transistor-level is impractical (but still probably easier than a general-purpose CPU due to its regular structure), the combination of the FPGA’s non-determinism in logic and routing placement, new tools that will enable bitstream inspection, and the prospect of 100% F/OSS solutions to compile designs significantly raises the bar for trust transfer and verification of an FPGA-based CPU.
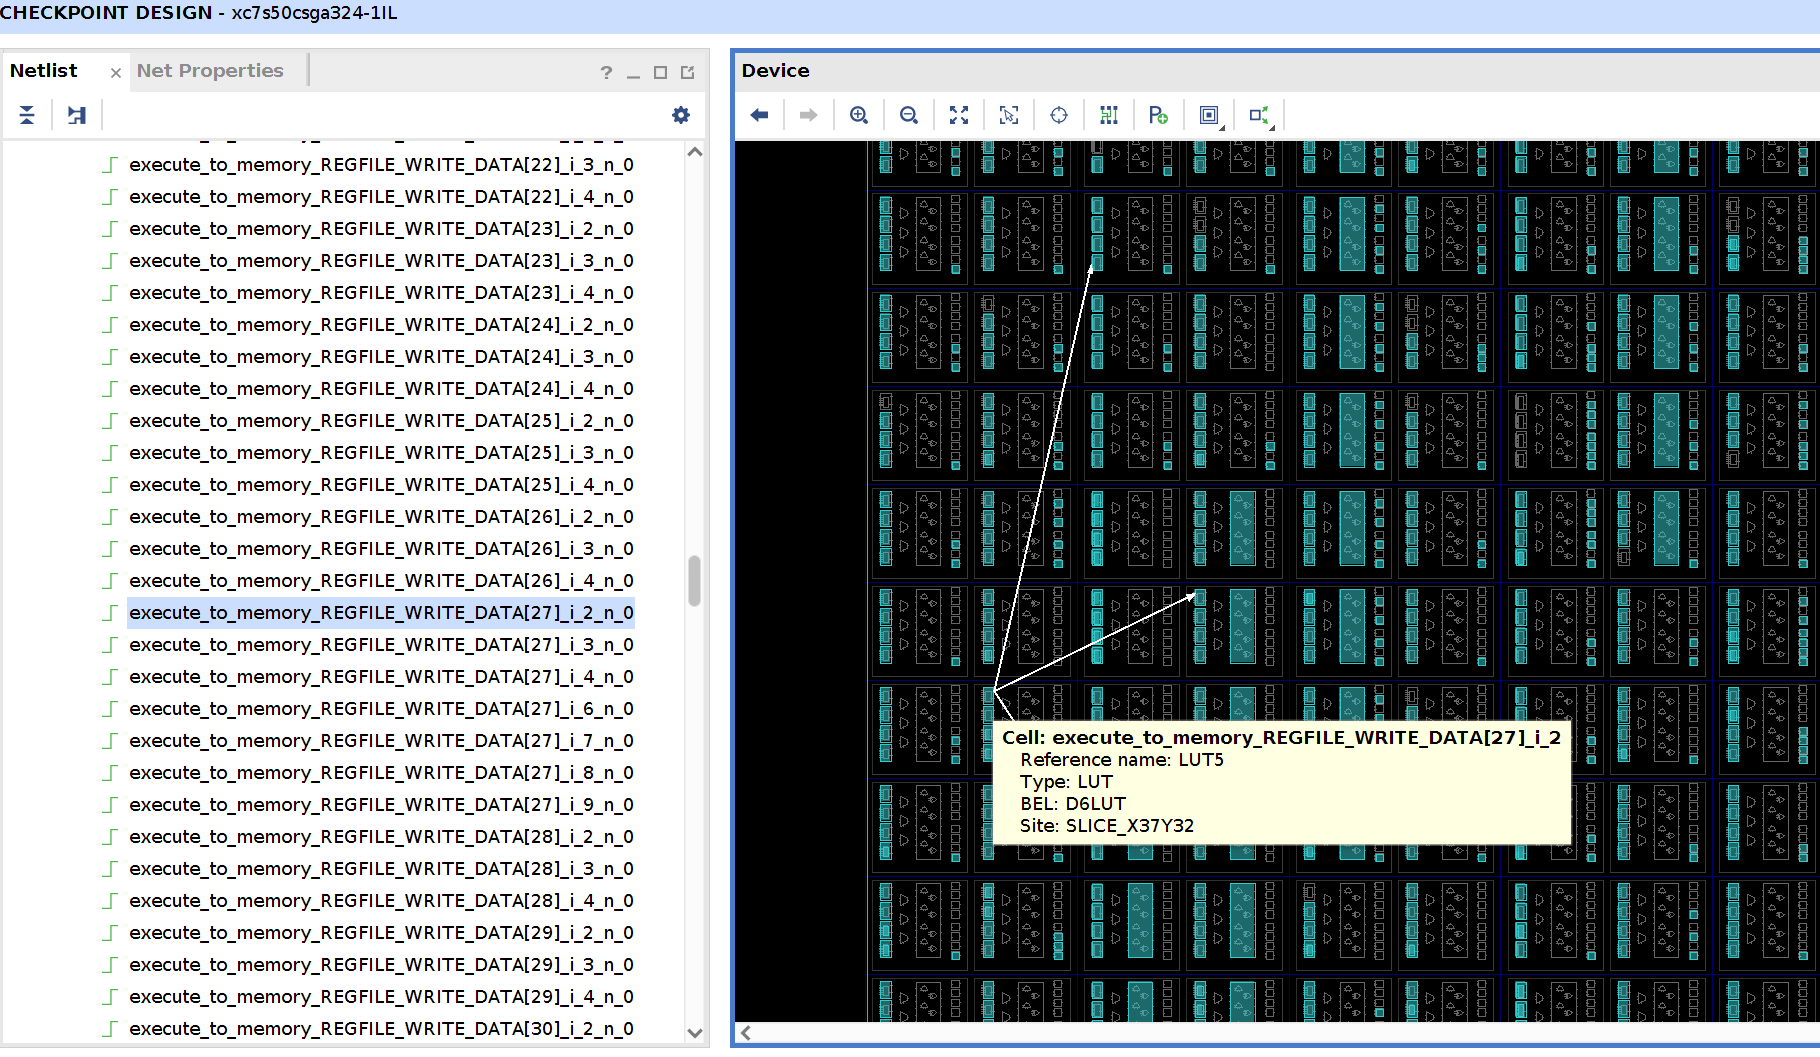
Above: a highlighted signal within an FPGA design tool, illustrating the notion that design intent can be correlated to hardware blocks within an FPGA.
One may argue that in fact, FPGAs may be the gold standard for verifiable and trustworthy hardware until a viable non-destructive method is developed for the verification of custom silicon. After all, even if the mask-level design for a chip is open sourced, how is one to divine that the chip in their possession faithfully implements every design feature?
The system described so far touches upon the first principle of simplicity, and the second principle of UI-to-silicon verification. It turns out that the 7-Series FPGA may also be able to meet the third principle, user-sealing of devices after inspection and acceptance.
Sealing Secrets within Betrusted
Transparency is great for verification, but users also need to be able to seal the hardware to protect their secrets. In an ideal work flow, users would:
1. Receive a Betrusted device
2. Confirm its correct construction through a combination of visual inspection and FPGA bitstream randomization and introspection, and
3. Provision their Betrusted device with secret keys and seal it.
Ideally, the keys are generated entirely within the Betrusted device itself, and once sealed it should be “difficult” for an adversary with direct physical possession of the device to extract or tamper with these keys.
We believe key generation and self-sealing should be achievable with a 7-series Xilinx device. This is made possible in part by leveraging the bitstream encryption features built into the FPGA hardware by Xilinx. At the time of writing, we are fairly close to understanding enough of the encryption formats and fuse burning mechanisms to provide a fully self-hosted, F/OSS solution for key generation and sealing.
As for how good the seal is, the answer is a bit technical. The TL;DR is that it should not be possible for someone to borrow a Betrusted device for a few hours and extract the keys, and any attempt to do so should leave the hardware permanently altered in obvious ways. The more nuanced answer is that the 7-series devices from Xilinx are quite popular, and have received extensive scrutiny over its lifetime by the broader security community. The best known attacks against the 256-bit CBC AES + SHA-256 HMAC used in these devices leverages hardware side channels to leak information between AES rounds. This attack requires unfettered access to the hardware and about 24 hours to collect data from 1.6 million chosen ciphertexts. While improvement is desirable, keep in mind that a decap-and-image operation to extract keys via physical inspection using a FIB takes around the same amount of time to execute. In other words, the absolute limit on how much one can protect secrets within hardware is probably driven more by physical tamper resistance measures than strictly cryptographic measures.
Furthermore, now that the principle of the side-channel attack has been disclosed, we can apply simple mitigations to frustrate this attack, such as gluing shut or removing the external configuration and debug interfaces necessary to present chosen ciphertexts to the FPGA. Users can also opt to use volatile SRAM-based encryption keys, which are immediately lost upon interruption of battery power, making attempts to remove the FPGA or modify the circuit board significantly riskier. This of course comes at the expense of accidental loss of the key should backup power be interrupted.
At the very least, with a 7-series device, a user will be well-aware that their device has been physically compromised, which is a good start; and in a limiting sense, all you can ever hope for from a tamper-protection standpoint.
You can learn more about the Betrusted project at our github page, https://betrusted.io. We think of Betrusted as more of a “hardware/software distro”, rather than as a product per se. We expect that it will be forked to fit the various specific needs and user scenarios of our diverse digital ecosystem. Whether or not we make completed Betrusted reference devices for sale will depend upon the feedback of the community; we’ve received widely varying opinions on the real demand for a device like this.
Trusting Betrusted vs Using Betrusted
I personally regard Betrusted as more of an evolution toward — rather than an end to — the quest for verifiable, trustworthy hardware. I’ve struggled for years to distill the reasons why openness is insufficient to solve trust problems in hardware into a succinct set of principles. I’m also sure these principles will continue to evolve as we develop a better and more sophisticated understanding of the use cases, their threat models, and the tools available to address them.
My personal motivation for Betrusted was to have private conversations with my non-technical friends. So, another huge hurdle in all of this will of course be user acceptance: would you ever care enough to take the time to verify your hardware? Verifying hardware takes effort, iPhones are just so convenient, Apple has a pretty compelling privacy pitch…and “anyways, good people like me have nothing to hide…right?” Perhaps our quixotic attempt to build a truly verifiable, trustworthy communications device may be received by everyday users as nothing more than a quirky curio.
Even so, I hope that by at least starting the conversation about the problem and spelling it out in concrete terms, we’re laying the framework for others to move the goal posts toward a safer, more private, and more trustworthy digital future.
The Betrusted team would like to extend a special thanks to the NLnet foundation for sponsoring our efforts.