I’ve spent a considerable portion of my time in the past couple of years helping to develop products for Chibitronics, a startup that blends two unlikely bedfellows together, papercraft and electronics, to create paper circuits. The primary emphasis of Chibitronics is creating a more friendly way to learn, design and create electronics. Because of this, much of the material relating to paper circuitry on the Internet looks more like art than electronics.
This belies the capabilities of paper as an engineering material. Google’s Cardboard and Nintendo’s Labo are mainstream examples of paper’s extraordinary capability as an engineering material. Prof. Nadya Peek at the University of Washington has written several academic papers on building multi-axis CNC machines using paper products.
A couple points to clarify up top: for the sake of brevity, I will use the term “paper” instead of “paper and/or cardboard”, analogous to how one would refer to a PCB made of Kapton or FR-4 both as printed circuits. Furthermore, while Chibitronics focuses on providing solderless solutions for younger learners, the techniques shared in this post targets engineers who have the skill to routinely assemble modern SMT designs. I assume you’ve got a good soldering iron and a microscope, and you know how to use both (or perhaps are up to the challenge of learning how to use them better).
The Argument for Paper
For prototyping and learning the principles of electronics, paper has several distinct advantages over breadboards.
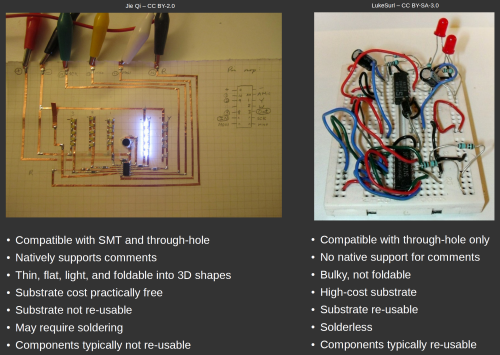
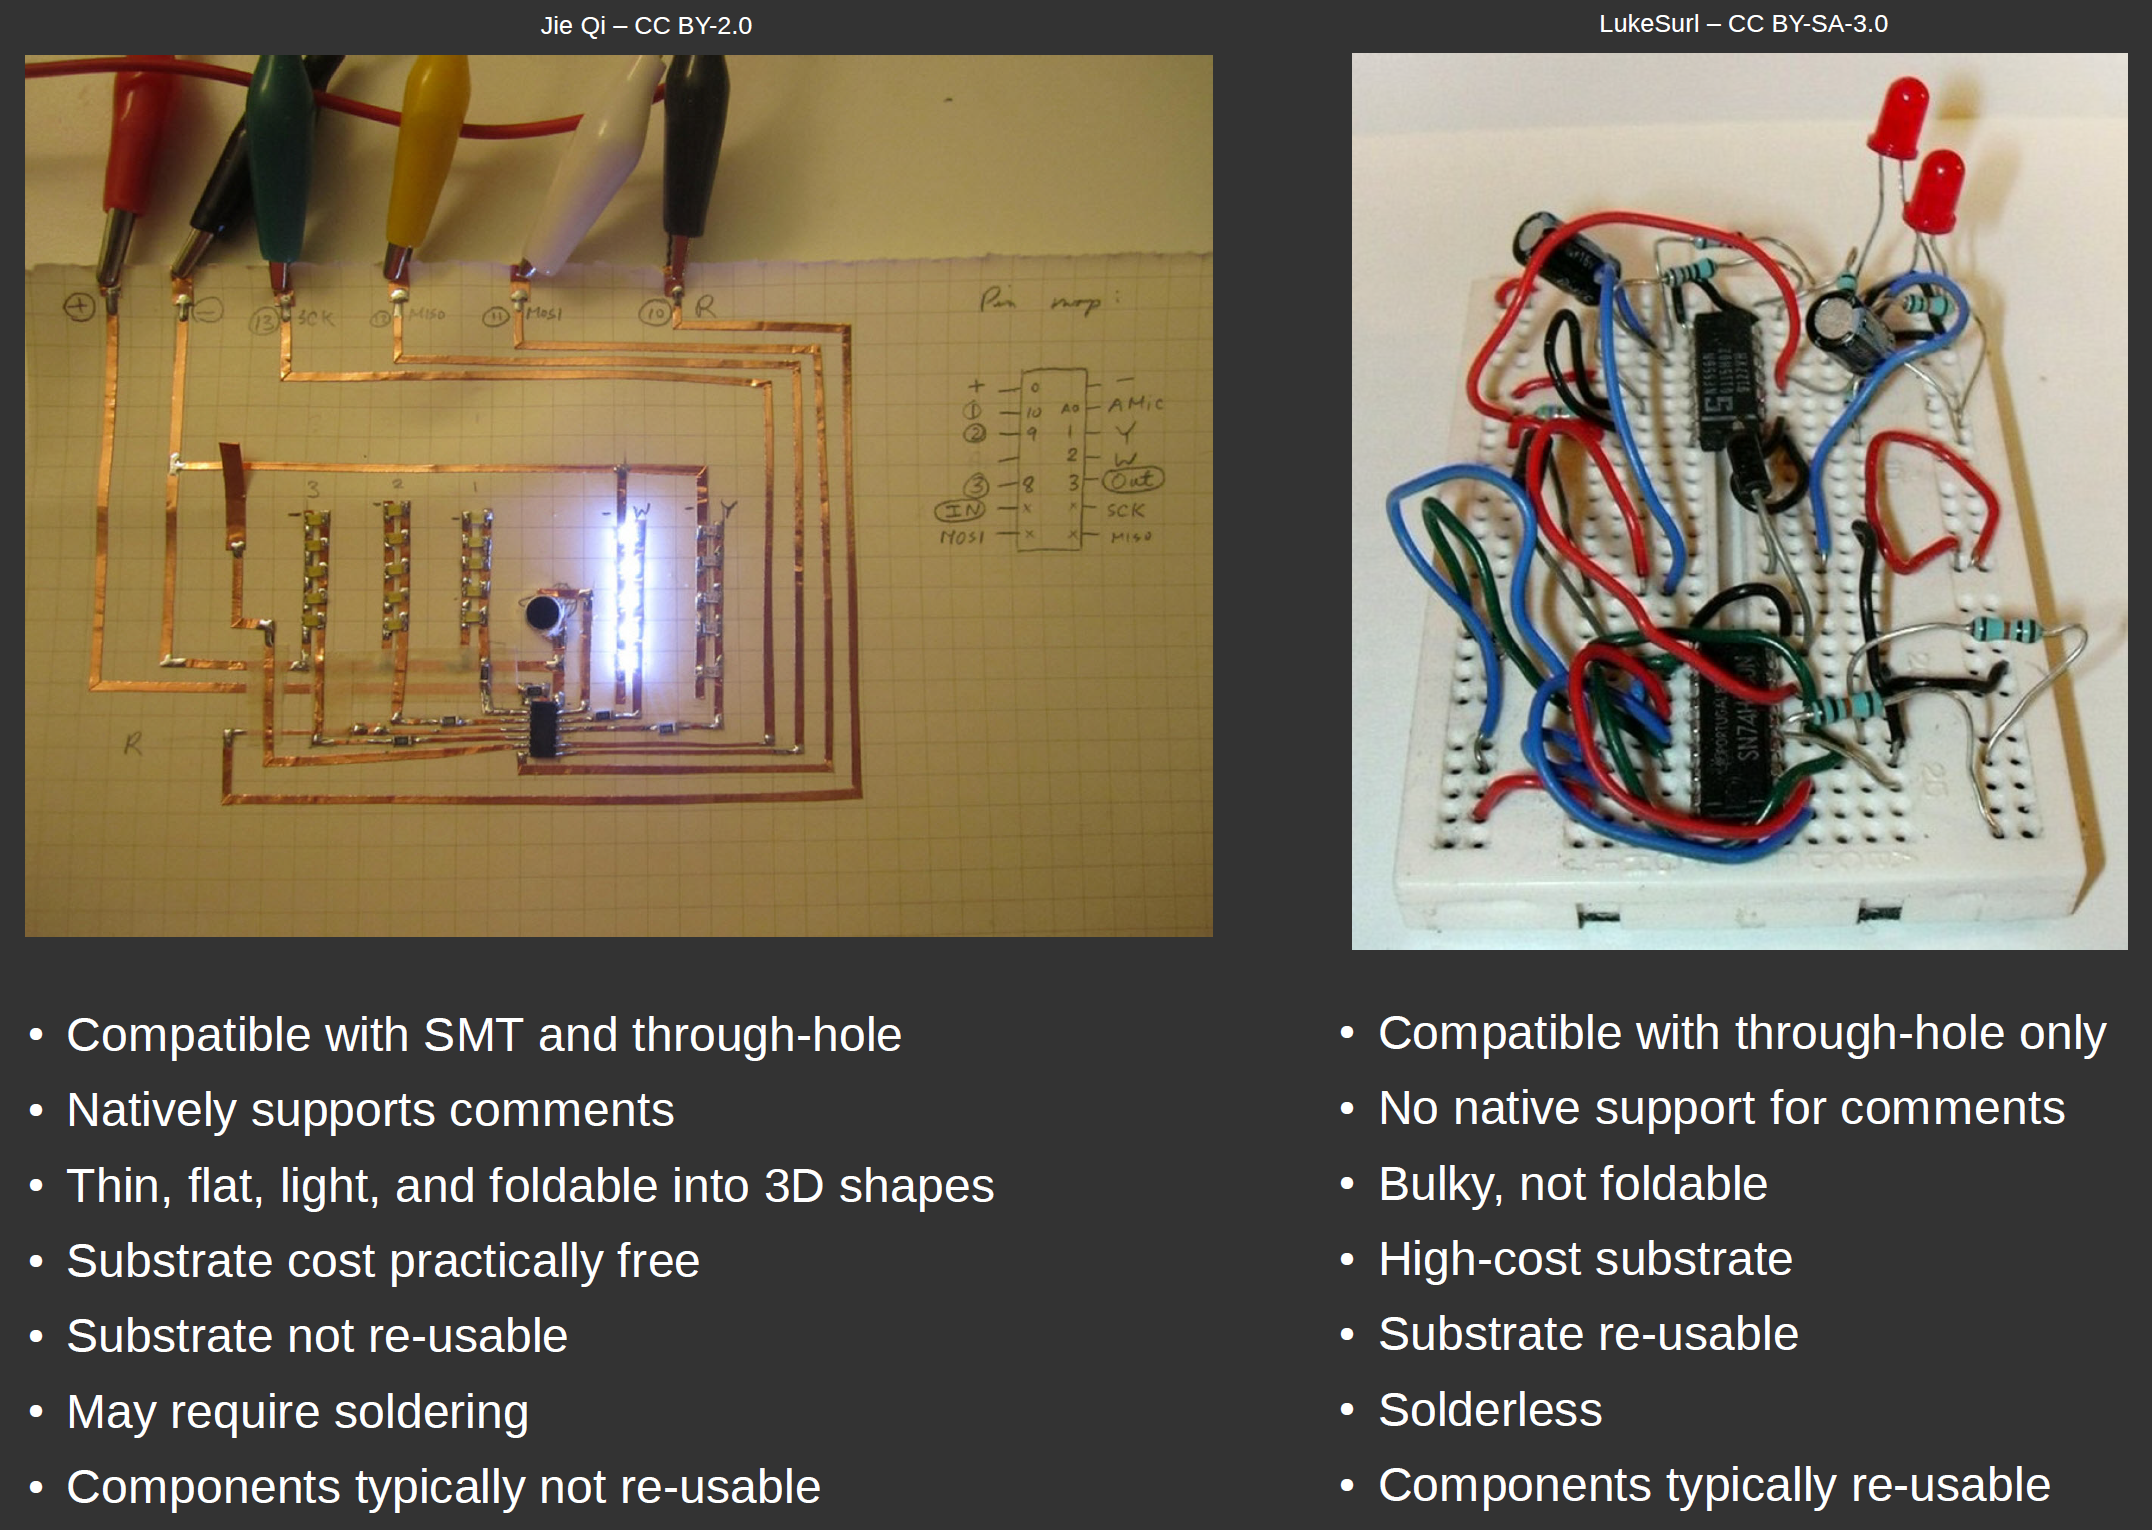
The primary advantage of a breadboard is that it’s solderless, and as a result you can re-use the components. This made a lot more sense back when a 6502 used to cost $25 in 1975 ($115 in 2018 money), but today the wire jumper kit for a solderless breadboard can cost more than the microcontroller. Considering also the relatively high cost of a solderless breadboard and the relatively low value of the parts, you’re probably better off buying extra parts and soldering them to disposable paper substrates than purchasing a re-usable solderless breadboard for all but the simplest of circuits.
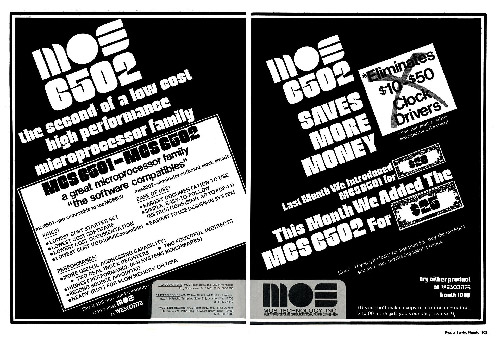
Electronic components used to be really expensive, so you wanted to re-use them as much as possible. The 8-bit 6502 at $115 (adjusted for inflation) was considerably cheaper than its competition in 1975 (from Wikipedia).
On the other hand, paper has a number of important advantages. The first is that it’s compatible with surface mount ICs. This is increasingly important as chip vendors have largely abandoned DIP packages in favor of SMT packages: mobile computing represents the highest demand for chips, and SMT packages beat DIP packages in both thermal and parasitic electrical characteristics. So if you want a part that wasn’t designed by someone wearing a jean jacket and highwaters, you’re probably going to find it only available in SMT.
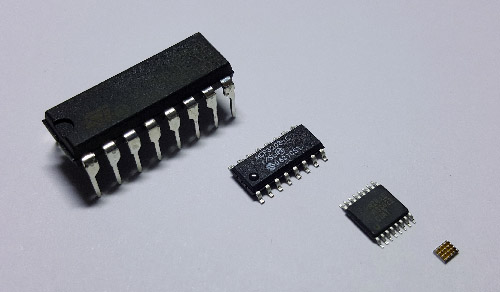
The evolution of packaging (from left to right): DIP, SOIC, TSSOP, and WLCSP. The WLCSP is shown upside-down so you can see how solder balls are applied directly to a naked silicon chip. It’s the asymptotic size limit of packaging, and is quite popular in mobile phones today.
The second and perhaps more important advantage is that it’s electrically similar to a printed circuit substrate. Breadboards feature long, loose wires with no sense of impedance control at all. Printed circuits are 2.5-D (e.g. planar multi-layer) constructions that feature short, flat wires and often times ground planes that enable impedance control. Paper circuit construction is much closer to that of a printed circuit, in that flat copper tape forms traces that can be layered on top of each other (using non-conductive tape to isolate the layers). Furthermore, when laid on top of a controlled-thickness substrate such as cardboard, the reverse side can be covered with a plane of copper tape, thus allowing for impedance control. The exact same equations govern impedance control in a paper circuit constructed with a ground plane as a printed circuit constructed with a ground plane – just the constants are different.
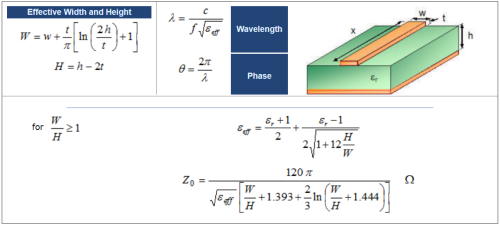
This equation works for both FR-4 and cardboard. Just plug in the corresponding ε, w, t, and h. From rfcafe.com.
This means you can construct RF circuits using paper electronic techniques — from directional couplers to antennae to amplifiers. The low parasitics of copper tape also means you can construct demanding circuits that would be virtually impossible to breadboard, such as high-power switching regulators, where ripple performance is heavily impacted by parasitic resistance and inductance in the ground connections.
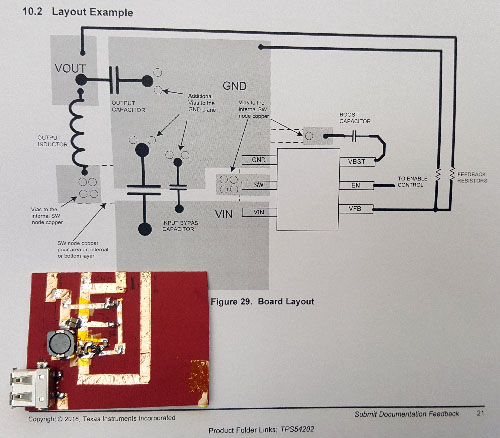
A 10W, 5V buck regulator laid out with paper electronics. The final layout closely resembles the datasheet layout example and performs smoothly at 2A load; this circuit probably wouldn’t regulate properly at high loads if built with a SMT-to-DIP breakout and a breadboard.
In addition to impedance control and lower parasitics, the use of copper tape to form planes means paper electronics can push the power envelope by leveraging copper plans as heatsinks. This is an important technique in FR-4 based PCBs; in fact, for many chips, the dominant path for heat to escape a chip is not through the package surface, but instead through the pins and package traces.
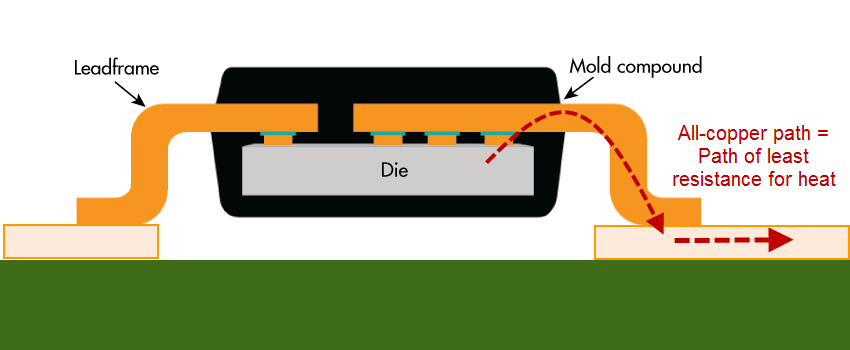
Copper conducts heat about 1000x better than plastic, so even the tiny metal pins on a chip can conduct heat more efficiently from an IC than the surface of the plastic package. Flip-chip on lead frame graphic adapted from Electronic Design.
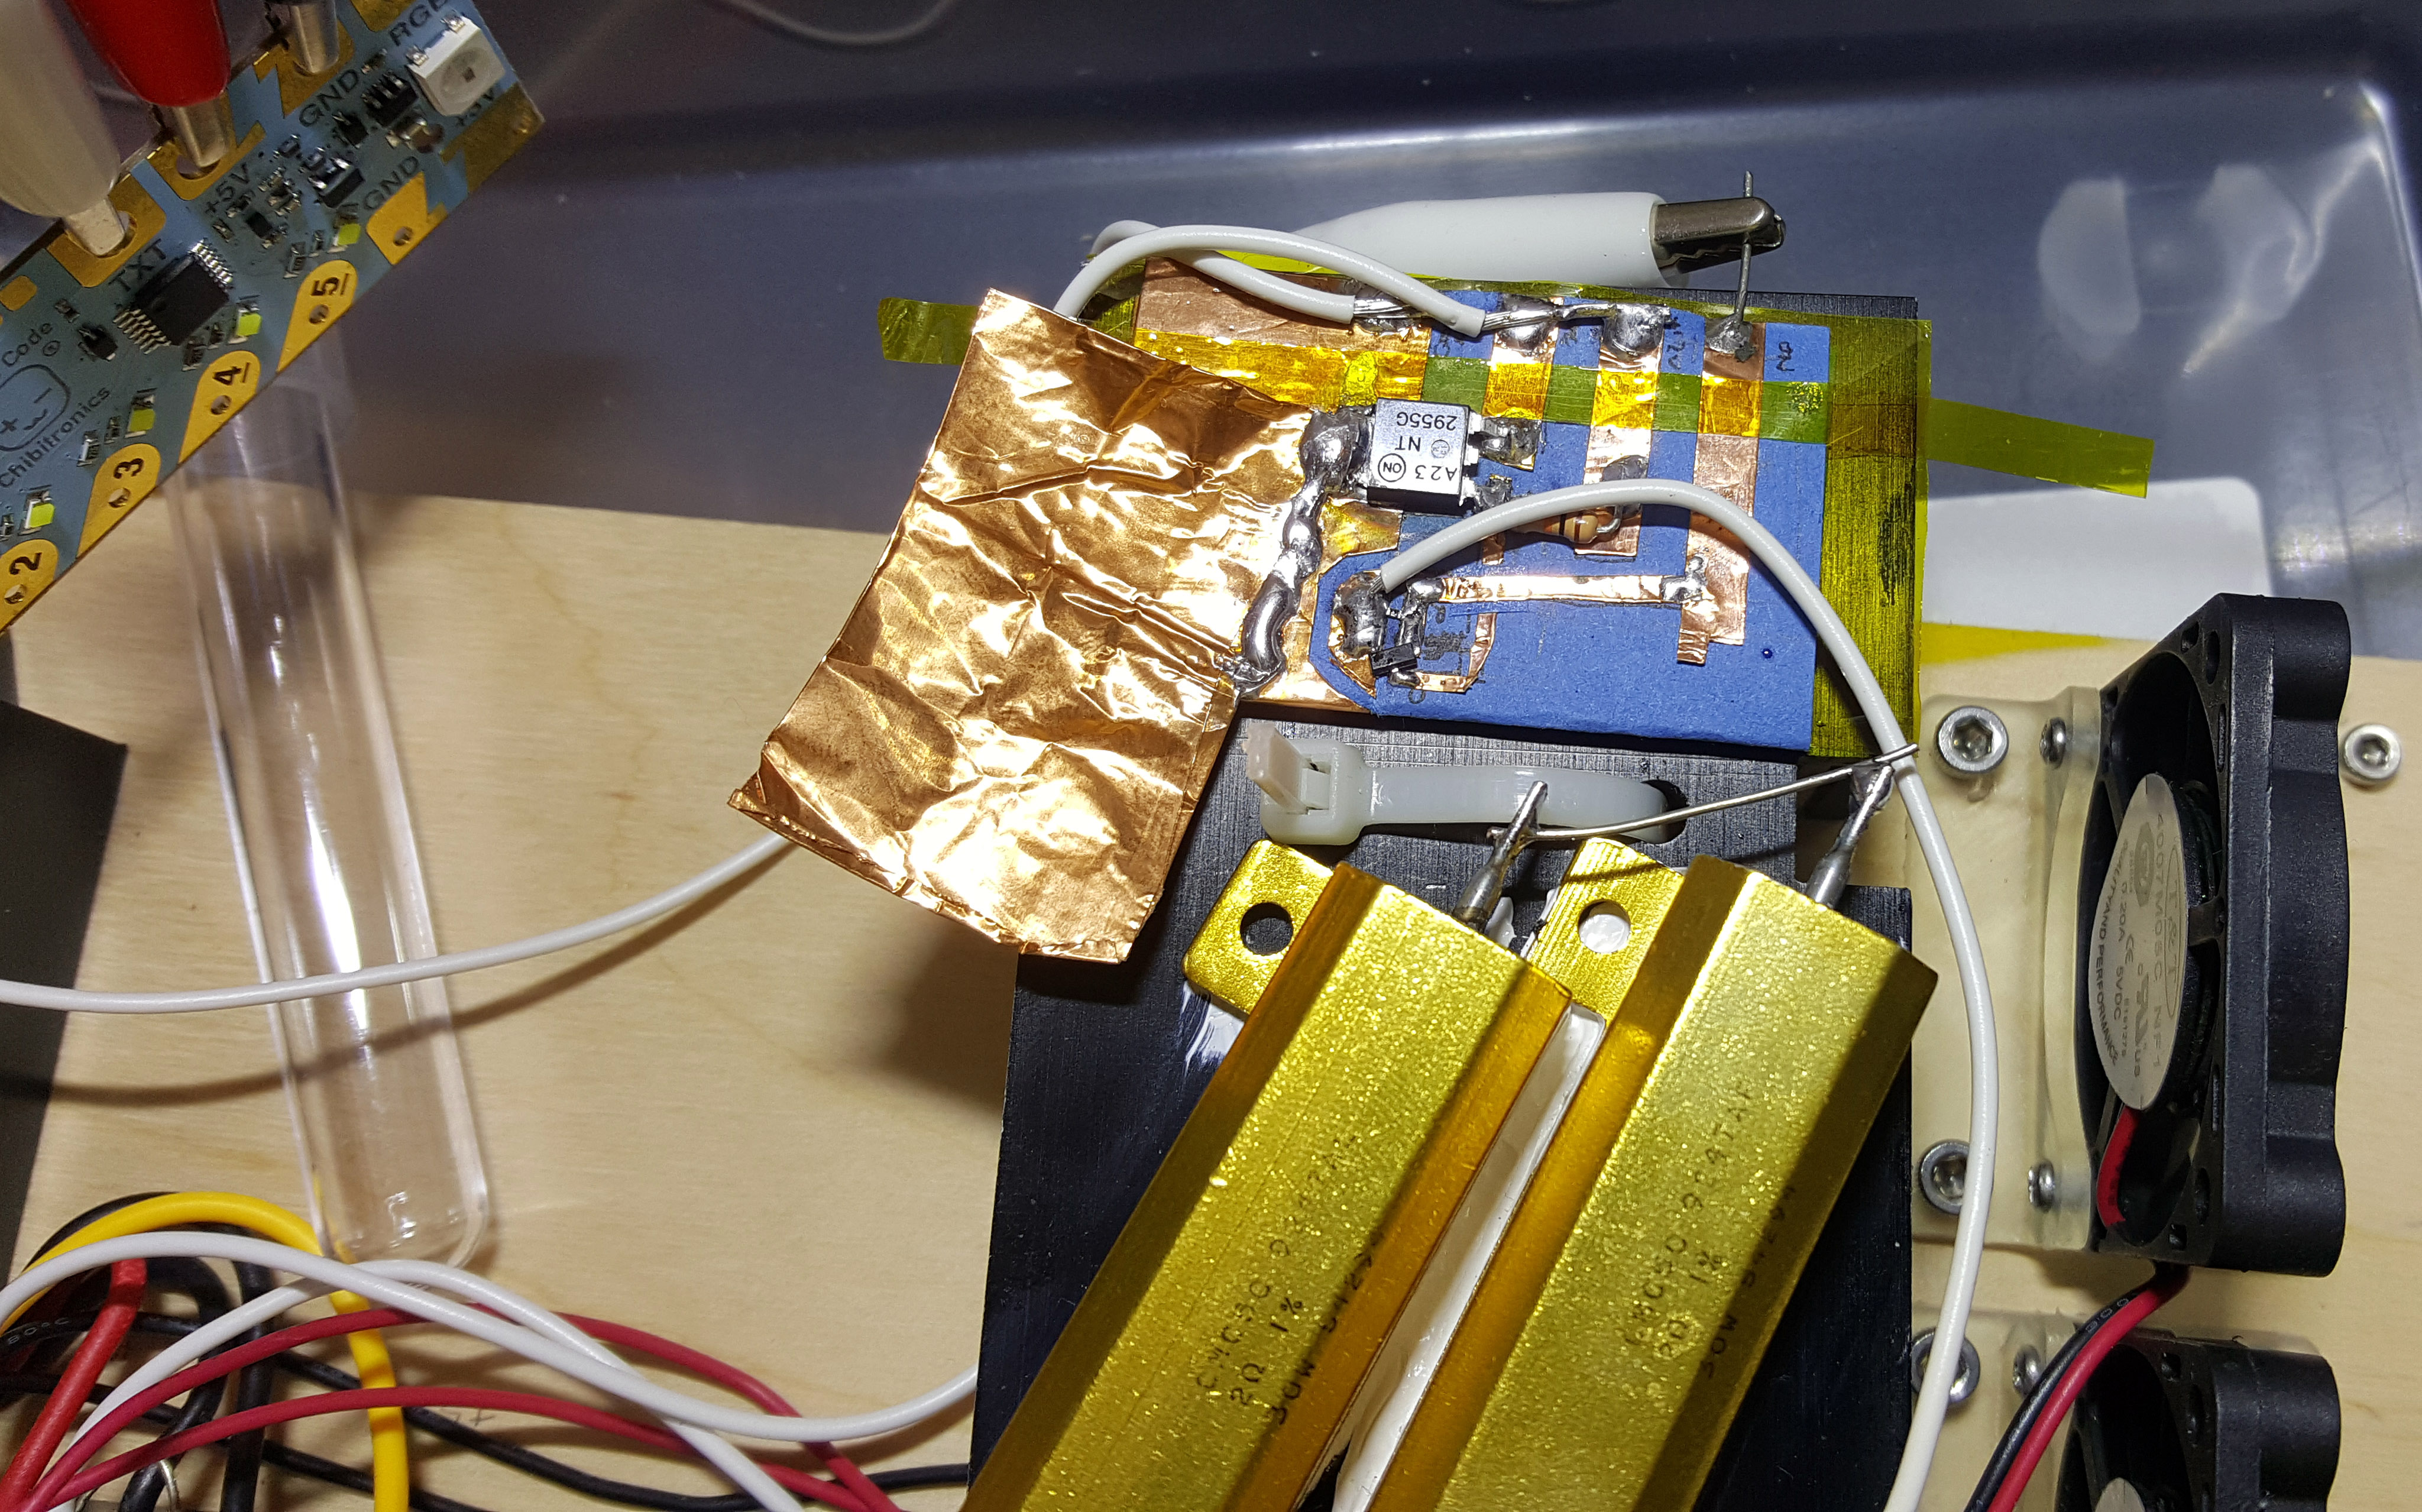
The copper which forms the pins and lead frames of a chip package is a vastly superior (about 1000x better) heat conductor compared to air or plastic, so a cheap and effective method of heatsinking is to lay out a large plane of copper connected to the chip. Below is an example of a 60-watt power driver that I built using paper electronics, leveraging a copper tape plane plus extra foil as heat sinks.
That’s a 12A power transistor, and this heater control circuit can use much of that ampacity. Additional copper foil was soldered on for extra heat sinking. The equivalent in DIP/TO packages might melt a breadboard during normal operation.
Paper electronics has one additional advantage that is unique to itself: the ability to fold and bend into 3-dimensional shapes. This is something that neither breadboards nor FR-4 circuit boards can readily do. Normally, circuit boards that can bend require more exotic processes like rigi-flex or flex PCB manufacture; but paper supports this natively. Artists take advantage of this property to create stunning electronic origami, but engineers can also use this property to great effect.

Trox Circuit Study 05 by Jonathan Bobrow, from the Paper Curiosities gallery
The ability to fold a sheet of cardboard or paper means that paper circuits can be slotted around tight corners and conformed to irregular or flexible surfaces, eliminating connectors and creating a thinner, sleeker packages. Need a test point? Cut a hanging tab out of your substrate, and you’ve got a fold-up point where you can attach an alligator clip!
Using Paper to Facilitate Prototyping with SMT
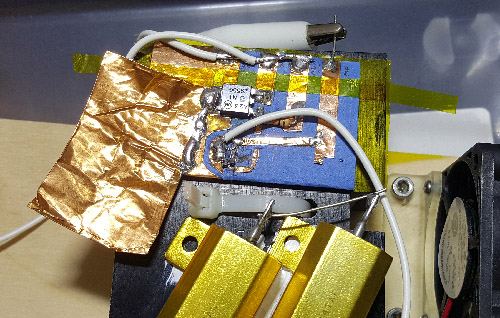
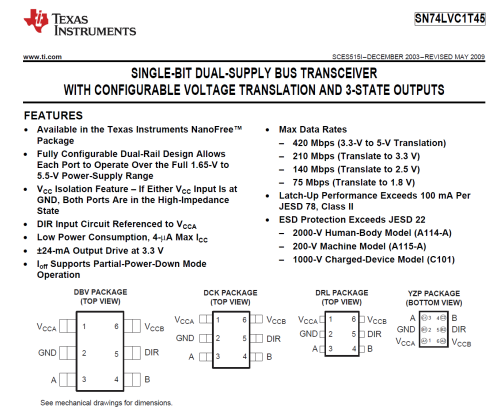
Here’s a detailed example of the construction techniques I use when working with paper electronics. I built a breakout board to solve a common problem: matching voltages between chips. Older chips are powered by 5V, newer ones by 1.8V or lower, and none of these are a match for your typical 3.3V-tolerante microcontroller. There are small circuits called “level shifters” that can safely take digital signals of one signal swing to another range. The problem is that most of the “good” ICs today come only in SMT packages, so if you’re prototyping on a breadboard or using alligator clips to cobble something together, you’ve got very limited options. In fact, one of my “go-to” ICs for this purpose is the 74LVC1T45; it’s capable of 420Mbps data rates, and can convert anywhere from 1.65V to 5.5V in a direction that can be selected using an input pin. The packaging options for this chip range from a DSBGA to a SOT-23 – clearly a chip targeted at the mobile phone generation, and not meant for breadboarding.
However, I’m often confronted with the problem of driving a WS281B LED strip from the I/O of a modern microprocessor. WS2812B LEDs operate off of 5V, and expect 5V CMOS levels; and no modern microprocessor can produce that. You can usually get away with driving a single WS2812B with a 3.3V-compatible I/O, but if you’re driving a long chain of them you’ll start to see glitches down the chain because of degraded timing margins due to improper voltage levels at the head of the chain. So, I’d love to have a little breakout board that adapts a SOT-23-sized 74LVC1T45 to an alligator-clip friendly format.
Instead of laying out a PCB, fabbing a one-off, and soldering it together, I took a piece of cardboard and built a breakout board in under an hour. Furthermore, because I can bend cardboard, I can make my breakout board dual-purpose: I can add pins to it that make it breadboard-compatible, while having fold-up “wings” for alligator clips. Without the ability to fold up, the alligator clip extensions would block access to the breadboard connections. Below are some shots of the finished project.
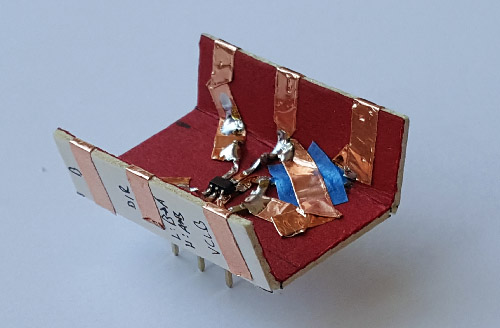
Native comments plus on-board decoupling caps makes this simple to use, even with long alligator clips
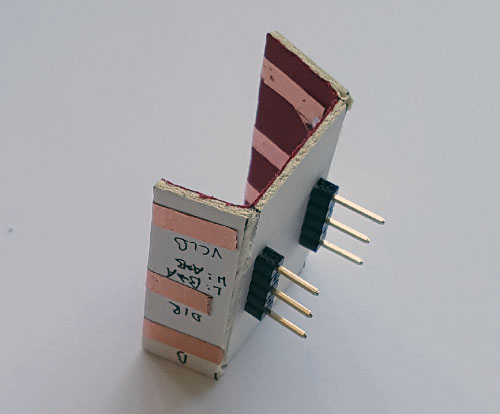
DIP pins coming out the bottom side allow this to be used in a breadboard, too
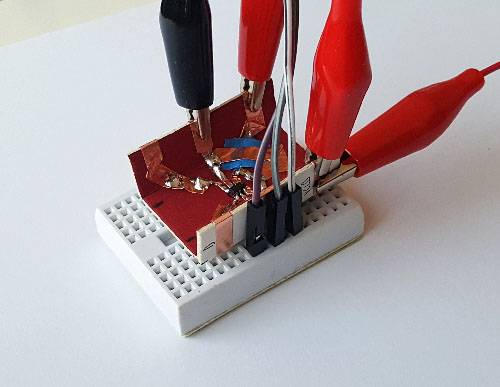
SMT, DIP, and alligator clips all coexisting in a single breakout — easy to do with paper!
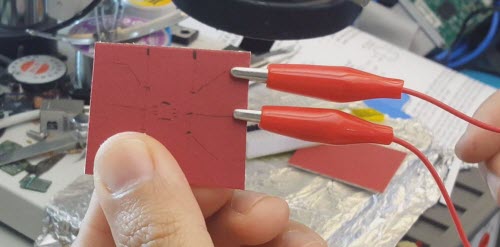
The first step in making a paper circuit is to grab a suitable piece of cardboard. I’ve come to really enjoy the cardboard used to make high-quality mats for picture framing. It’s about 1.3-1.4mm thick, which is fairly similar to FR-4 thickness, and its laminate structure means you can score one side and make accurate folds into the third dimension. The material is also robust to soldering temperatures, and its dense fiber construction and surface coating keeps the paper surface intact when pulling off mild adhesives, like the ones found on copper tape.
I’ll then cut out a square about the size I think it needs to be. I’ll usually cut a little larger, because it’s trivial to trim it back later on, but janky to tape on an extension if it’s too small.
Then, I lay the components on top and sketch a layout – this one’s pretty simple, I just note where I want the SOT-23 to go, and where the breakouts should run to.
Once I’m happy with the sketch, I’ll lay down copper tape, solder on the components, and then fold/bend the breakout into the final shape.
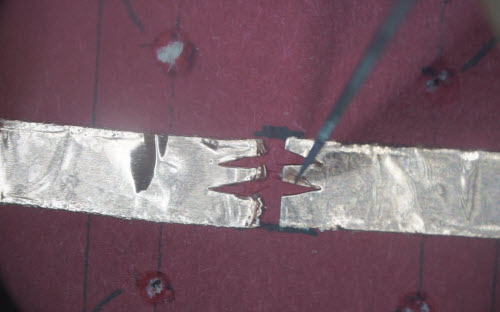
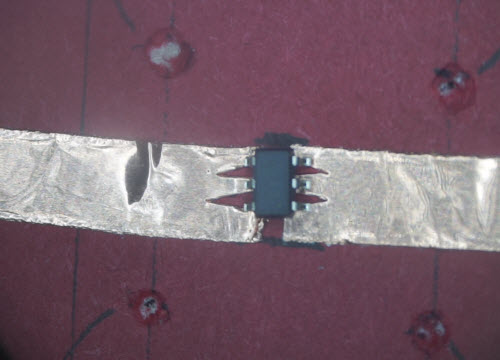
The trickiest and most important technique to master is how to mate the copper tape to the tiny pins of the SOT-23 (or other SMT) package. I use a trick that Dr. Jie Qi taught me, which is to cut a set of triangular notches into the tip of a wider piece of copper tape of roughly the right pitch. The triangular shape lets you adjust the size of the landing pad by simply changing the gap between the two ends of the tape, alleviating the need for precise alignment. Then, once the component is soldered to the wide piece of copper tape, you take a knife and cut the tape into individual traces – voilà, an SMT breakout is born!
A lot of this is better shown not told, so I’ve created a little video, below, that walks you through the entire process of building the breakout.
Try Something Different, and You Might be Rewarded!
Paper as an electrical engineering material is something I would never have thought of on my own – I grew up prototyping with breadboards and wire-wrap, and I was prejudiced against paper as a cheap, throwaway material that I incorrectly thought was too flammable to solder. Instead, I spent hundreds of dollars on breadboards and wire wrap sockets, when I could have made do with much cheaper materials. Indeed, there is an irrational psychology that regards expensive things as inherently better than cheap things, which means cheap options are often overlooked in the search for solutions to hard problems.
But this is why it’s important to collaborate with experts outside your normal field of expertise – the further outside, the better. In addition to being a great engineer, Jie Qi is a prodigious artist. Through our Chibitronics collaboration, she’s added so much more depth and dimension to my world on so many fronts. She’s imparted upon me invaluable gifts of skills and perspectives that I would never have developed otherwise.
It’s my hope that by sharing a little more about paper electronics, I can bring a fresh perspective on old problems while broadening awareness and getting more users to improve upon the basics. After all, this is a new area, and we’re just starting to explore the possibilities.
Interested in hacking paper electronics? Check out the Chibitronics Creative Coding Kit, and the Love to Code product line. It’s a gentle introduction to paper electronics targeted at newcomers, but it’s also open source, so you can take it as far as your imagination can go — hook up a JTAG box, build the OS, and get hacking! Get 30% off the Creative Coding Kit with the TRY-LTC-18 coupon code until June 30, 2018!
Quick edit: some basic techniques on using copper tape are documented at Chibitronics’ Copper Tape Chronicles. It’s a small compilation of videos like the one below:
Also, here’s a handy tip on how to keep copper tape from falling off the roll: